> ## Documentation Index
> Fetch the complete documentation index at: https://checklyhq.com/docs/llms.txt
> Use this file to discover all available pages before exploring further.
# Configuration
> Configure your API checks to validate responses and ensure your endpoints behave as expected.
While configuring up your API check, you can run the request and its assertions using the **Run request** button. This will run the API check on production infrastructure and help you debug any issues.
## Basic Setup
Start by specifying the endpoint you want to track.
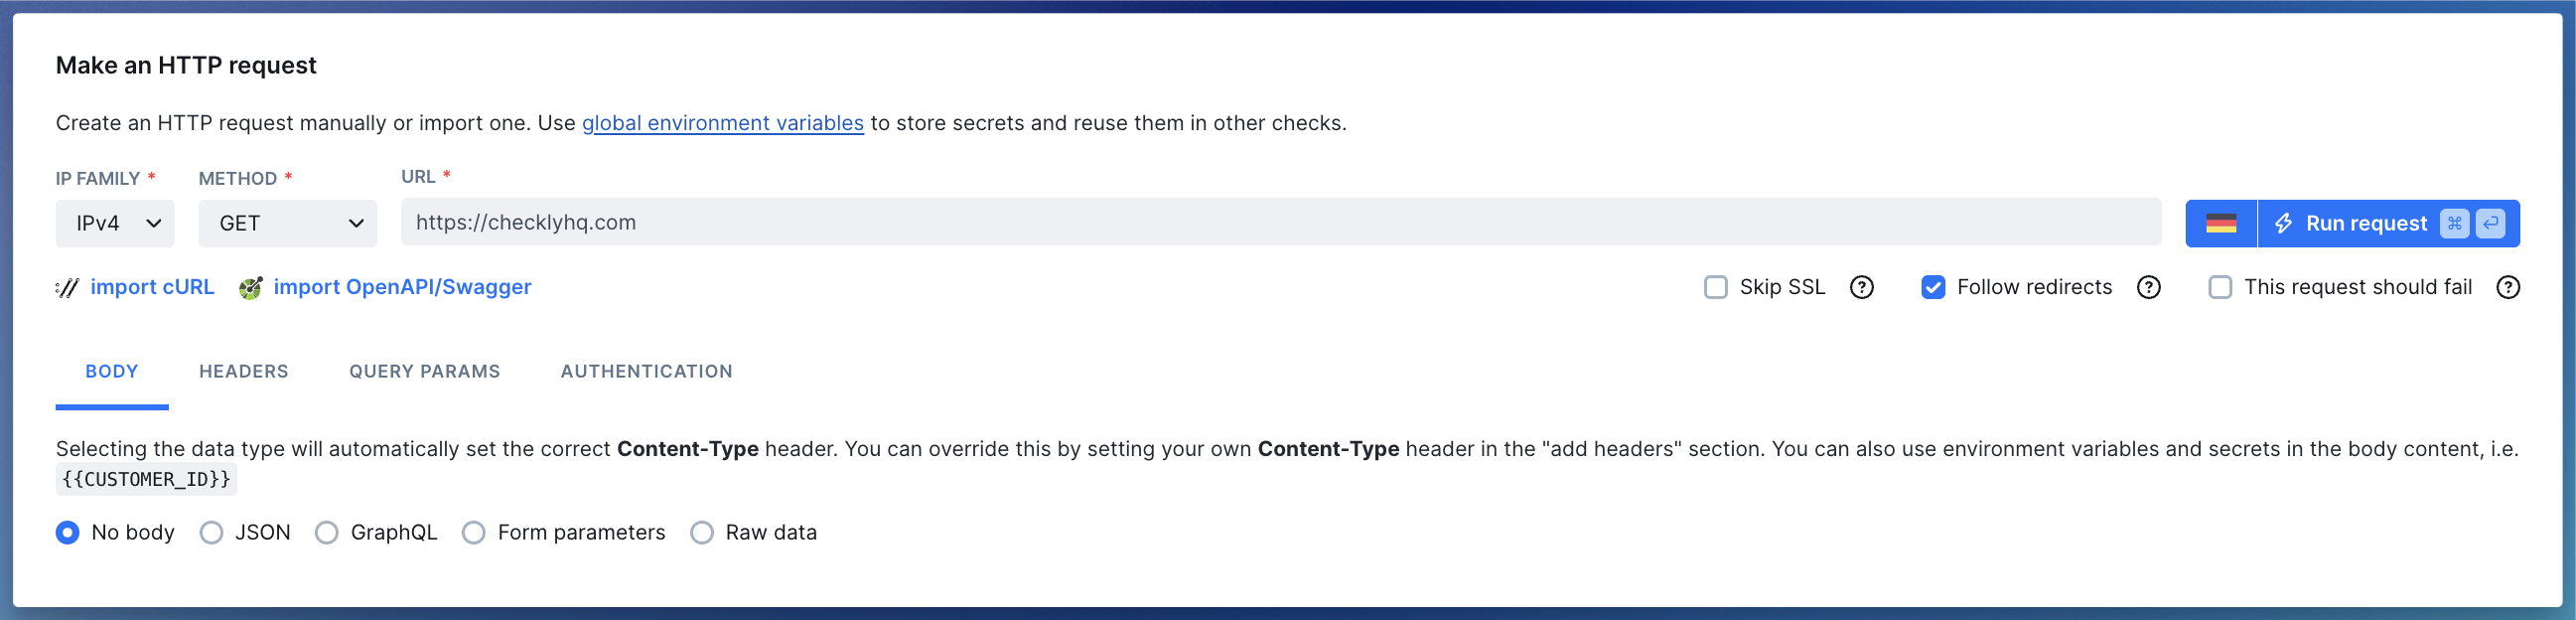 * **URL**: The HTTP(S) URL to monitor (e.g. [https://checklyhq.com](https://checklyhq.com)). URL's are checked for correctness and must start with either `http://` or `https://`.
* **Request methods**: Available methods are `GET, POST, PUT, HEAD, DELETE, PATCH`.
* **IP family**: Defaults to IPv4.
* **Skip SSL**: Skip SSL certificate validation.
* **Follow redirects**: Automatically follow 30x redirects.
* **This request should fail**: Treat HTTP error codes (4xx and 5xx) as passed. Please note that successful responses still pass. Only failed assertions will cause the check to fail.
## Body
Add body content to your request by formatting your content as text. Selecting the type of content will automatically set the correct `Content-Type` header for your request.
### JSON
This option sets the `Content-Type` request header to `application/json`. Format your input as standard JSON, i.e:
```js theme={null}
{
"key1": "val2",
"key2": {
"nestedKey1": "val2"
}
}
```
JSON bodies are commonly used with REST APIs.
### GraphQL
This option also sets the `Content-Type` request header to `application/json`, but allows you to type GraphQL queries and
format them as such, i.e.
```graphql theme={null}
query {
allUsers {
posts {
id
}
}
}
```
### Form parameters
This option sets `Content-Type` request header to `application/x-www-form-urlencoded`. Format your input as a string of key/value pairs concatenated with ampersands, i.e:
```bash theme={null}
key1=value1&key2=value2
```
Form encodes bodies are commonly used "traditional" HTML form submissions.
### Raw data
If the predefined data types don't work for you, use `Raw data`. Make sure to define your `Content-Type` header explicitly then.
> To monitor an XML/SOAP-based API define `text/xml; charset=utf-8` as `Content-Type` header, send your XML as `Raw data` and [use a setup script to parse required access tokens](/detect/synthetic-monitoring/api-checks/examples#parse-xmlsoap-data).
## Headers
Add HTTP request headers. The type ahead feature is pre-populated with the most common headers, but you can add any custom headers you want.
* **URL**: The HTTP(S) URL to monitor (e.g. [https://checklyhq.com](https://checklyhq.com)). URL's are checked for correctness and must start with either `http://` or `https://`.
* **Request methods**: Available methods are `GET, POST, PUT, HEAD, DELETE, PATCH`.
* **IP family**: Defaults to IPv4.
* **Skip SSL**: Skip SSL certificate validation.
* **Follow redirects**: Automatically follow 30x redirects.
* **This request should fail**: Treat HTTP error codes (4xx and 5xx) as passed. Please note that successful responses still pass. Only failed assertions will cause the check to fail.
## Body
Add body content to your request by formatting your content as text. Selecting the type of content will automatically set the correct `Content-Type` header for your request.
### JSON
This option sets the `Content-Type` request header to `application/json`. Format your input as standard JSON, i.e:
```js theme={null}
{
"key1": "val2",
"key2": {
"nestedKey1": "val2"
}
}
```
JSON bodies are commonly used with REST APIs.
### GraphQL
This option also sets the `Content-Type` request header to `application/json`, but allows you to type GraphQL queries and
format them as such, i.e.
```graphql theme={null}
query {
allUsers {
posts {
id
}
}
}
```
### Form parameters
This option sets `Content-Type` request header to `application/x-www-form-urlencoded`. Format your input as a string of key/value pairs concatenated with ampersands, i.e:
```bash theme={null}
key1=value1&key2=value2
```
Form encodes bodies are commonly used "traditional" HTML form submissions.
### Raw data
If the predefined data types don't work for you, use `Raw data`. Make sure to define your `Content-Type` header explicitly then.
> To monitor an XML/SOAP-based API define `text/xml; charset=utf-8` as `Content-Type` header, send your XML as `Raw data` and [use a setup script to parse required access tokens](/detect/synthetic-monitoring/api-checks/examples#parse-xmlsoap-data).
## Headers
Add HTTP request headers. The type ahead feature is pre-populated with the most common headers, but you can add any custom headers you want.
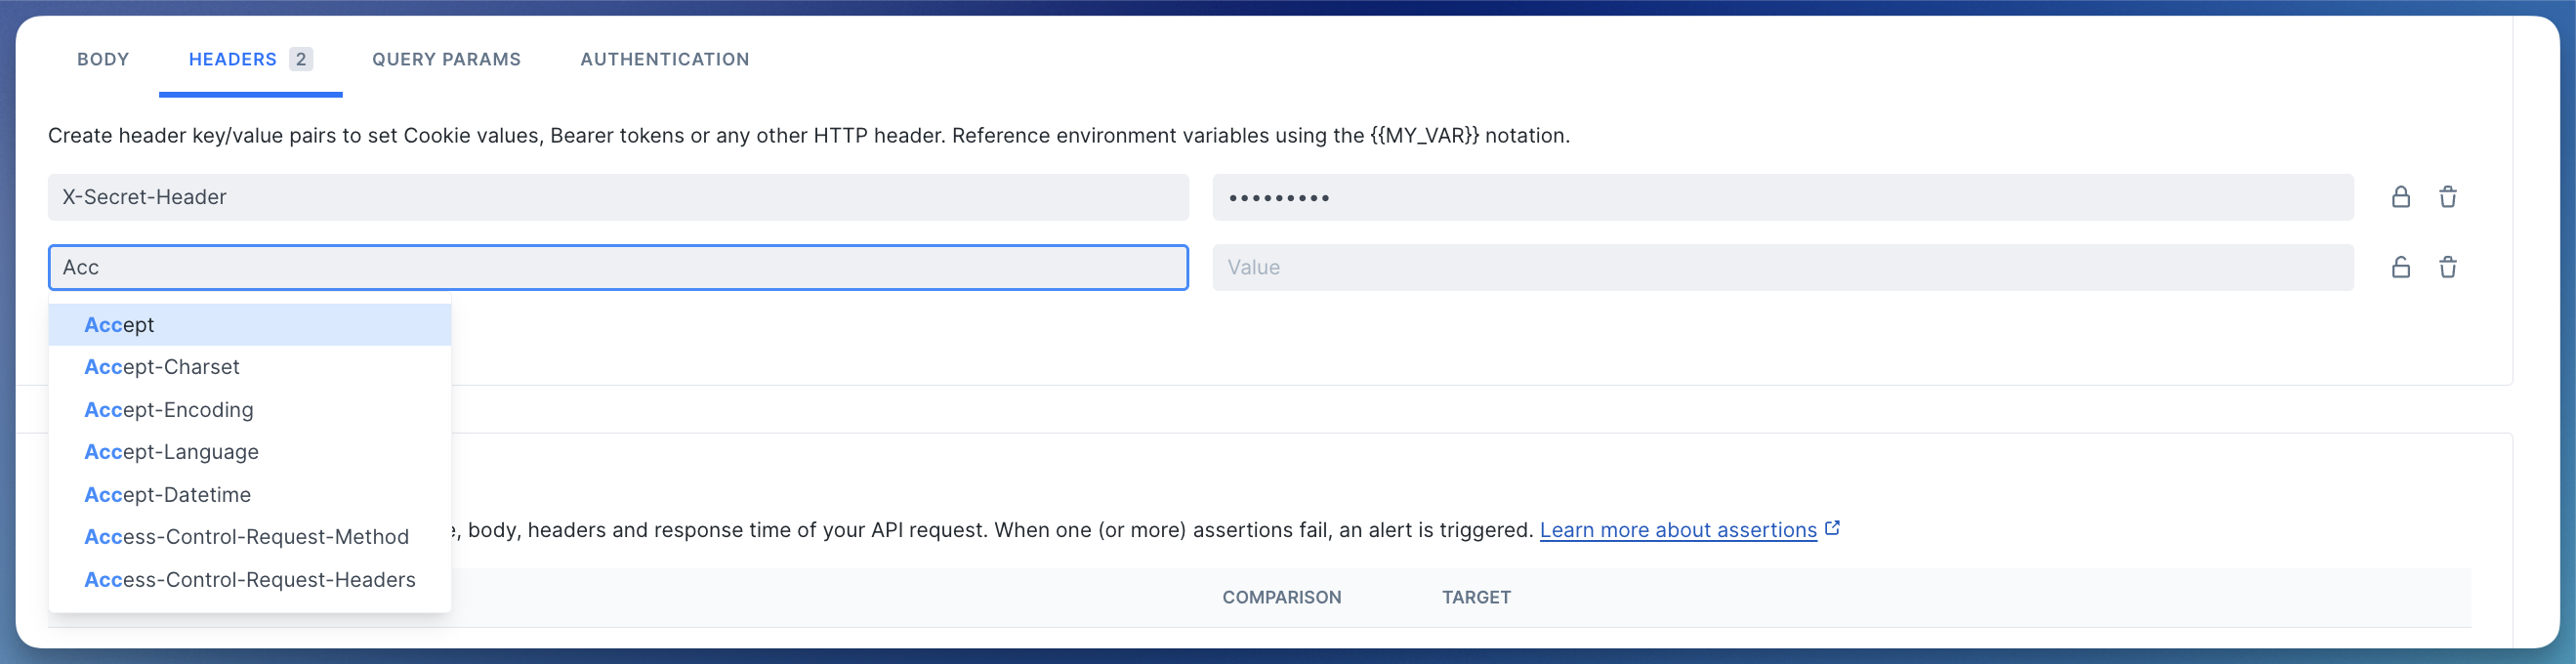 Clicking the **lock icon** toggles between encrypting the value of the header on the Checkly backend and hiding it from your screen.
## Query parameters
This section allows you to add query parameters to the request URL in a structured way. You can add as many query parameters as you want. The interface is the same as for the HTTP headers: you can use the lock icon to toggle encryption and screen hiding.
> You can also just leave the query parameters as part of the URL. Whatever works for you.
## Basic authentication
Add [HTTP basic authentication parameters](https://developer.mozilla.org/en-US/docs/Web/HTTP/Authentication) to your API
request by entering a username and password in the Authentication tab.
## Accessing environment variables
[Environment variables](/platform/variables) are exposed to your API checks using the common Handlebars/Moustache templating delimiters, i.e. `{{USER_API_KEY}}`. Note that Handlebars (double brackets) variables will be URI encoded. To avoid encoding, you can access your environment variables with triple brackets, i.e. `{{{USER_API_KEY}}}`.
Variables can be used in the following API checks fields:
* URL
* Body
* Header values
* Query parameters values
* Basic authentication username and password
### Using helpers and built-in variables
Next to your own variables, we've added some built-in ones.
These variables are specific to API checks:
| Helper | Description |
| -------------------- | ----------------------------------------------------------------------------------------------------------------------------------------------------------------------------------------------------------------------------------------------------------------------------------------------------------------------------------------------- |
| `{{GROUP_BASE_URL}}` | If your check belongs to a group, this resolves to the group's configured base URL. |
| `{{REQUEST_URL}}` | The request URL. |
| `{{$UUID}}` | Generates a random UUID/v4, i.e. 9b1deb4d-3b7d-4bad-9bdd-2b0d7b3dcb6d. |
| `{{$RANDOM_NUMBER}}` | Generates a random decimal number between 0 and 10000, i.e. 345. |
| `{{moment}}` | Generates a date or time using **moment.js** and allows for formatting:
Clicking the **lock icon** toggles between encrypting the value of the header on the Checkly backend and hiding it from your screen.
## Query parameters
This section allows you to add query parameters to the request URL in a structured way. You can add as many query parameters as you want. The interface is the same as for the HTTP headers: you can use the lock icon to toggle encryption and screen hiding.
> You can also just leave the query parameters as part of the URL. Whatever works for you.
## Basic authentication
Add [HTTP basic authentication parameters](https://developer.mozilla.org/en-US/docs/Web/HTTP/Authentication) to your API
request by entering a username and password in the Authentication tab.
## Accessing environment variables
[Environment variables](/platform/variables) are exposed to your API checks using the common Handlebars/Moustache templating delimiters, i.e. `{{USER_API_KEY}}`. Note that Handlebars (double brackets) variables will be URI encoded. To avoid encoding, you can access your environment variables with triple brackets, i.e. `{{{USER_API_KEY}}}`.
Variables can be used in the following API checks fields:
* URL
* Body
* Header values
* Query parameters values
* Basic authentication username and password
### Using helpers and built-in variables
Next to your own variables, we've added some built-in ones.
These variables are specific to API checks:
| Helper | Description |
| -------------------- | ----------------------------------------------------------------------------------------------------------------------------------------------------------------------------------------------------------------------------------------------------------------------------------------------------------------------------------------------- |
| `{{GROUP_BASE_URL}}` | If your check belongs to a group, this resolves to the group's configured base URL. |
| `{{REQUEST_URL}}` | The request URL. |
| `{{$UUID}}` | Generates a random UUID/v4, i.e. 9b1deb4d-3b7d-4bad-9bdd-2b0d7b3dcb6d. |
| `{{$RANDOM_NUMBER}}` | Generates a random decimal number between 0 and 10000, i.e. 345. |
| `{{moment}}` | Generates a date or time using **moment.js** and allows for formatting: - `{{moment "YYYY-MM-DD"}}` generates a date, i.e. 2020-08-26
- `{{moment "2 days ago" "YYYY-MM-DD"}}` generates the date two days ago: 2020-08-24
- `{{moment "last week" "X"}}` generates a UNIX timestamp from last week: 1597924480
|
A practical example of using the `{{moment}}` helper would be setting the pagination options on a typical API endpoint:
```
GET https://api.acme.com/events?from={{moment "last week" "X"}}&to={{moment "X"}}
```
For a full overview of date formatting option, check the [moment.js docs](https://momentjs.com/docs/#/displaying/format/).
In addition, you have access to these generic variables available to all checks:
| Variable | Description | Availability |
| ----------------- | ------------------------------------------- | ----------------------------------------------------------- |
| `ACCOUNT_ID` | The ID of the account the check belongs to. | |
| `CHECK_ID` | The UUID of the check being executed. | Only available after saving the check. |
| `CHECK_NAME` | The name of the check being executed. | |
| `CHECK_RESULT_ID` | The UUID where the result will be saved. | Only available on scheduled runs. |
| `CHECK_RUN_ID` | The UUID of the check run execution. | Only available on scheduled runs. |
| `CHECK_TYPE` | The type of the check, e.g. `BROWSER`. | |
| `PUBLIC_IP_V4` | The IPv4 of the check run execution. | |
| `PUBLIC_IP_V6` | The IPv6 of the check run execution. | |
| `REGION` | The current region, e.g. `us-west-1`. | |
| `RUNTIME_VERSION` | The version of the runtime, e.g, `2023.09`. | Only in Browser, Multistep, and API setup/teardown scripts. |
## Import a cURL request
You can import the request method, url, headers and body from a [cURL](https://curl.haxx.se/) command.
Arguments `--user-agent`, `--cookie` and `--compressed` also work.
## Import a Swagger / OpenAPI specification
If your API implements the Swagger 2.0 or OpenAPI spec, you can import the `swagger.json` spec. The importer
parses your spec and prompts you to make some decisions about which requests are to be imported and how.
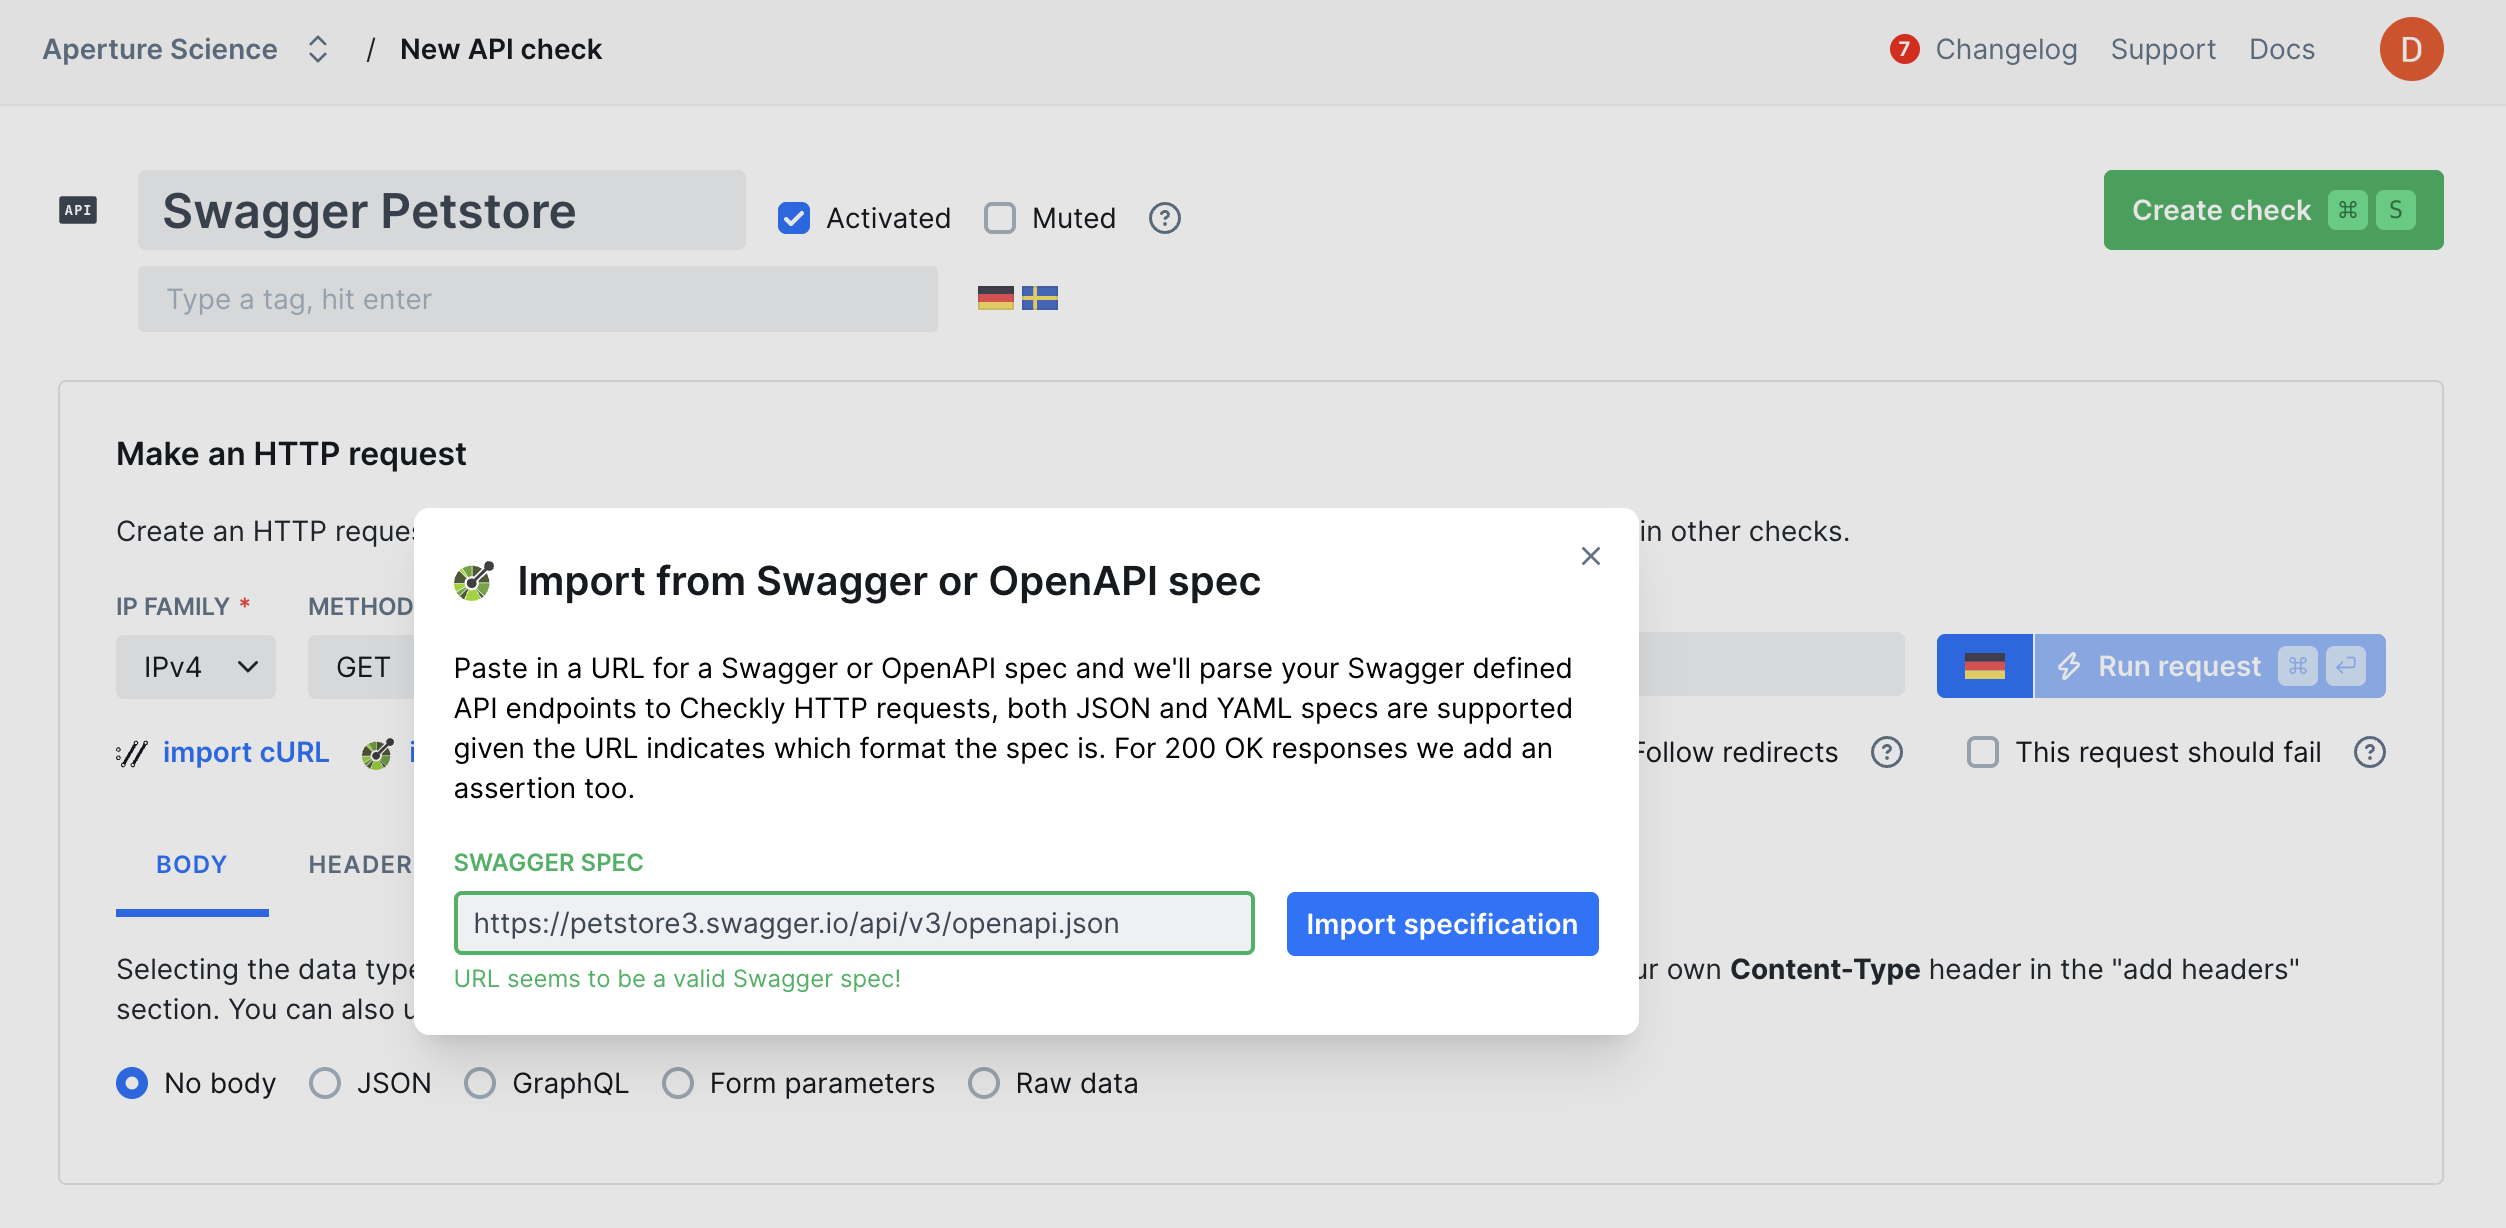
 * **Name:** you can set the check name to the "description" or "url" from your spec.
* **Tags:** import tags from you spec.
* **Headers:** import HTTP headers from you spec.
* **Query parameters:** import query parameters from your spec.
* **Add a "group" tag:** Copy the name of you spec to a tag and add it to each imported request. This helps
filtering and grouping related checks in the Checkly dashboard.
## Assertions
The response of an API request can be checked for correctness and timeliness by using assertions on the response data. This allows you to verify things such as:
* HTTP response status equals 200.
* HTTP response body equals the text "success".
* HTTP response time is lower than 2000 milliseconds.
* HTTP response header "X-Custom-Header" equals "SomeValue".
* HTTP response JSON object has a key called "accountBalance" with a value greater than 9999.
* **Name:** you can set the check name to the "description" or "url" from your spec.
* **Tags:** import tags from you spec.
* **Headers:** import HTTP headers from you spec.
* **Query parameters:** import query parameters from your spec.
* **Add a "group" tag:** Copy the name of you spec to a tag and add it to each imported request. This helps
filtering and grouping related checks in the Checkly dashboard.
## Assertions
The response of an API request can be checked for correctness and timeliness by using assertions on the response data. This allows you to verify things such as:
* HTTP response status equals 200.
* HTTP response body equals the text "success".
* HTTP response time is lower than 2000 milliseconds.
* HTTP response header "X-Custom-Header" equals "SomeValue".
* HTTP response JSON object has a key called "accountBalance" with a value greater than 9999.
 On each API check assertion, the following sources are available:
* **Status code:** The HTTP response status, parsed as an integer.
* **JSON body:** The response body parsed as a JSON object. To enable parsing, the Content-Type header of the response should be set to application/json.
* **Text body:** The response body as plain text.
* **Headers:** The response headers as an array of key/value pairs.
* **Response time:** The response time of the full API request in milliseconds, parsed as an integer value.
For more details, see our documentation on [Assertions](/detect/assertions).
## Responses
In almost all cases, you have full access to the HTTP response for assertions. We also store the full response
for later retrieval and triaging issues.
Response bodies are limited to a size of 25MB. Responses over this size will trigger a check failure.
Additionally, if your API responds with a binary type body, i.e. a PDF or video file, we scrub the body and replace
it with a short text saying that we scrubbed it. We determine the body content type by looking at the `Content-Type`
response header.
This list shows all content types that we scrub from the response data.
| content type |
| ------------------------------- |
| `application/pdf` |
| `audio/wave` |
| `audio/wav` |
| `audio/x-wav` |
| `audio/x-pn-wav` |
| `audio/mpeg` |
| `audio/x-ms-wma` |
| `audio/vnd.rn-realaudio` |
| `application/octet-stream` |
| `application/ogg` |
| `application/x-shockwave-flash` |
| `application/zip` |
| `video/mpeg` |
| `video/mp4` |
| `video/quicktime` |
| `video/x-ms-wmv` |
| `video/x-msvideo` |
| `video/x-flv` |
| `video/webm` |
## Additional Settings
* **Name:** Give your check a clear name to identify it in dashboards and alerts
* **Description:** Add context about what this check does and why it matters. Supports markdown, max 500 characters. When a failure occurs, [Rocky AI](/ai/rocky-ai) uses the description to provide more accurate [root cause and user impact analysis](/resolve/ai-root-cause-analysis/overview)
* **Tags:** Use tags to organize checks across [dashboards](/communicate/dashboards/overview/) and [maintenance windows](/communicate/maintenance-windows/overview)
* **Retries:** Define how failed runs should be retried. See [retry strategies](/communicate/alerts/retries)
* **Alerting:** Configure your [alert settings](/communicate/alerts/configuration), [alert channels](/communicate/alerts/channels), or set up [webhooks](/integrations/alerts/webhooks) for custom integrations
On each API check assertion, the following sources are available:
* **Status code:** The HTTP response status, parsed as an integer.
* **JSON body:** The response body parsed as a JSON object. To enable parsing, the Content-Type header of the response should be set to application/json.
* **Text body:** The response body as plain text.
* **Headers:** The response headers as an array of key/value pairs.
* **Response time:** The response time of the full API request in milliseconds, parsed as an integer value.
For more details, see our documentation on [Assertions](/detect/assertions).
## Responses
In almost all cases, you have full access to the HTTP response for assertions. We also store the full response
for later retrieval and triaging issues.
Response bodies are limited to a size of 25MB. Responses over this size will trigger a check failure.
Additionally, if your API responds with a binary type body, i.e. a PDF or video file, we scrub the body and replace
it with a short text saying that we scrubbed it. We determine the body content type by looking at the `Content-Type`
response header.
This list shows all content types that we scrub from the response data.
| content type |
| ------------------------------- |
| `application/pdf` |
| `audio/wave` |
| `audio/wav` |
| `audio/x-wav` |
| `audio/x-pn-wav` |
| `audio/mpeg` |
| `audio/x-ms-wma` |
| `audio/vnd.rn-realaudio` |
| `application/octet-stream` |
| `application/ogg` |
| `application/x-shockwave-flash` |
| `application/zip` |
| `video/mpeg` |
| `video/mp4` |
| `video/quicktime` |
| `video/x-ms-wmv` |
| `video/x-msvideo` |
| `video/x-flv` |
| `video/webm` |
## Additional Settings
* **Name:** Give your check a clear name to identify it in dashboards and alerts
* **Description:** Add context about what this check does and why it matters. Supports markdown, max 500 characters. When a failure occurs, [Rocky AI](/ai/rocky-ai) uses the description to provide more accurate [root cause and user impact analysis](/resolve/ai-root-cause-analysis/overview)
* **Tags:** Use tags to organize checks across [dashboards](/communicate/dashboards/overview/) and [maintenance windows](/communicate/maintenance-windows/overview)
* **Retries:** Define how failed runs should be retried. See [retry strategies](/communicate/alerts/retries)
* **Alerting:** Configure your [alert settings](/communicate/alerts/configuration), [alert channels](/communicate/alerts/channels), or set up [webhooks](/integrations/alerts/webhooks) for custom integrations