> ## Documentation Index
> Fetch the complete documentation index at: https://www.checklyhq.com/docs/llms.txt
> Use this file to discover all available pages before exploring further.
# Organize your tests and monitors
> Learn how to structure and organize your Playwright Check Suites.
Playwright Check Suites enable you to reuse your existing Playwright end-to-end tests for global synthetic monitoring.
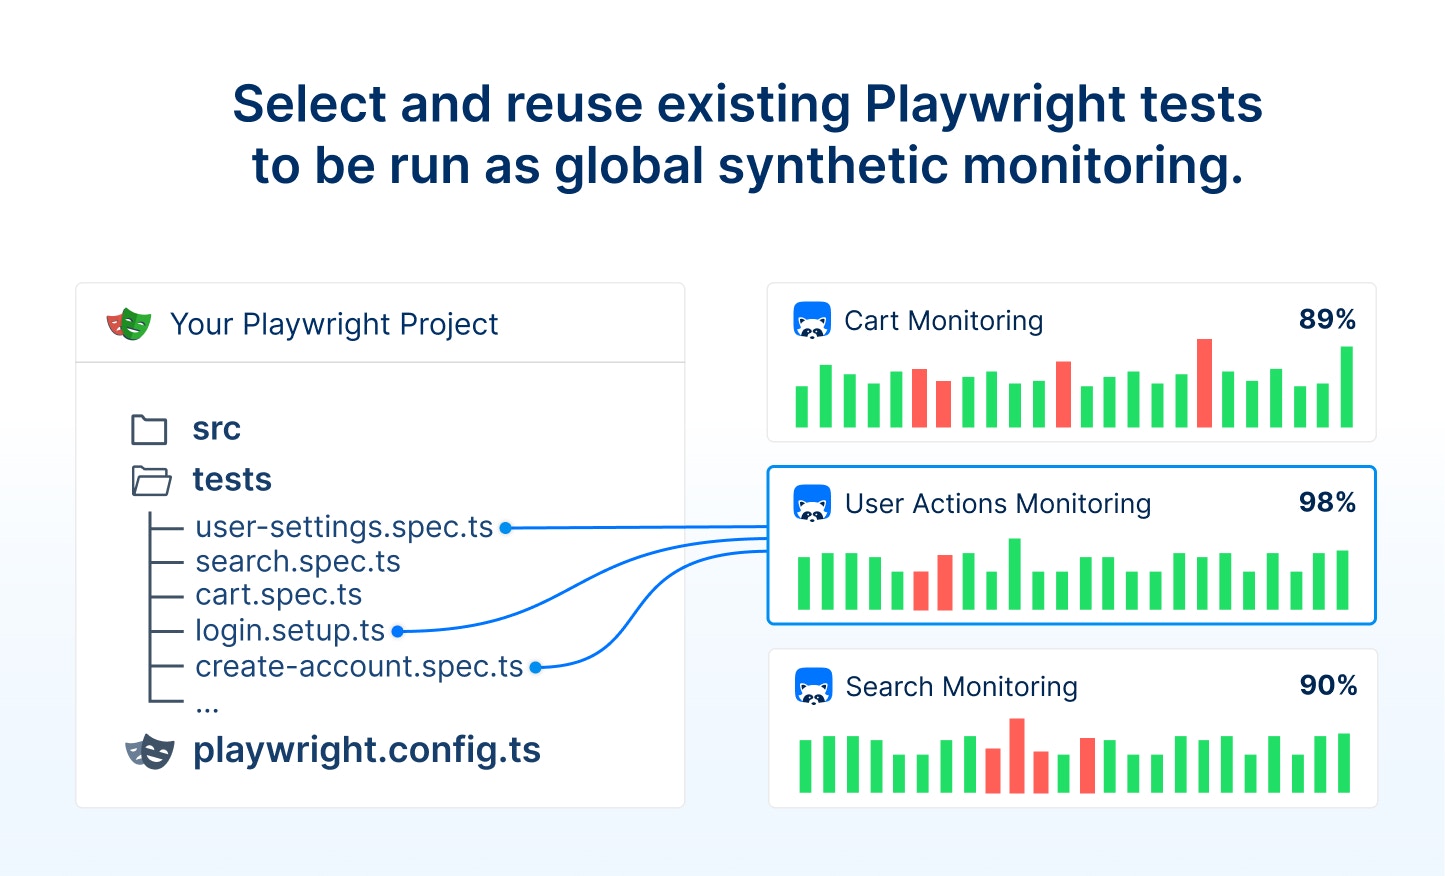 Run your entire Playwright end-to-end test suite, pick specific tests or group multiple tests together to run them as global synthetic monitoring and get alerted when your Playwright-based monitors fail.
## How long should an ideal Playwright Check Suite run?
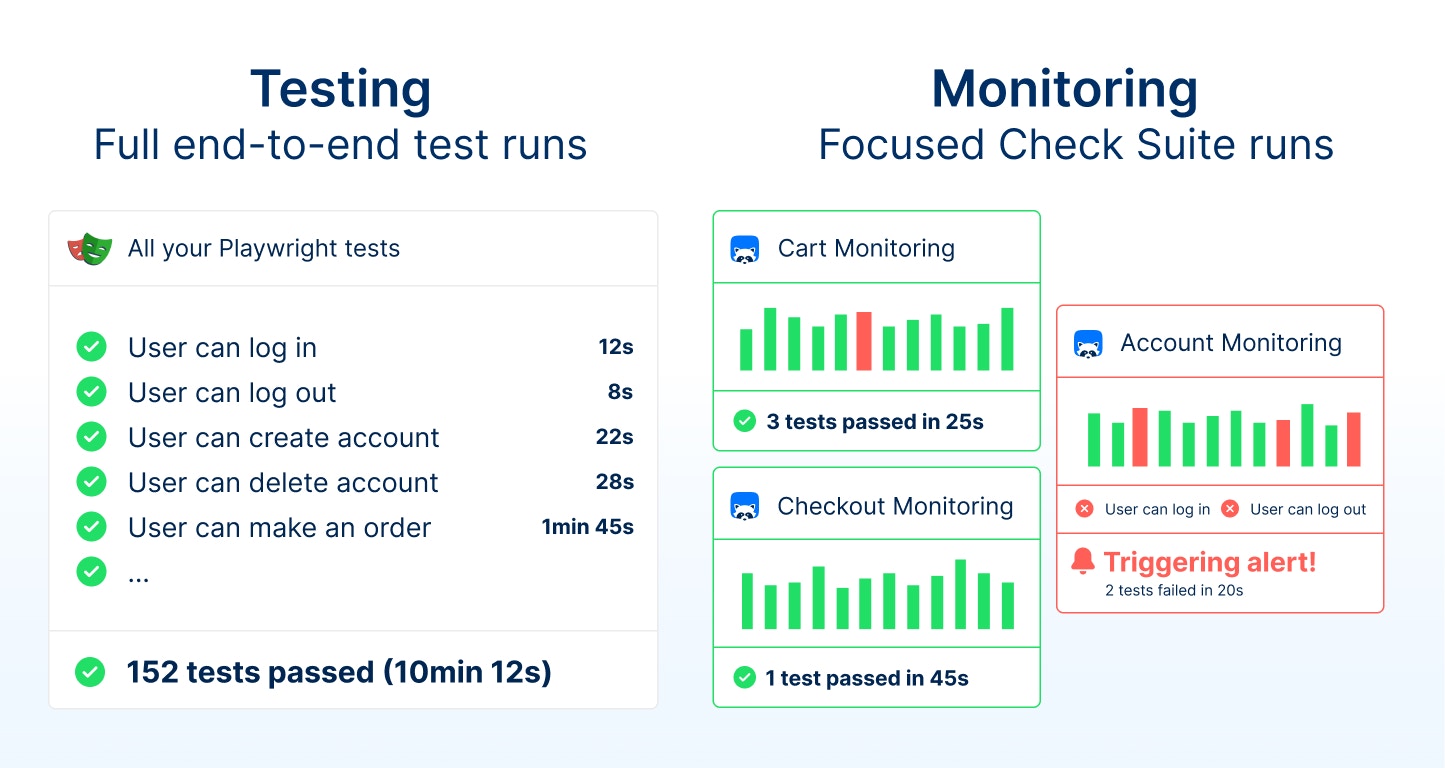
While a Playwright Check Suite can reflect and run your entire existing end-to-end test suite, **it's best to split your Playwright test suite into multiple Playwright Check Suites to meet your alerting and monitoring needs**.
Playwright tests are run to validate a pre-production environment and prepare a production release. Full end-to-end test executions that last over fifteen minutes are common for this purpose. While running all the tests during CI/CD makes sense for testing, it is not ideal for monitoring.
**The longer your Playwright Check Suite runs, the longer you wait for a failure alert.** To ensure a short Mean Time to Detect (MTTD), your Playwright Check Suites should execute and fail quickly.
Run your entire Playwright end-to-end test suite, pick specific tests or group multiple tests together to run them as global synthetic monitoring and get alerted when your Playwright-based monitors fail.
## How long should an ideal Playwright Check Suite run?
While a Playwright Check Suite can reflect and run your entire existing end-to-end test suite, **it's best to split your Playwright test suite into multiple Playwright Check Suites to meet your alerting and monitoring needs**.
Playwright tests are run to validate a pre-production environment and prepare a production release. Full end-to-end test executions that last over fifteen minutes are common for this purpose. While running all the tests during CI/CD makes sense for testing, it is not ideal for monitoring.
**The longer your Playwright Check Suite runs, the longer you wait for a failure alert.** To ensure a short Mean Time to Detect (MTTD), your Playwright Check Suites should execute and fail quickly.
 Split your Playwright tests into focus areas or groups of urgency to ensure the best monitoring frequency and alerting mechanisms.
The acceptable test duration depends on your application and how quickly you want to be alerted in case of an issue. **If [your service level agreements (SLAs)](/learn/incidents/slo-sla-sli) require a fast reaction time, we recommend keeping your Playwright Check Suite execution times as short as possible**.
Remember: 99.9% uptime means about 1 minute and 26 seconds of downtime each day. To ensure high uptime, your Playwright Check Suites should run much faster than the maximum downtime per day. To guarantee a high level of uptime, your Playwright Check Suites should run significantly faster than 1 minute and 26 seconds.
## How to include Playwright tests in your Playwright Check Suite
The quickest way to reuse your existing Playwright end-to-end tests as Playwright Check Suites is to specify your Playwright config path and a single Playwright Check Suite in your `checkly.config.ts`.
```typescript highlight={3-11} theme={null}
export default defineConfig({
checks: {
playwrightConfigPath: "./playwright.config.ts",
playwrightChecks: [
// Playwright Check Suite without
// additional configuration or test selection
{
name: "Multiple Browser Suite",
logicalId: "browser-compat-e2e-suite",
},
],
},
})
```
Each Playwright Check Suite requires a `name` and `logicalId`.
Without providing additional Playwright configuration (`pwProjects` or `pwTags`), the Playwright Check Suite will run all tests defined in the `playwright.config.ts`. It will include the tests that would also be run by `npx playwright test`.
Without providing additional Checkly configuration (`frequency` or `locations`), the Playwright Check Suite will run **every 10 minutes** in **the three default locations** (North Carolina, Tokyo, London).
While it's possible to run **all** your Playwright tests as long as your suite runs in under 15 minutes, we recommend to group your tests into multiple Playwright Check Suites with different monitoring configuration.
This approach leads to faster Mean Time to Detect (MTTD), overall transparency and more granular monitoring information.
## How to Organize your tests in Playwright Check Suites
Use the `pwProjects` and `pwTags` properties to group and organize your Playwright Check Suites.
### Group your Tests using Playwright Projects (recommended)
Select existing Playwright tests and run them in a Playwright Check Suite by relying on [Playwright projects](https://playwright.dev/docs/test-projects).
Use the `pwProjects` option to choose Playwright projects defined in the `playwright.config.ts` by name.
```typescript checkly.config.ts highlight={10} theme={null}
export default defineConfig({
checks: {
playwrightConfigPath: "./playwright.config.ts",
playwrightChecks: [
{
name: "Multiple Browser Suite",
logicalId: "browser-compat-e2e-suite",
// Specify which projects should be
// included in the Playwright Check Suite
pwProjects: ["chromium", "firefox"],
frequency: Frequency.EVERY_10M,
},
],
},
})
```
```typescript playwright.config.ts theme={null}
export default defineConfig({
projects: [
{
name: "chromium",
testMatch: /.*\/example-1\/.*\.spec\.ts/,
use: {
...devices["Desktop Chrome"],
},
},
{
name: "firefox",
testMatch: /.*\/example-1\/.*\.spec\.ts/,
use: {
...devices["Desktop Firefox"],
},
},
],
})
```
Playwright projects are most commonly used to configure different browser settings, but they can be used to configure different environments, authentication states, or any other Playwright configuration.
Using `pwProjects` creates a custom `testCommand` that includes the exact same `npx playwright test --project` configuration.
[Find more Playwright project examples below](#recommendations-and-examples).
### Group your Tests using Playwright tags
Select existing Playwright tests and run them in a Playwright Check Suite by relying on [Playwright test annotations and tags](https://playwright.dev/docs/test-annotations#tag-tests).
```typescript checkly.config.ts highlight={9} theme={null}
export default defineConfig({
checks: {
playwrightChecks: [
{
name: "Tagged Checkly Tests",
logicalId: "tagged-tests",
// Specify which tagged tests should be
// included in the Playwright Check Suite
pwTags: ["@checkly"],
frequency: Frequency.EVERY_1H,
},
],
},
})
```
```typescript example.spec.ts highlight={6} theme={null}
import { expect, test } from "@playwright/test"
test(
"Visit Checkly home page",
// Annotate a test to reuse is for synthetic monitoring
{ tag: "@checkly" },
async ({ page }) => {
await page.goto("/")
// More test code ...
}
)
```
Playwright Check Suites let you filter existing tests using `pwTags`. However, we recommend to always start with a separated Playwright project and reuse it via `pwProjects` in your `checkly.config.ts`.
This approach improves the maintainability and separates the Playwright test configuration (`playwright.config.ts`) from the Checkly monitoring configuration (`checkly.config.ts`).
Using `pwTags` creates a custom `testCommand` that includes the exact same `npx playwright test --grep @tag` configuration for your check suite to run.
## Recommendations and Examples
Synthetic monitoring with Playwright Check Suites is most effective when you organize your Playwright tests to match your monitoring needs. The best setup depends on your application and how quickly you want to receive alerts.
[The following examples are also available on GitHub](https://github.com/checkly/playwright-check-suite-examples/) if you want to see them in action.
### Group different environments
If you want to use your Playwright tests to monitor different environments (e.g., `staging, production, ...` or `/de, /fr, ...`, ), create Playwright projects for each environment target.
Split your Playwright tests into focus areas or groups of urgency to ensure the best monitoring frequency and alerting mechanisms.
The acceptable test duration depends on your application and how quickly you want to be alerted in case of an issue. **If [your service level agreements (SLAs)](/learn/incidents/slo-sla-sli) require a fast reaction time, we recommend keeping your Playwright Check Suite execution times as short as possible**.
Remember: 99.9% uptime means about 1 minute and 26 seconds of downtime each day. To ensure high uptime, your Playwright Check Suites should run much faster than the maximum downtime per day. To guarantee a high level of uptime, your Playwright Check Suites should run significantly faster than 1 minute and 26 seconds.
## How to include Playwright tests in your Playwright Check Suite
The quickest way to reuse your existing Playwright end-to-end tests as Playwright Check Suites is to specify your Playwright config path and a single Playwright Check Suite in your `checkly.config.ts`.
```typescript highlight={3-11} theme={null}
export default defineConfig({
checks: {
playwrightConfigPath: "./playwright.config.ts",
playwrightChecks: [
// Playwright Check Suite without
// additional configuration or test selection
{
name: "Multiple Browser Suite",
logicalId: "browser-compat-e2e-suite",
},
],
},
})
```
Each Playwright Check Suite requires a `name` and `logicalId`.
Without providing additional Playwright configuration (`pwProjects` or `pwTags`), the Playwright Check Suite will run all tests defined in the `playwright.config.ts`. It will include the tests that would also be run by `npx playwright test`.
Without providing additional Checkly configuration (`frequency` or `locations`), the Playwright Check Suite will run **every 10 minutes** in **the three default locations** (North Carolina, Tokyo, London).
While it's possible to run **all** your Playwright tests as long as your suite runs in under 15 minutes, we recommend to group your tests into multiple Playwright Check Suites with different monitoring configuration.
This approach leads to faster Mean Time to Detect (MTTD), overall transparency and more granular monitoring information.
## How to Organize your tests in Playwright Check Suites
Use the `pwProjects` and `pwTags` properties to group and organize your Playwright Check Suites.
### Group your Tests using Playwright Projects (recommended)
Select existing Playwright tests and run them in a Playwright Check Suite by relying on [Playwright projects](https://playwright.dev/docs/test-projects).
Use the `pwProjects` option to choose Playwright projects defined in the `playwright.config.ts` by name.
```typescript checkly.config.ts highlight={10} theme={null}
export default defineConfig({
checks: {
playwrightConfigPath: "./playwright.config.ts",
playwrightChecks: [
{
name: "Multiple Browser Suite",
logicalId: "browser-compat-e2e-suite",
// Specify which projects should be
// included in the Playwright Check Suite
pwProjects: ["chromium", "firefox"],
frequency: Frequency.EVERY_10M,
},
],
},
})
```
```typescript playwright.config.ts theme={null}
export default defineConfig({
projects: [
{
name: "chromium",
testMatch: /.*\/example-1\/.*\.spec\.ts/,
use: {
...devices["Desktop Chrome"],
},
},
{
name: "firefox",
testMatch: /.*\/example-1\/.*\.spec\.ts/,
use: {
...devices["Desktop Firefox"],
},
},
],
})
```
Playwright projects are most commonly used to configure different browser settings, but they can be used to configure different environments, authentication states, or any other Playwright configuration.
Using `pwProjects` creates a custom `testCommand` that includes the exact same `npx playwright test --project` configuration.
[Find more Playwright project examples below](#recommendations-and-examples).
### Group your Tests using Playwright tags
Select existing Playwright tests and run them in a Playwright Check Suite by relying on [Playwright test annotations and tags](https://playwright.dev/docs/test-annotations#tag-tests).
```typescript checkly.config.ts highlight={9} theme={null}
export default defineConfig({
checks: {
playwrightChecks: [
{
name: "Tagged Checkly Tests",
logicalId: "tagged-tests",
// Specify which tagged tests should be
// included in the Playwright Check Suite
pwTags: ["@checkly"],
frequency: Frequency.EVERY_1H,
},
],
},
})
```
```typescript example.spec.ts highlight={6} theme={null}
import { expect, test } from "@playwright/test"
test(
"Visit Checkly home page",
// Annotate a test to reuse is for synthetic monitoring
{ tag: "@checkly" },
async ({ page }) => {
await page.goto("/")
// More test code ...
}
)
```
Playwright Check Suites let you filter existing tests using `pwTags`. However, we recommend to always start with a separated Playwright project and reuse it via `pwProjects` in your `checkly.config.ts`.
This approach improves the maintainability and separates the Playwright test configuration (`playwright.config.ts`) from the Checkly monitoring configuration (`checkly.config.ts`).
Using `pwTags` creates a custom `testCommand` that includes the exact same `npx playwright test --grep @tag` configuration for your check suite to run.
## Recommendations and Examples
Synthetic monitoring with Playwright Check Suites is most effective when you organize your Playwright tests to match your monitoring needs. The best setup depends on your application and how quickly you want to receive alerts.
[The following examples are also available on GitHub](https://github.com/checkly/playwright-check-suite-examples/) if you want to see them in action.
### Group different environments
If you want to use your Playwright tests to monitor different environments (e.g., `staging, production, ...` or `/de, /fr, ...`, ), create Playwright projects for each environment target.
 Specify a different `baseURL` options for each project.
```typescript playwright.config.ts highlight={7,14} theme={null}
export default defineConfig({
projects: [
{
name: "environment-staging",
use: {
...devices["Desktop Chrome"],
baseURL: "https://staging.checklyhq.com"
},
},
{
name: "environment-production",
use: {
...devices["Desktop Chrome"],
baseURL: "https://checklyhq.com",
},
},
],
})
```
`baseURL` is one example of using advanced Playwright configuration.
The Playwright test runner can always be configured at a global, project, or test level. If needed, set up your project:
* to increase timeouts for a slow environment (e.g. `timeout` or `expect.timeout`)
* to run more retries for an unstable environment (e.g. `retries`)
* to use different authentication for each environment (e.g. `storageState`)
And configure different monitoring configuration for each Playwright project in your Playwright Check Suite.
```typescript checkly.config.ts highlight={8-12, 17-21} theme={null}
export default defineConfig({
checks: {
playwrightConfigPath: "./playwright.config.ts",
playwrightChecks: [
{
name: "Staging Environment",
logicalId: "environment-staging",
// Pick the Playwright project for the staging environment
pwProjects: ["environment-staging"],
// Run this Playwright Check Suite in one location every hour
frequency: Frequency.EVERY_1H,
locations: ["us-west-1", "eu-west-2", "af-south-1"],
},
{
name: "Production Environment",
logicalId: "environment-production",
// Pick the Playwright project for the production environment
pwProjects: ["environment-production"],
// Run this Playwright check suite in three locations every ten minutes
frequency: Frequency.EVERY_10M,
locations: ["us-west-1", "eu-west-2", "af-south-1"],
},
],
},
})
```
### Group specific application areas
If you want to use your Playwright tests to monitor different application areas (e.g. customer functionality, search, etc.), create [Playwright projects](https://playwright.dev/docs/test-projects) and select files via [Playwright annotations and tags](https://playwright.dev/docs/test-annotations#tag-tests).
Specify a different `baseURL` options for each project.
```typescript playwright.config.ts highlight={7,14} theme={null}
export default defineConfig({
projects: [
{
name: "environment-staging",
use: {
...devices["Desktop Chrome"],
baseURL: "https://staging.checklyhq.com"
},
},
{
name: "environment-production",
use: {
...devices["Desktop Chrome"],
baseURL: "https://checklyhq.com",
},
},
],
})
```
`baseURL` is one example of using advanced Playwright configuration.
The Playwright test runner can always be configured at a global, project, or test level. If needed, set up your project:
* to increase timeouts for a slow environment (e.g. `timeout` or `expect.timeout`)
* to run more retries for an unstable environment (e.g. `retries`)
* to use different authentication for each environment (e.g. `storageState`)
And configure different monitoring configuration for each Playwright project in your Playwright Check Suite.
```typescript checkly.config.ts highlight={8-12, 17-21} theme={null}
export default defineConfig({
checks: {
playwrightConfigPath: "./playwright.config.ts",
playwrightChecks: [
{
name: "Staging Environment",
logicalId: "environment-staging",
// Pick the Playwright project for the staging environment
pwProjects: ["environment-staging"],
// Run this Playwright Check Suite in one location every hour
frequency: Frequency.EVERY_1H,
locations: ["us-west-1", "eu-west-2", "af-south-1"],
},
{
name: "Production Environment",
logicalId: "environment-production",
// Pick the Playwright project for the production environment
pwProjects: ["environment-production"],
// Run this Playwright check suite in three locations every ten minutes
frequency: Frequency.EVERY_10M,
locations: ["us-west-1", "eu-west-2", "af-south-1"],
},
],
},
})
```
### Group specific application areas
If you want to use your Playwright tests to monitor different application areas (e.g. customer functionality, search, etc.), create [Playwright projects](https://playwright.dev/docs/test-projects) and select files via [Playwright annotations and tags](https://playwright.dev/docs/test-annotations#tag-tests).
 Select and group tests via Playwright projects.
```typescript playwright.config.ts highlight={6,11} theme={null}
export default defineConfig({
projects: [
{
name: "user-sign-up",
use: { ...devices["Desktop Chrome"] },
grep: /@signup/,
},
{
name: "search",
use: { ...devices["Desktop Chrome"] },
grep: /@search/,
},
],
})
```
And configure different monitoring configuration for each Playwright project in your Playwright Check Suite.
```typescript checkly.config.ts highlight={8-12, 17-21} theme={null}
export default defineConfig({
checks: {
playwrightConfigPath: "./playwright.config.ts",
playwrightChecks: [
{
name: "User Sign-up Suite",
logicalId: "user-sign-up",
// Pick the Playwright project covering user sign ups
pwProjects: ["user-sign-up"],
// Run this Playwright Check Suite in one location every hour
frequency: Frequency.EVERY_1H,
locations: ["us-west-1"],
},
{
name: "Search Suite",
logicalId: "search",
// Pick the Playwright project covering search functionality
pwProjects: ["search"],
// Run this Playwright check suite in three locations every ten minutes
frequency: Frequency.EVERY_10M,
locations: ["us-west-1", "eu-west-2", "af-south-1"],
},
],
},
})
```
### Group tests depending on urgency or execution time
If you want to use your Playwright tests to monitor both essential user flows, like login at a high frequency with critical alerts, and less critical ones, like profile updates at a lower frequency, create [Playwright projects](https://playwright.dev/docs/test-projects) and select tests via [Playwright annotations and tags](https://playwright.dev/docs/test-annotations#tag-tests).
Select and group tests via Playwright projects.
```typescript playwright.config.ts highlight={6,11} theme={null}
export default defineConfig({
projects: [
{
name: "user-sign-up",
use: { ...devices["Desktop Chrome"] },
grep: /@signup/,
},
{
name: "search",
use: { ...devices["Desktop Chrome"] },
grep: /@search/,
},
],
})
```
And configure different monitoring configuration for each Playwright project in your Playwright Check Suite.
```typescript checkly.config.ts highlight={8-12, 17-21} theme={null}
export default defineConfig({
checks: {
playwrightConfigPath: "./playwright.config.ts",
playwrightChecks: [
{
name: "User Sign-up Suite",
logicalId: "user-sign-up",
// Pick the Playwright project covering user sign ups
pwProjects: ["user-sign-up"],
// Run this Playwright Check Suite in one location every hour
frequency: Frequency.EVERY_1H,
locations: ["us-west-1"],
},
{
name: "Search Suite",
logicalId: "search",
// Pick the Playwright project covering search functionality
pwProjects: ["search"],
// Run this Playwright check suite in three locations every ten minutes
frequency: Frequency.EVERY_10M,
locations: ["us-west-1", "eu-west-2", "af-south-1"],
},
],
},
})
```
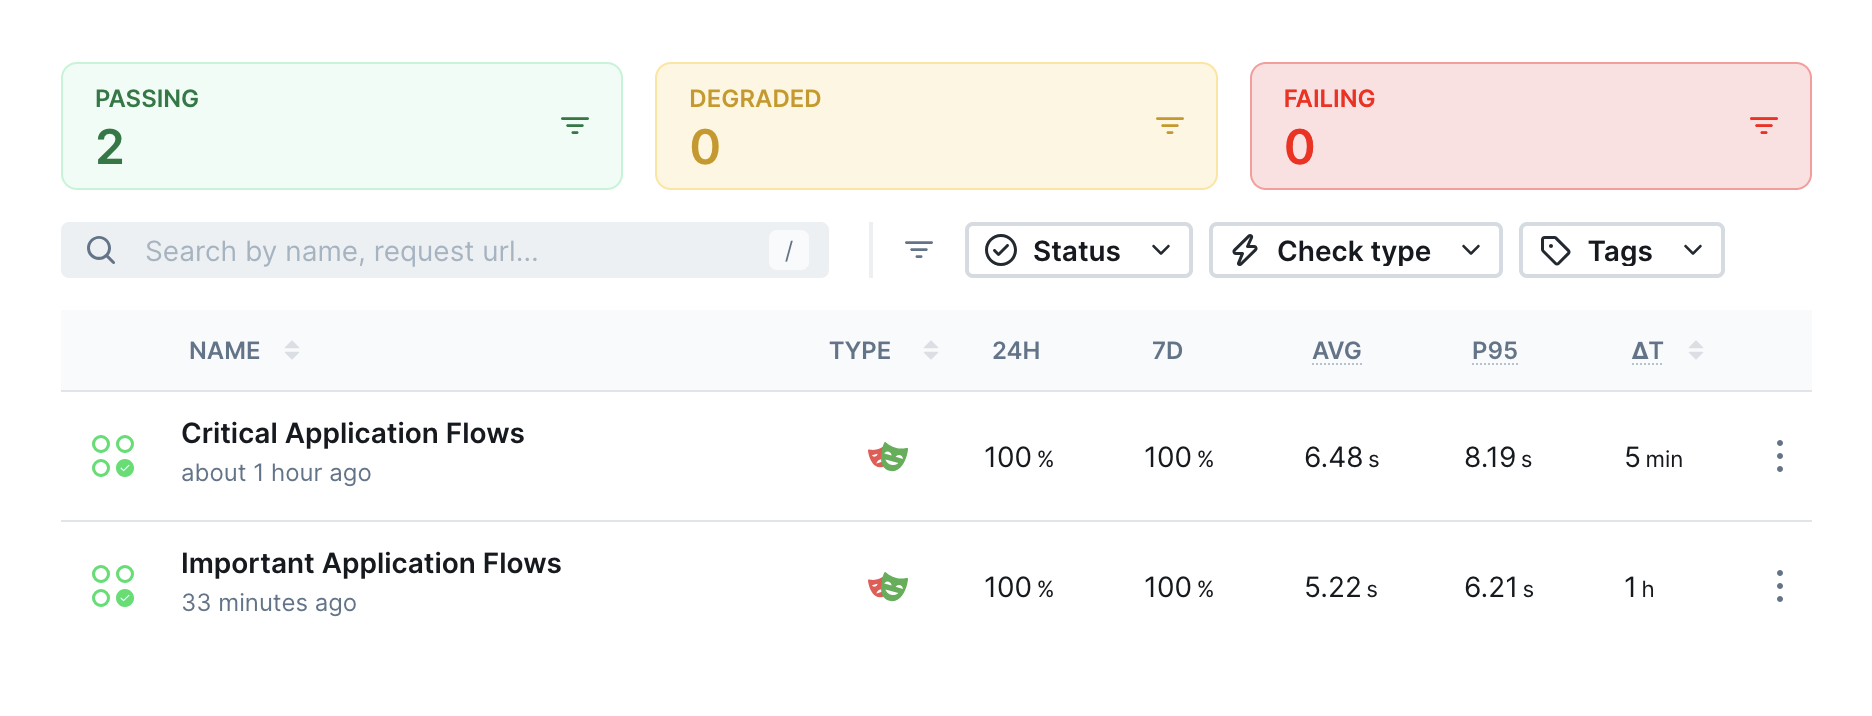
### Group tests depending on urgency or execution time
If you want to use your Playwright tests to monitor both essential user flows, like login at a high frequency with critical alerts, and less critical ones, like profile updates at a lower frequency, create [Playwright projects](https://playwright.dev/docs/test-projects) and select tests via [Playwright annotations and tags](https://playwright.dev/docs/test-annotations#tag-tests).
 Select and group tests via Playwright projects.
```typescript playwright.config.ts highlight={6,11} theme={null}
export default defineConfig({
projects: [
{
name: "critical",
use: { ...devices["Desktop Chrome"] },
grep: /@critical/,
},
{
name: "important",
use: { ...devices["Desktop Chrome"] },
grep: /@important/,
},
],
})
```
And configure different monitoring configuration for each Playwright project in your Playwright Check Suite.
```typescript checkly.config.ts highlight={8-14, 19-25} theme={null}
export default defineConfig({
checks: {
playwrightConfigPath: "./playwright.config.ts",
playwrightChecks: [
{
name: "Critical Application Flows",
logicalId: "critical",
// Pick the `critical` project
pwProjects: ["critical"],
// Run this Playwright Check Suite in three locations every 5 minutes
frequency: Frequency.EVERY_5M,
locations: ["us-west-1", "eu-west-2", "af-south-1"],
// Assign critical alert channels
alertChannels: [criticalPagerDuty, criticalSlack],
},
{
name: "Important Application Flows",
logicalId: "important",
// Pick the `important` project
pwProjects: ["important"],
// Run this Playwright check suite in two locations every thirty minutes
frequency: Frequency.EVERY_1H,
locations: ["us-west-1", "eu-west-2"],
// Assign important alert channels
alertChannels: [importantPagerDuty, importantSlack],
},
],
},
})
```
Critical Playwright Check Suites running on high intervals should only include fast test cases to guarantee a short Mean Time to Detect (MTTD).
**If a Check Suite run exceeds the specified interval frequency, subsequent runs will be skipped while it is running.**
### Group tests to reuse authentication states
If your existing Playwright tests require authentication and a login step, use [Playwright project dependencies and storage state](https://playwright.dev/docs/test-global-setup-teardown#option-1-project-dependencies) to log in once and reuse the browser session information.
Create a Playwright test that performs your login actions and calls [`context().storageState()`](https://playwright.dev/docs/api/class-browsercontext#browser-context-storage-state).
```typescript login.setup.ts theme={null}
const AUTH_FILE = ".auth/user.json"
setup("Log into Checkly", async ({ page }) => {
await page.goto("/")
// Perform your login actions
// ...
// Use storage state to write the browser state to disk
await page.context().storageState({ path: AUTH_FILE })
})
```
Configure two new Playwright projects. The first one performs the login actions to persist the browser state, while the other one imports the browser state to avoid the login steps.
```typescript playwright.config.ts highlight={15, 18} theme={null}
export default defineConfig({
projects: [
{
name: "login-setup",
use: {
...devices["Desktop Chrome"],
baseURL: "https://checklyhq.com"
},
},
{
name: "logged-in-tests",
use: {
...devices["Desktop Chrome"],
// 2. Reuse the written browser state to avoid login steps
storageState: path.resolve(__dirname, AUTH_FILE),
},
// 1. Set the project doing the login as a dependency
dependencies: ["login-setup"],
},
],
})
```
This Playwright setup will always run the `login-setup` project before running `logged-in-tests` so that the authentication will be available and the browser state can be reused.
Reuse the `logged-in-tests` project in your Checkly configuration.
```typescript checkly.config.ts highlight={9} theme={null}
export default defineConfig({
checks: {
playwrightChecks: [
{
name: "Logged-in tests",
logicalId: "logged-in-tests",
// Run the `logged-in-tests` project which will automatically run
// `login-setup` to write the authentication file to disk
pwProjects: ["logged-in-tests"],
frequency: Frequency.EVERY_1H,
},
],
},
})
```
Project dependencies and storage state work the same way as your standard Playwright project.
Check this video to learn more about [Playwright `storageState` and how to configure Playwright project dependencies](https://www.youtube.com/watch?v=nSHPCLUwwVk).
Select and group tests via Playwright projects.
```typescript playwright.config.ts highlight={6,11} theme={null}
export default defineConfig({
projects: [
{
name: "critical",
use: { ...devices["Desktop Chrome"] },
grep: /@critical/,
},
{
name: "important",
use: { ...devices["Desktop Chrome"] },
grep: /@important/,
},
],
})
```
And configure different monitoring configuration for each Playwright project in your Playwright Check Suite.
```typescript checkly.config.ts highlight={8-14, 19-25} theme={null}
export default defineConfig({
checks: {
playwrightConfigPath: "./playwright.config.ts",
playwrightChecks: [
{
name: "Critical Application Flows",
logicalId: "critical",
// Pick the `critical` project
pwProjects: ["critical"],
// Run this Playwright Check Suite in three locations every 5 minutes
frequency: Frequency.EVERY_5M,
locations: ["us-west-1", "eu-west-2", "af-south-1"],
// Assign critical alert channels
alertChannels: [criticalPagerDuty, criticalSlack],
},
{
name: "Important Application Flows",
logicalId: "important",
// Pick the `important` project
pwProjects: ["important"],
// Run this Playwright check suite in two locations every thirty minutes
frequency: Frequency.EVERY_1H,
locations: ["us-west-1", "eu-west-2"],
// Assign important alert channels
alertChannels: [importantPagerDuty, importantSlack],
},
],
},
})
```
Critical Playwright Check Suites running on high intervals should only include fast test cases to guarantee a short Mean Time to Detect (MTTD).
**If a Check Suite run exceeds the specified interval frequency, subsequent runs will be skipped while it is running.**
### Group tests to reuse authentication states
If your existing Playwright tests require authentication and a login step, use [Playwright project dependencies and storage state](https://playwright.dev/docs/test-global-setup-teardown#option-1-project-dependencies) to log in once and reuse the browser session information.
Create a Playwright test that performs your login actions and calls [`context().storageState()`](https://playwright.dev/docs/api/class-browsercontext#browser-context-storage-state).
```typescript login.setup.ts theme={null}
const AUTH_FILE = ".auth/user.json"
setup("Log into Checkly", async ({ page }) => {
await page.goto("/")
// Perform your login actions
// ...
// Use storage state to write the browser state to disk
await page.context().storageState({ path: AUTH_FILE })
})
```
Configure two new Playwright projects. The first one performs the login actions to persist the browser state, while the other one imports the browser state to avoid the login steps.
```typescript playwright.config.ts highlight={15, 18} theme={null}
export default defineConfig({
projects: [
{
name: "login-setup",
use: {
...devices["Desktop Chrome"],
baseURL: "https://checklyhq.com"
},
},
{
name: "logged-in-tests",
use: {
...devices["Desktop Chrome"],
// 2. Reuse the written browser state to avoid login steps
storageState: path.resolve(__dirname, AUTH_FILE),
},
// 1. Set the project doing the login as a dependency
dependencies: ["login-setup"],
},
],
})
```
This Playwright setup will always run the `login-setup` project before running `logged-in-tests` so that the authentication will be available and the browser state can be reused.
Reuse the `logged-in-tests` project in your Checkly configuration.
```typescript checkly.config.ts highlight={9} theme={null}
export default defineConfig({
checks: {
playwrightChecks: [
{
name: "Logged-in tests",
logicalId: "logged-in-tests",
// Run the `logged-in-tests` project which will automatically run
// `login-setup` to write the authentication file to disk
pwProjects: ["logged-in-tests"],
frequency: Frequency.EVERY_1H,
},
],
},
})
```
Project dependencies and storage state work the same way as your standard Playwright project.
Check this video to learn more about [Playwright `storageState` and how to configure Playwright project dependencies](https://www.youtube.com/watch?v=nSHPCLUwwVk).