> ## Documentation Index
> Fetch the complete documentation index at: https://checklyhq.com/docs/llms.txt
> Use this file to discover all available pages before exploring further.
# How to Monitor an E-Commerce Application with Playwright
> Discover how Monitoring as Code transforms cloud infrastructure management with a hands-on Checkly case study. Start optimizing your workflow today!
export const YoutubeEmbed = ({id, allowFullScreen = true, end, loading = "eager", start, title = "YouTube video"}) => {
if (!id) {
console.error("YouTube component requires an id prop");
}
const params = new URLSearchParams();
if (start) params.append("start", start.toString());
if (end) params.append("end", end.toString());
const src = `https://www.youtube.com/embed/${id}?${params.toString()}`;
return ;
};
## Inspired by Infrastructure-as-Code and E2E-Testing
Historically, IT infrastructure has been provisioned manually, both on premise and in the cloud. This presented several challenges, including fragmented workflows, lack of transparency and scalability issues. In response to these problems, the last few years have seen a shift to the Infrastructure-as-Code (IaC) paradigm, in which large-scale systems are declared in configuration files as code.
A new generation of tools has emerged to serve this use case, the most notable example of which is HashiCorp Terraform. Terraform provides a CLI workflow allowing users to specify what the final infrastructure setup should look like, and then takes care of all the intermediate steps needed to get there.
E2E testing evolved similarly during the last decade during from proprietary algorithms living in tools like HP Quality Center to open-source-based code hosted in your repository next to your application code. Today, cross-functional DevOps teams continuously run automated E2E tests in their CI/CD pipeline instead of isolated QA teams testing new versions of your app for three months before release.
## Monitoring as integral part of your SDLC
Setting up monitoring can present some of the same issues as provisioning infrastructure or testing. This becomes apparent when we move past the initial rollout or proof-of-concept and onboard multiple products and/or teams, and see our monitoring setup rapidly grow in scope - along with its maintenance needs, that is.
Monitoring as code learns from IaC, Unit testing and E2E testing and brings your monitoring close to your development workflows. How? By having it defined as code, much like you would do with any kind of End-to-End tests.
## Why Monitoring as Code with the Checkly CLI
What does one gain when moving from a manual to a monitoring as code approach? The **main advantages of the Checkly CLI** are:
1. **Unite E2E testing & monitoring in one workflow.** No more silos between Dev, QA and Ops.
2. **Programmable, testable, reviewable.** Works with your dev pipeline. From your IDE, via PR to CI.
3. **Native @playwright/test support.** No lock-in, just write standard \*.spec.ts files.
4. **Alerting baked in.** Set alerts for Slack, SMS and many more channels.
5. **Typescript-first.** Fully typed for a stellar developer experience with code completion.
6. **Run in the cloud or on-prem**. Run on the Checkly cloud or in your network using [Private Locations](/platform/private-locations/overview)
Watch our launch event to learn more about our CLI:
## Monitoring as Code with Checkly
Users who have already used Checkly will be familiar with creating Checks, Check Groups, Alert Channels and other resources through the Checkly UI. Creating, debugging and managing E2E and synthetic monitoring at scale is best done “as code”. Currently, Checkly supports three tools you can use for your monitoring as code (MaC) workflow:
1. [The Checkly CLI.](https://www.checklyhq.com/cli/overview)
2. [Terraform (through our Terraform provider)](https://checklyhq-com-git-cli-guide-checkly.vercel.app/docs/terraform-provider/)
3. [Pulumi (through our Pulumi provider)](https://www.checklyhq.com/docs/integrations/pulumi/)
## Monitoring an e-commerce website - as code
How does this all look like in practice? Let's find out by creating a small monitoring setup for our [demo e-commerce website](https://danube-web.shop/).
### Setting up the Checkly CLI
A quick way to bootstrap a new project with the Checkly CLI is to run the following command.
```bash Terminal theme={null}
npx checkly init
```
But for this guide, we will show you the manual process to show you all the structure and general idea behind the setup.
For our example we will be creating Browser Checks using [Playwright](https://playwright.dev) scripts we have previously written as part of our Playwright guides.
```ts login.spec.ts theme={null}
import { test, expect } from '@playwright/test';
test('test', async ({ page }) => {
// navigate to our target web page
await page.goto('https://danube-web.shop/');
// click on the login button and go through the login procedure
await page.getByRole('button', { name: 'Log in' }).click();
await page.getByPlaceholder('Email').fill('user@email.com');
await page.getByPlaceholder('Password').fill('supersecure1');
await page.getByRole('button', { name: 'Sign In' }).click();
// wait until the login Welcome back message is shown
await page.getByText('Welcome back, user@email.com').isVisible();
});
```
```ts search.spec.ts theme={null}
import { test, expect } from '@playwright/test';
test('test', async ({ page }) => {
const bookList = [
"The Foreigner",
"The Transformation",
"For Whom the Ball Tells",
"Baiting for Robot",
];
// navigate to our target web page
await page.goto("https://danube-web.shop/");
// search for keyword
await page.click(".topbar > input");
await page.type(".topbar > input", "for");
await page.click("#button-search");
await page.waitForSelector(
".shop-content > ul > .preview:nth-child(1) > .preview-title"
);
// halt immediately if results do not equal expected number
let resultsNumber = (await page.$$(".preview-title")).length;
await expect(resultsNumber).toEqual(bookList.length);
// remove every element found from the original array...
for (var i = 0; i < resultsNumber; i++) {
const resultTitle = await page.$eval(
`.preview:nth-child(${i + 1}) > .preview-title`,
(e) => e.innerText
);
const index = bookList.indexOf(resultTitle);
bookList.splice(index, 1);
}
// ...then assert that the original array is now empty
await expect(bookList.length).toEqual(0);
});
```
```ts checkout.spec.ts theme={null}
import { test, expect } from '@playwright/test';
test('test', async ({ page }) => {
// navigate to our target web page
await page.goto('https://danube-web.shop/');
// add the first item to the cart
await page.getByText('Haben oder haben').click();
await page.getByRole('button', { name: 'Add to cart' }).click();
// navigate to cart and proceed
await page.getByRole('button', { name: 'Checkout' }).click();
// fill out checkout info
await page.locator('#s-name').fill('Max');
await page.getByPlaceholder('Surname').fill('Mustermann');
await page.getByPlaceholder('Address').fill('Charlottenstr. 57');
await page.getByPlaceholder('Zipcode').fill('10117');
await page.getByPlaceholder('City').fill('Berlin');
await page.getByPlaceholder('Company (optional)').fill('Firma GmbH');
await page.getByLabel('as soon as possible').check();
// confirm checkout
await page.getByRole('button', { name: 'Buy' }).click();
// wait until the order confirmation message is shown
await page.getByText('All good, order is on the way. Thank you!! Shop more').isVisible();
});
```
Let's start off by creating a brand new folder:
```bash create-project theme={null}
mkdir checkly-mac-cli-example && cd $_
```
To keep things easy, we create a subdirectory...
```bash create-checks-directory theme={null}
mkdir __checks__
```
...and copy all our scripts from above into separate files, for example `login.spec.ts`.
...install playwright
```bash install-playwright theme={null}
npm init playwright@latest
```
First, install the CLI.
```bash install-checkly-cli theme={null}
npm install --save-dev checkly
```
Built-in TypeScript support requires Checkly CLI `v8` or later. On earlier versions, also install a TypeScript loader with `npm install --save-dev jiti` (preferred) or `npm install --save-dev ts-node typescript`.
Next up, we want to create our `checkly.config.ts` file and include the basic Checkly configuration as follows:
```ts checkly.config.ts theme={null}
import { defineConfig } from '@checkly/cli'
export default defineConfig({
projectName: 'Website Monitoring',
logicalId: 'website-monitoring-1',
repoUrl: 'https://github.com/acme/website',
checks: {
activated: true,
muted: false,
runtimeId: '2022.10',
frequency: 5,
locations: ['us-east-1', 'eu-west-1'],
tags: ['website', 'api'],
alertChannels: [],
checkMatch: '**/__checks__/*.check.ts',
ignoreDirectoriesMatch: [],
browserChecks: {
frequency: 10,
testMatch: '**/__checks__/*.spec.ts',
},
},
cli: {
runLocation: 'eu-west-1',
}
})
```
We are ready to run the first tests of our project. Use the CLI to authenticate and pick a Checkly account. Make sure you have signed up for a free account on [checklyhq.com](https://app.checklyhq.com/signup). That is achieved by running:
```bash Terminal theme={null}
npx checkly login
```
After a few seconds, you should see a similar message to the following:
```
$ npx checkly login
? Do you allow to open the browser to continue with login? Yes
? Which account do you want to use? TestCheckly
Successfully logged in as Hannes Lenke
Welcome to @checkly/cli 🦝
```
Now it's time to test run your browser checks on Checkly:
```bash run-tests theme={null}
npx checkly test
```
Success! You should see a similar message to the following:
```
$ npx checkly test
Running 3 checks in eu-west-1.
__checks__/checkout.spec.ts
✔ checkout.spec.ts (6s)
__checks__/login.spec.ts
✔ login.spec.ts (6s)
__checks__/search.spec.ts
✔ search.spec.ts (5s)
3 passed, 3 total
```
### Deploy your first Checks to Checkly
Now that our project has been initialised and we have added some resources, we can deploy our Checks by running `npx checkly deploy`.
The CLI will determine all the needed changes to be performed to replicate our monitoring code on Checkly.
```
$ npx checkly deploy
? You are about to deploy your project "Website Monitoring" to account
"TestCheckly". Do you want to continue? Yes
Successfully deployed project "Website Monitoring" to account "TestCheckly".
```
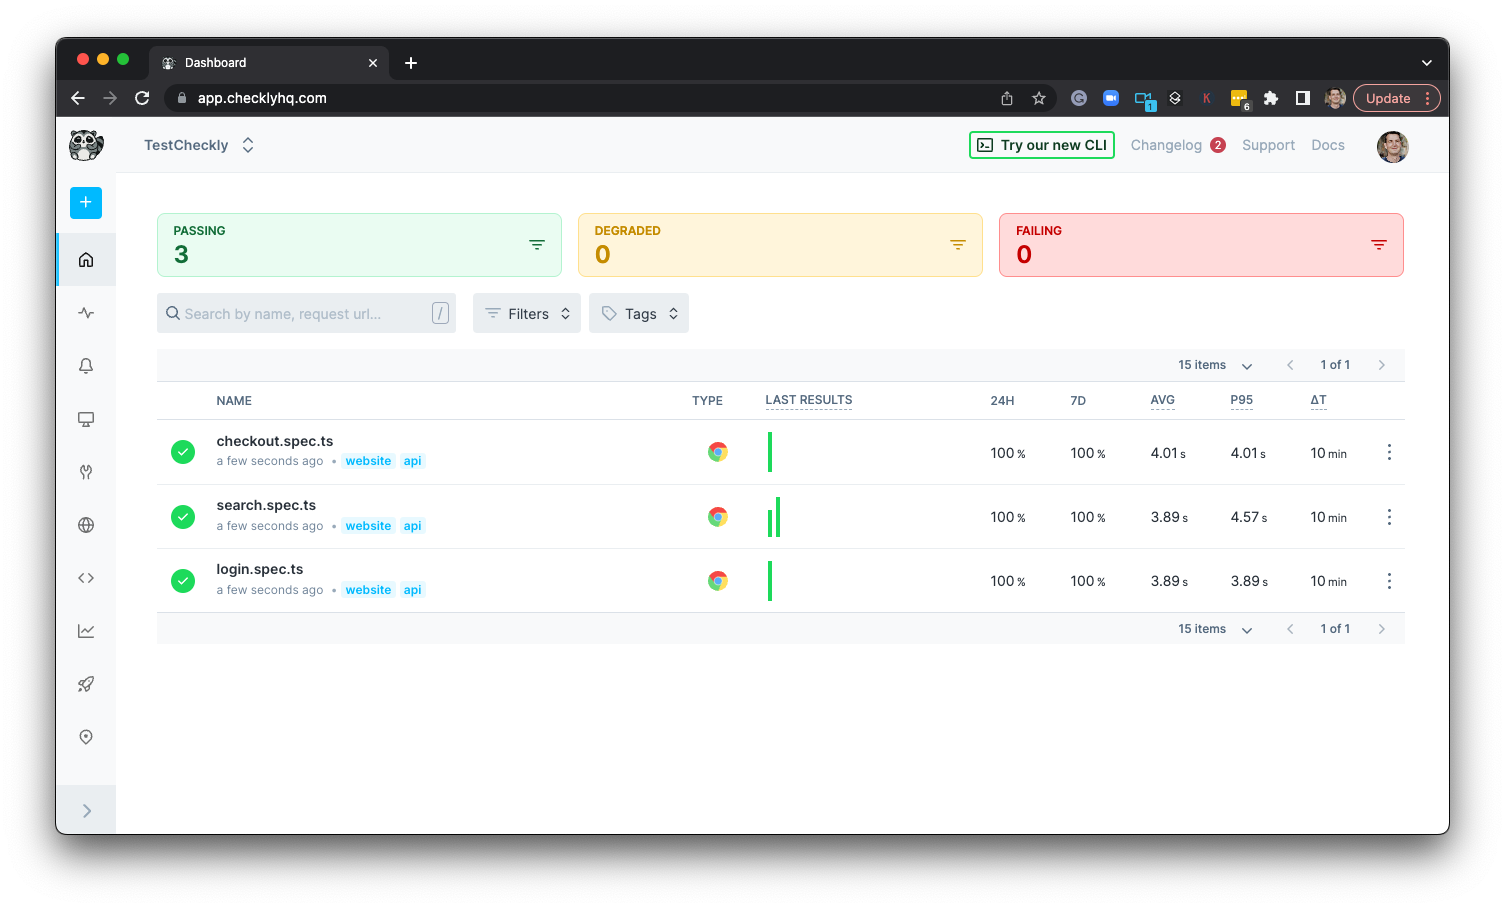
Logging in to our Checkly account, we will see the dashboard has been populated with our three Checks, which will soon start executing on their set schedules.
 ### Monitoring API correctness and performance
Browser Checks are now there to keep us informed on the status of our key website flows. What about our APIs, though? Whether they make up the foundation of our service or they are consumed directly by the customer, we need to ensure our endpoints are working as expected. This is easily achieved by setting up API Check resources.
```ts api.check.ts theme={null}
// __check__/api.check.ts
import { ApiCheck, AssertionBuilder } from '@checkly/cli/constructs'
const api = new ApiCheck('webstore-list-books', {
name: 'List Books API',
locations: ['eu-central-1','us-west-1'], // overrides the locations property
frequency: 1, // overrides the frequency property
degradedResponseTime: 5000,
maxResponseTime: 10000,
request: {
method: 'GET',
url: 'https://danube-web.shop/api/books',
assertions: [
AssertionBuilder.statusCode().equals(200),
AssertionBuilder.jsonBody('$.length').equals('30')
]
}
})
```
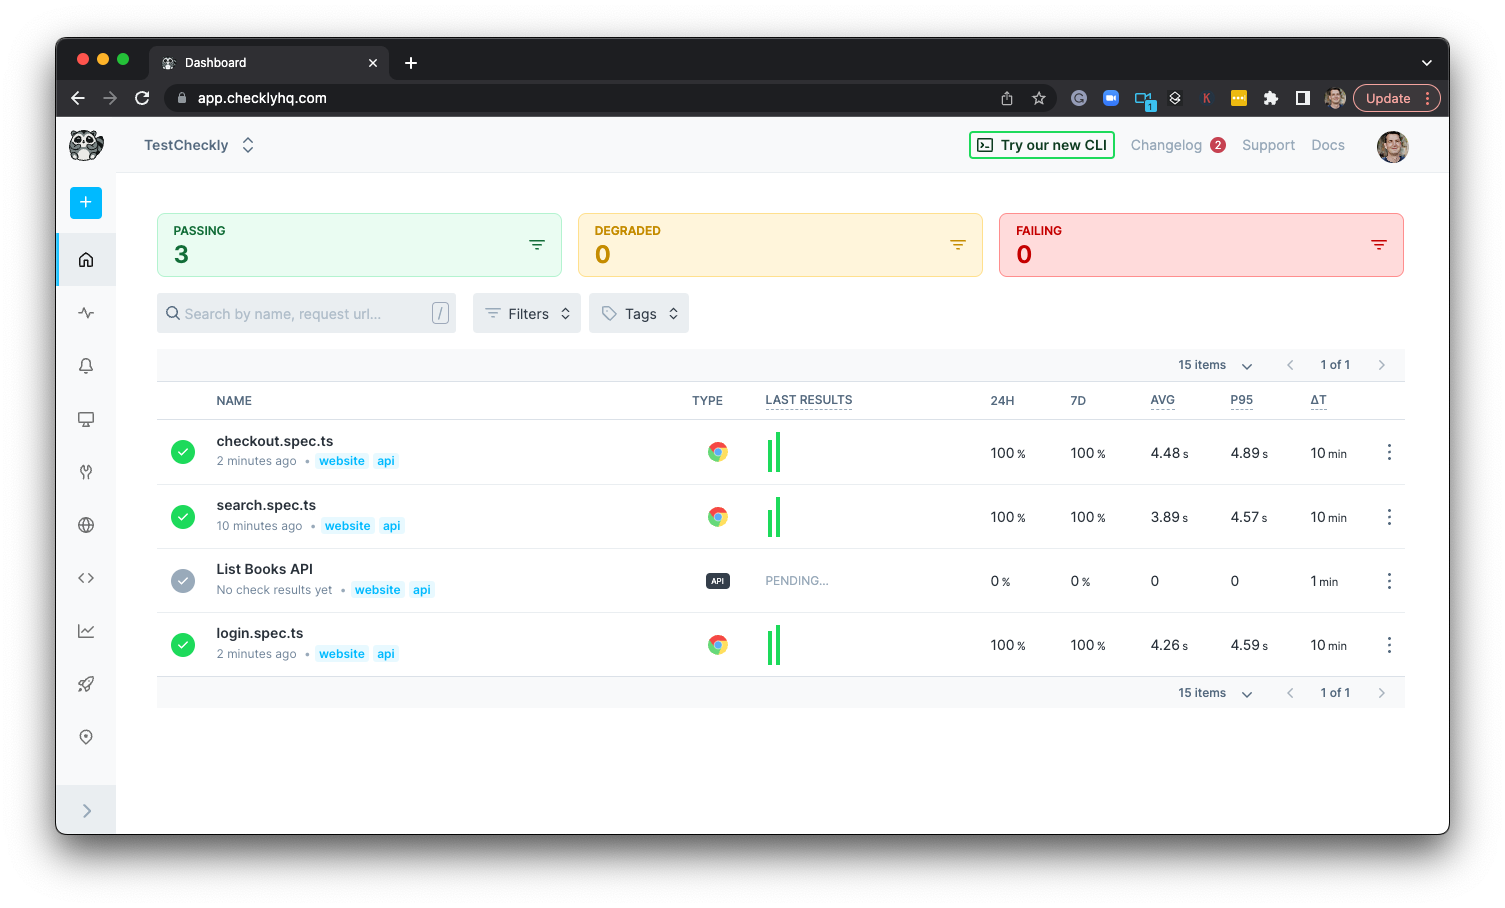
We can now once more run `checkly deploy` to see the new Check on Checkly:
### Monitoring API correctness and performance
Browser Checks are now there to keep us informed on the status of our key website flows. What about our APIs, though? Whether they make up the foundation of our service or they are consumed directly by the customer, we need to ensure our endpoints are working as expected. This is easily achieved by setting up API Check resources.
```ts api.check.ts theme={null}
// __check__/api.check.ts
import { ApiCheck, AssertionBuilder } from '@checkly/cli/constructs'
const api = new ApiCheck('webstore-list-books', {
name: 'List Books API',
locations: ['eu-central-1','us-west-1'], // overrides the locations property
frequency: 1, // overrides the frequency property
degradedResponseTime: 5000,
maxResponseTime: 10000,
request: {
method: 'GET',
url: 'https://danube-web.shop/api/books',
assertions: [
AssertionBuilder.statusCode().equals(200),
AssertionBuilder.jsonBody('$.length').equals('30')
]
}
})
```
We can now once more run `checkly deploy` to see the new Check on Checkly:
 ### Alerting
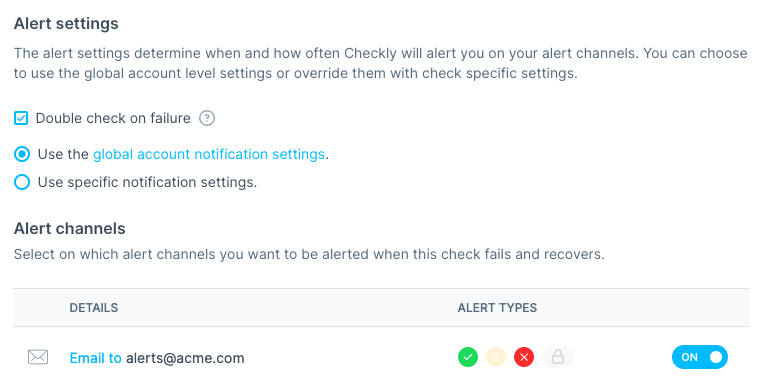
Now that we have our Checks in place, we want to set up alerting to ensure we are informed as soon as a failure takes place. Alert channels can be declared as constructs, just like the Checks. Let's add the following to our `alert-channels.ts` file:
```ts alert-channels.ts theme={null}
// alert-channels.ts
import { EmailAlertChannel } from '@checkly/cli/constructs'
const sendDefaults = {
sendFailure: true,
sendRecovery: true,
sendDegraded: false,
}
export const emailChannel = new EmailAlertChannel('email-channel-1', {
address: 'alerts@acme.com',
...sendDefaults
})
```
We are setting up things so that we are alerted when our Check starts failing, as well as when it recovers. But we still need to decide which Checks will subscribe to this channel, and therefore be able to trigger the alerts. This is done by adding the following inside the resource declaration of each check, e.g.:
```ts api.check.ts theme={null}
// __check__/api.check.ts
import { ApiCheck, AssertionBuilder } from '@checkly/cli/constructs'
import { emailChannel } from './alert-Channels'
const api = new ApiCheck('webstore-list-books', {
name: 'List Books API',
alertChannels: [emailChannel],
locations: ['eu-central-1','us-west-1'], // overrides the locations property
frequency: 1, // overrides the frequency property
degradedResponseTime: 5000,
maxResponseTime: 10000,
request: {
method: 'GET',
url: 'https://danube-web.shop/api/books',
assertions: [
AssertionBuilder.statusCode().equals(200),
AssertionBuilder.jsonBody('$.length').equals('30')
]
}
})
```
The usual `checkly deploy` will apply the changes on our Checkly account:
### Alerting
Now that we have our Checks in place, we want to set up alerting to ensure we are informed as soon as a failure takes place. Alert channels can be declared as constructs, just like the Checks. Let's add the following to our `alert-channels.ts` file:
```ts alert-channels.ts theme={null}
// alert-channels.ts
import { EmailAlertChannel } from '@checkly/cli/constructs'
const sendDefaults = {
sendFailure: true,
sendRecovery: true,
sendDegraded: false,
}
export const emailChannel = new EmailAlertChannel('email-channel-1', {
address: 'alerts@acme.com',
...sendDefaults
})
```
We are setting up things so that we are alerted when our Check starts failing, as well as when it recovers. But we still need to decide which Checks will subscribe to this channel, and therefore be able to trigger the alerts. This is done by adding the following inside the resource declaration of each check, e.g.:
```ts api.check.ts theme={null}
// __check__/api.check.ts
import { ApiCheck, AssertionBuilder } from '@checkly/cli/constructs'
import { emailChannel } from './alert-Channels'
const api = new ApiCheck('webstore-list-books', {
name: 'List Books API',
alertChannels: [emailChannel],
locations: ['eu-central-1','us-west-1'], // overrides the locations property
frequency: 1, // overrides the frequency property
degradedResponseTime: 5000,
maxResponseTime: 10000,
request: {
method: 'GET',
url: 'https://danube-web.shop/api/books',
assertions: [
AssertionBuilder.statusCode().equals(200),
AssertionBuilder.jsonBody('$.length').equals('30')
]
}
})
```
The usual `checkly deploy` will apply the changes on our Checkly account:
 We are now fully up and running with our monitoring as code setup. Our Checks will run on a schedule, informing us promptly if anything were to go wrong. Rapidly getting to know about failures in our API and key website flows will allow us to react fast and mitigate impact on our users, ensuring a better experience with our product.
You can find the more details about our CLI on our doc [Checkly cli docs](https://www.checklyhq.com/cli/overview).
### More on MaC with our CLI
Expanding our initial setup from here is easy, please follow these links if you want to know more:
1. [Why we built Monitoring as Code blog post](https://blog.checklyhq.com/why-we-built-a-developer-first-typescript-cli-for-monitoring-as-code/)
2. [Deep-dive & live coding session](https://www.youtube.com/watch?v=IcaMW2opx2U)
3. [Checkly CLI Docs](https://www.checklyhq.com/cli/overview)
## Read More
We are now fully up and running with our monitoring as code setup. Our Checks will run on a schedule, informing us promptly if anything were to go wrong. Rapidly getting to know about failures in our API and key website flows will allow us to react fast and mitigate impact on our users, ensuring a better experience with our product.
You can find the more details about our CLI on our doc [Checkly cli docs](https://www.checklyhq.com/cli/overview).
### More on MaC with our CLI
Expanding our initial setup from here is easy, please follow these links if you want to know more:
1. [Why we built Monitoring as Code blog post](https://blog.checklyhq.com/why-we-built-a-developer-first-typescript-cli-for-monitoring-as-code/)
2. [Deep-dive & live coding session](https://www.youtube.com/watch?v=IcaMW2opx2U)
3. [Checkly CLI Docs](https://www.checklyhq.com/cli/overview)
## Read More
Why should the way we manage monitoring be any different?
Learn end-to-end monitoring with playwright to test key website flows.
Setup scripts are a fundamental tool to tailor API checks to your own target endpoints.