| Variable | Description |
|---|---|
API_KEY | API key for the Private Location in which the agent will serve. The API key is shown in the web app once, when initially creating a Private Location. |
HTTPS_PROXY | HTTPS proxy configuration for the outbound connection to the Checkly API, used for agent management and monitoring. https://user:password@127.0.0.1:8080 |
HTTP_PROXY | HTTP proxy configuration for the outbound connection to the Checkly API, used for agent management and monitoring. Used if the proxy server does not accept HTTPS connections. http://user:password@127.0.0.1:8080 |
JOB_CONCURRENCY | (Default: 1, max: 10) Number of concurrent checks that are run by the agent. |
LOG_LEVEL | (Default: INFO) Set the log level of the agent. Can be one of DEBUG, LOG, INFO, WARN or ERROR. |
USE_OS_DNS_RESOLVER | When set to true, TCP monitors will resolve DNS using getaddrinfo C function, instead of using the network. This enables easier DNS resolution for internal services e.g. services running in the same Kubernetes cluster. |
DEPENDENCY_CACHE | (Default: OFF) Set to CHECKLY_S3 to enable dependency caching for Playwright Check Suites. Caches installed dependencies between runs to speed up check execution. Learn more about dependency caching. |
AGENT_HEALTH_PORT | (Default: 8081) Port for the HTTP health probe endpoints. |
EXTERNAL_OBSERVABILITY | Enabled by default. Set to off to disable external observability reporting of agent runtime errors to Checkly. |
Terminal
- Set the
JOB_CONCURRENCYto the appropriate value (1-10) based on your scaling calculations:
Terminal
- Configure an HTTPS or HTTP proxy if one is required for your environment:
Terminal
docker ps).
Terminal
- You can also check the logs of the new container to ensure it’s up and running (typically
docker logs <container_name>).
Terminal
Local Docker workflow
You can easily install the Checkly Agent on your Macbook, Windows or Linux machine for local debugging using Docker Desktop. The installation procedure is the same as described above. To resolve locally running webapps or APIs, e.g. some project running onhttp://localhost:3000 you need to use the internal
Docker host http://host.docker.internal:3000 to bridge to your localhost address.
Updating the agent container
New versions of the Checkly Agent are released regularly to Docker Hub. To have access to the latest improvements, you can update the Checkly Agent containers. View our changelog to learn more about each version.Manual updates
To manually upgrade your Checkly Agent containers, first pull the image:Terminal
Terminal
docker ps to find the names of the previous Agent containers.
Terminal
CREATED field. Then run docker stop <old container name> and docker rm <old container name> to remove the old Agent containers.
Automatic updates
Use caution when enabling automatic updates in production. This could automatically update to a version with breaking changes, and upgrade to an agent version supporting a later runtime.
Terminal
Rotating API keys
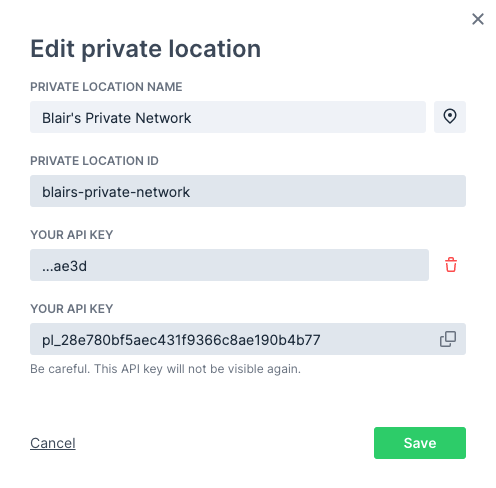
API keys can be rotated as necessary in order to maintain good security practices or in case a key is lost or compromised. A Private Location can have two active API keys. To rotate the API keys:- Navigate to Private Locations in your Account Settings.
- Click the edit icon on the Private Location you want to update.
- There will only be a single API key in place on a new Private Location. Click Add new API key to add the second key.
-
The new API key will appear. Click the copy icon to copy it to your clipboard and save it somewhere secure.
-
Click Save to close the dialog. You can now see the trailing characters of the two defined API keys in the list of Private Locations.

- You now need to replace your Checkly agents. You can do this one-by-one or as a group, just make sure you always have enough agent containers up and running based on your workload. Using your container management tool, start new agents with the new API key:
Terminal
- Make sure the new agents are running properly. You can check the agent count on the Private Locations page, or check your container logs. Remove the old agent containers:
Terminal
docker inspect <container name or ID> command and look for the API_KEY variable in the output.
- Now that your new agents are in place, remove the old API key. Click the edit icon in the Private Location again.
- Click the delete icon next to the old API key (verified by the shown trailing characters) then click the confirmation.
- Click Save to close the dialog. You will now only see the new API key listed for the Private Location.
Trusting Enterprise TLS Certificates
Some enterprise environments may use internal certificates for TLS connections. These certificates need to be trusted by the agent; otherwise, the agent’s TLS connection to the Checkly platform will fail. To configure the agent to trust the certificate, first copy the certificate as a PEM file onto the host. The Docker run command should then be updated to mount the certificate as a volume and pass the path to the certificate in theNODE_EXTRA_CA_CERTS environment variable. For a certificate stored at the path ~/certificate.pem, the Docker run command will be:
Terminal
Health Probe Endpoints
The Checkly Agent exposes HTTP health probe endpoints on port8081 by default. You can change this port using the AGENT_HEALTH_PORT environment variable.
| Endpoint | Description |
|---|---|
GET /-/readiness | Returns 200 OK when the agent is ready to accept work. Returns 503 Service Unavailable during shutdown. |
GET /-/liveness | Returns 200 OK to indicate the agent process is running. |
GET /health | Returns 200 OK as a general health check. |
External Observability
The Checkly Agent reports error-level events to Checkly to help detect crashes, bugs, and environment-related issues. This is enabled by default starting with agent v7.0.0. Only limited technical metadata is collected (e.g. error messages, stack traces, agent version, platform, go runtime information). Sensitive data such as API keys, environment variables, check configuration, URLs, headers, and response bodies is never sent. To disable external observability, set theEXTERNAL_OBSERVABILITY environment variable to off:
Terminal
Agent Version and Runtimes
Each Checkly Agent only supports specific runtimes. This is to keep the container image at an acceptable size. When you change the runtime a check uses, you may also need to change to the corresponding agent version. Similarly, if you update the agent version to one using a different runtime you also need to update your checks to use the same runtime.| Agent version | Runtimes |
|---|---|
| 8.0.0 | 2026.04 |
| 7.0.0* | 2026.04, 2025.04 |
| 6.0.0 | 2025.04, 2024.09 |
| 5.0.0 | 2025.04 |
| 4.0.0 | 2024.09 |
| 3.5.0 | 2024.09 |
| 3.4.0 | 2024.02 |
| 3.2.0 | 2023.09 |
| 2.0.0 | 2023.02 |
| 1.3.9 | 2022.10 |
Troubleshooting
Self-signed proxy certificate not trusted
Self-signed proxy certificate not trusted
If you’re using a self-signed certificate for your proxy, the Agent’s HTTP client will not trust it by default. There are two ways to fix this.
- Add your Certificate Authority’s (CA) root certificate to the system’s CA store. On Debian, and related Linux distributions, you can do this by copying your
*.crtcertificate to/usr/local/share/ca-certificates/and runningsudo update-ca-certificates. - Alternatively, you can tell the node process in the Agent’s container to accept unauthorized certificates with the following environment variable,
NODE_TLS_REJECT_UNAUTHORIZED=0. This can be appended to yourdocker run ..command with the-eflag.
Raw socket permission denied for Traceroute or Packet Capture on private locations
Raw socket permission denied for Traceroute or Packet Capture on private locations
Container runtimes drop In Docker:Docker does not set
NET_RAW by default. Traceroute and Packet Capture need raw sockets, so the Checkly Agent needs this capability explicitly granted.How to fix:In Kubernetes, update your pod spec or Helm values:allowPrivilegeEscalation=true— prevents Kubernetes from setting theno_new_privsbit on the container process, which would otherwise block file capabilities (likecap_net_raw+ep) from taking effect.capabilities.add=["NET_RAW"]— addsCAP_NET_RAWto the container’s bounding and permitted capability sets, allowing the kernel to open the raw sockets (SOCK_RAW).
no_new_privs by default, so --cap-add is sufficient. If you run with --security-opt no-new-privileges, file capabilities on binaries will be blocked — remove that flag to allow NET_RAW.NET_RAW only grants permission to create raw sockets. It does not escalate broader container privileges.