FAQ

Automate Uptime Monitor Creation at Scale

Monitoring hundreds or even thousands of pages doesn’t have to be a manual process. With Checkly’s Monitoring as Code approach, you can dynamically create, update, and manage URL monitors at scale.

Nočnica Mellifera Nočnica Mellifera

Checkly’s model of Monitoring as Code lets you create site monitors right from your IDE. With the simple and scalable monitors of Uptime Monitoring, we have the ability to monitor every single URL, API route, and even TCP endpoint that our service provides. Since we’re likely to want to monitor dozens or hundreds of URLs for complete coverage, this guide will show you how to create a large number of monitors all at once with a single file.

How it Works

Creating a Single URL Monitor With CLI Constructs

Checkly’s Monitoring as Code workflow starts with creating a project where all your checks will be stored. You can use the Checkly construct API to describe new Checkly monitors within your Checkly dashboard. If you haven’t worked with Checkly at all, or have only created new monitors from our web UI, install the Checkly CLI and create a new project for our checks with our getting started guide here. A basic URL monitor with minimal configuration looks like this:

first-url-monitor.check.ts
import { UrlAssertionBuilder, UrlMonitor } from 'checkly/constructs' 

new UrlMonitor('url-monitor-001', { // the monitor's unique logical ID
  name: 'Example URL Monitor', // display name to show in the Checkly UI
  activated: true, 
  frequency: 1, // frequency in minutes 
  maxResponseTime: 10000, // milliseconds
  request: {
    url: 'https://www.checklyhq.com/learn/', // target URL
    followRedirects: true, // allow 3xx responses
    skipSSL: false,
    assertions: [ 
      //unlike more advanced checks, URL monitors only check the status code
      UrlAssertionBuilder.statusCode().equals(200), 
    ]
  }
})

This uses the constructs API with components that are standardized between most check types. With the same construct API you can configure everything from the simplest URL monitor to an advanced browser check. A few details to note as we begin:

  • Each monitor needs a unique logical ID. By matching this ID we can update an existing monitor without deleting its history.
  • Except for the request object, logical ID, and name, every other configuration of a URL monitor can be defined either:
    • Individually on that single monitor
    • As part of a group of monitors
    • By using defaults set in the project configuration file (checkly.config.ts).

If we save this file to our Checkly project’s /__checks__ folder, we can run this test or deploy it. Go ahead and save this check locally, and try replacing the URL provided with one from your own site, and then running the check with:

Terminal
npx checkly test first-url-monitor

You should see feedback on your terminal as this check runs through the Checkly network.

Terminal
__checks__/first-url-monitor.check.ts
  ✔ Example URL Monitor (287ms)

1 passed, 1 total

So far, so good - you could even run npx checkly deploy to deploy this to Checkly. But what we really want is to create dozens or hundreds of URL monitors all at once. We definitely don’t want to create hundreds of individual files just to monitor every URL in our service (and we certainly don’t want to manage all those files long-term 😅). Next, let’s use this same file to create multiple monitors.

Monitor Multiple URLs

urlArrayMonitors.check.ts
//In this bulk monitoring example we'll monitor several URLs from one file

import { Frequency, UrlMonitor, UrlAssertionBuilder } from 'checkly/constructs'

const sitemapUrls = [
    'https://www.checklyhq.com/docs/',
    'https://www.checklyhq.com/learn/playwright/codegen/',
    'https://www.checklyhq.com/guides/using-pw-test-command/',
    'https://developers.checklyhq.com/reference/postv1incidents',
    'https://www.checklyhq.com/customers/'
]
// Loop through each URL and create a monitor
sitemapUrls.forEach((url, index) => {
  // Extract domain name for monitor ID
  const domain = new URL(url).hostname.replace('www.', '')
  // Generate unique logical ID for each monitor
  const logicalId = `multi-url-monitor-${index + domain}`
  
  
  new UrlMonitor(logicalId, {
    name: `URL Monitor - ${url}`,
    activated: true,
    frequency: 5, // Check every 5 minutes
    maxResponseTime: 10000,
    degradedResponseTime: 5000,
    request: {
      url: url,
      followRedirects: true,
      skipSSL: false,
      assertions: [
        UrlAssertionBuilder.statusCode().equals(200),
      ]
    }
  })
})

The array we’ve provided in this check means that 5 separate URL monitors will be created if we deploy this code. Let’s try previewing a deployment with just urlArrayMonitors.check.ts in our /__checks__ directory by running the command npx checkly deploy -p.

Terminal
Parsing your project... ✅

Validating project resources... ✅

Bundling project resources... ✅

Create:
    UrlMonitor: multi-url-monitor-0checklyhq.com
    UrlMonitor: multi-url-monitor-1checklyhq.com
    UrlMonitor: multi-url-monitor-2checklyhq.com
    UrlMonitor: multi-url-monitor-3developers.checklyhq.com
    UrlMonitor: multi-url-monitor-4checklyhq.com

Each of our new monitors is listed in the deployment preview.

We’ve already saved a significant amount of time since we can simply add new URLs to our array to monitor additional paths. But, we can take this even further.

Monitoring URLs Stored in a Local File

In our previous check, we defined the URLs to monitor in an array at the top of the file:

const sitemapUrls = [
    'https://www.checklyhq.com/docs/',
    'https://www.checklyhq.com/learn/playwright/codegen/',
    'https://www.checklyhq.com/guides/using-pw-test-command/',
    'https://developers.checklyhq.com/reference/postv1incidents',
    'https://www.checklyhq.com/customers/'
]

Rather than having to edit this check’s code every time we update our list of URLs, let’s make this more convenient for ourselves by reading a local JSON file with the same data. First, we’ll create urls.json

{ "urls":[
    "https://www.checklyhq.com/docs/",
    "https://www.checklyhq.com/learn/playwright/codegen/",
    "https://www.checklyhq.com/guides/using-pw-test-command/",
    "https://developers.checklyhq.com/reference/postv1incidents",
    "https://www.checklyhq.com/customers/"
]}

Then update our check to read the local file:

import * as urlsData from './urls.json'
// Configuration: URLs to monitor
const sitemapUrls = urlsData.urls

Now the monitored URLs are stored in a separate file that is easier for other engineers to read, access, and update.

Monitor URLs Based by Fetching a CSV

Let’s continue to increase the sophistication of our group of monitors. Right now our logical IDs are generated based on the URL. This leads to some names that aren’t very human-readable. Let’s have our check file look for a CSV file that has columns with all the data. Our CSV is formatted like this:

url logicalID name
https://www.checklyhq.com/docs/ docs-1 url monitor docs-1
https://www.checklyhq.com/learn/playwright/codegen/ codegen-1 url monitor codegen-1
https://www.checklyhq.com/guides/using-pw-test-command/ pw-test-1 url monitor pw-test-1
https://developers.checklyhq.com/reference/postv1incidents incidents-1 url monitor incidents-1

And this version of the URL monitor fetches the CSV and parses the three values for each check from the row before creating a monitor.

csv-import-url-monitors.check.ts
import { UrlAssertionBuilder, UrlMonitor } from 'checkly/constructs'
const csvUrl = 'https://raw.githubusercontent.com/serverless-mom/claudeExperiments/refs/heads/main/urlsWithIds.csv'

interface CsvRow {
  url: string
  logicalId: string
  name: string
}

async function fetchUrlsFromCsv(csvUrl: string): Promise<CsvRow[]> {
  try {
    const response = await fetch(csvUrl)
    if (!response.ok) {
      throw new Error(`Failed to fetch CSV: ${response.status} ${response.statusText}`)
    }
    const csvText = await response.text()
    return csvText
      .split('\n')
      .map(line => line.trim())
      .filter(line => line.length > 0)
      .map(line => {
        //split each line and remove the quotation marks around the URLs
        const parts = line.split(',').map(part => part.trim().replace(/"/g, ''))
        return {
          url: parts[0],
          logicalId: parts[1],
          name: parts[2]
        }
      })
      //remove the header row and any other invalid rows
      .filter(row => row.url.startsWith('http')) 
  } catch (error) {
    console.error('Error fetching URLs from CSV:', error)
    return []
  }
}

const urlsToMonitor = await fetchUrlsFromCsv(csvUrl)
urlsToMonitor.forEach((row) => {
  new UrlMonitor(row.logicalId, {
    name: row.name,
    activated: true,
    frequency: 5,
    maxResponseTime: 10000,
    request: {
      url: row.url,
      followRedirects: true,
      skipSSL: false,
      assertions: [
        UrlAssertionBuilder.statusCode().equals(200),
      ]
    }
  })
})

With these methods we could continue to extend the dynamic capabilities of this list of URL monitors, e.g., downloading and parsing a sitemap.2fad06b7.xml for URLs to monitor. For the moment, though, let’s move on to managing the configuration of multiple checks.

Manage Configuration for Multiple Monitors with Groups

As you handle monitors for multiple sites and environments, inevitably you’ll want to manage the configuration for a number of monitors all at once. Currently, by creating many monitors from a single file we’re giving each one the same configuration, and any configuration not specified will take the default values in checkly.config.ts in the project’s root directory. We can create specific groups to receive configuration by adding the monitor to a group with the Checkly construct API. Groups offer a convenient interface to configure your monitors, setting their retry strategy, alert thresholds, and where the group’s alerts will be sent. Groups also show up as folders in your Checkly web UI; making it easier to see the status of every check in the group.
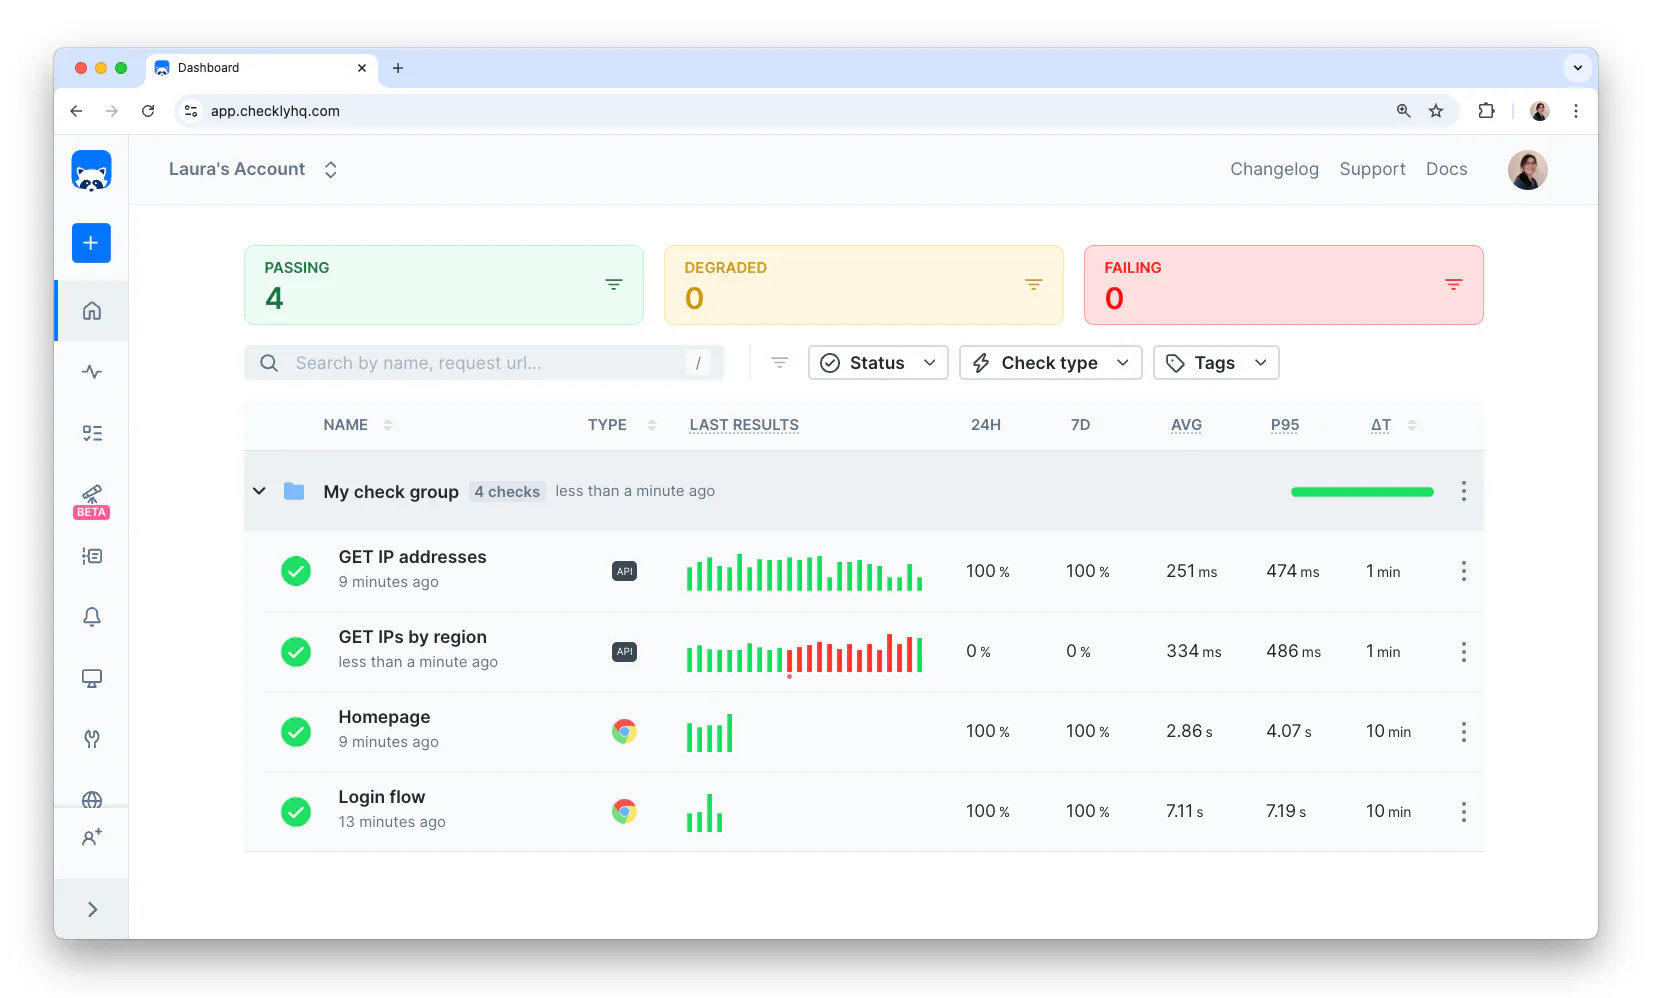
image.png

We can create a group with the construct API:

prod-monitoring-group.ts
import { CheckGroupV2 } from 'checkly/constructs'

export const prodMonitorGroup = new CheckGroupV2('prod-monitor-group', {
  name: 'Prod Monitor Group',
  activated: true,
  frequency: 5,
  maxResponseTime: 10000,
  locations: ['us-east-1', 'eu-west-1'],
  tags: ['url-monitoring', 'production'],
  environmentVariables: [],
  retryStrategy: {
    type: 'FIXED',
    baseBackoffSeconds: 60,
    maxRetries: 2,
    maxDurationSeconds: 600,
    sameRegion: false
  }
})

Now we can update the very first URL monitor we created to make it part of this group.

import { UrlAssertionBuilder, UrlMonitor } from 'checkly/constructs' 
//import the group
import { prodMonitorGroup } from './prod-monitoring-group.ts'

new UrlMonitor('url-monitor-example', { 
  name: 'Example URL Monitor',
  group: prodMonitorGroup, //add this check to the group
  //most config can now be handled at the group level
  request: {
    url: 'https://httpbin.org/get', 
    followRedirects: false, 
    skipSSL: false, 
    assertions: [ 
      UrlAssertionBuilder.statusCode().equals(200), 
    ]
  }
})

This single monitor’s file is now quite a bit more compact and clean, with more of the configuration handled at the group level.

Conclusion: Scale Your Monitoring Effortlessly with Checkly

Monitoring hundreds or even thousands of pages doesn’t have to be a tedious, manual process. With Checkly’s Monitoring as Code approach, you can dynamically create, update, and manage URL monitors at scale—whether from a local JSON file, a CSV, or even a sitemap. Remember that this approach works for more than just URL monitors, you can extend the automatic creation of monitors to API checks and even browser checks.

Key Takeaways:

  • Bulk Monitoring Made Simple: Define multiple URL monitors in a single file using arrays, loops, or external data sources like CSVs.
  • Centralized Configuration: Use Groups to standardize settings like frequency, retries, and alerting across multiple monitors.
  • Dynamic Updates: Modify your monitoring setup without losing historical data by leveraging unique logical IDs.

Next Steps

Ready to scale your monitoring? Sign up for Checkly today and deploy your first batch of monitors in minutes!

Further Reading:

Have questions? Join the Checkly Community Slack to chat with other developers and the Checkly team. Happy monitoring! 🚀