Why teams use Checkly
With Checkly, you can identify failures before your users do, resolve issues faster, and communicate more effectively with both users and team members. Here’s what makes Checkly different from other monitoring tools:- Proactive Monitoring - Checkly uses uptime and synthetic monitoring to actively measure and alert teams of downtimes and degraded performance in their web applications, APIs, or other services.
- Monitoring as Code Workflow - Your entire monitoring process - from checks, to error thresholds, to alert sequencing - can all be configured and scripted using the libraries and languages your engineers use today. Changes to your monitoring can be tracked and controlled with source control, just like your application code.
- Native Open Source Support - Checkly enables end-to-end and transaction monitoring by leveraging Playwright, OpenAPI, Terraform, or Pulumi to run automated monitors globally, in production.
The Checkly Tutorial: Build Faster With Monitoring as Code
For this tutorial, we’ll monitor the status of multiple pages, with the ability to simulate deep interaction with your pages through an automated browser. Throughout, we’ll follow Checkly’s Monitoring as Code approach, setting up everything through the CLI and your preferred IDE. The result will be a Checkly dashboard that offers a high level view or your services’ status, and deep insight into the causes of failures. Here’s a preview of our goal: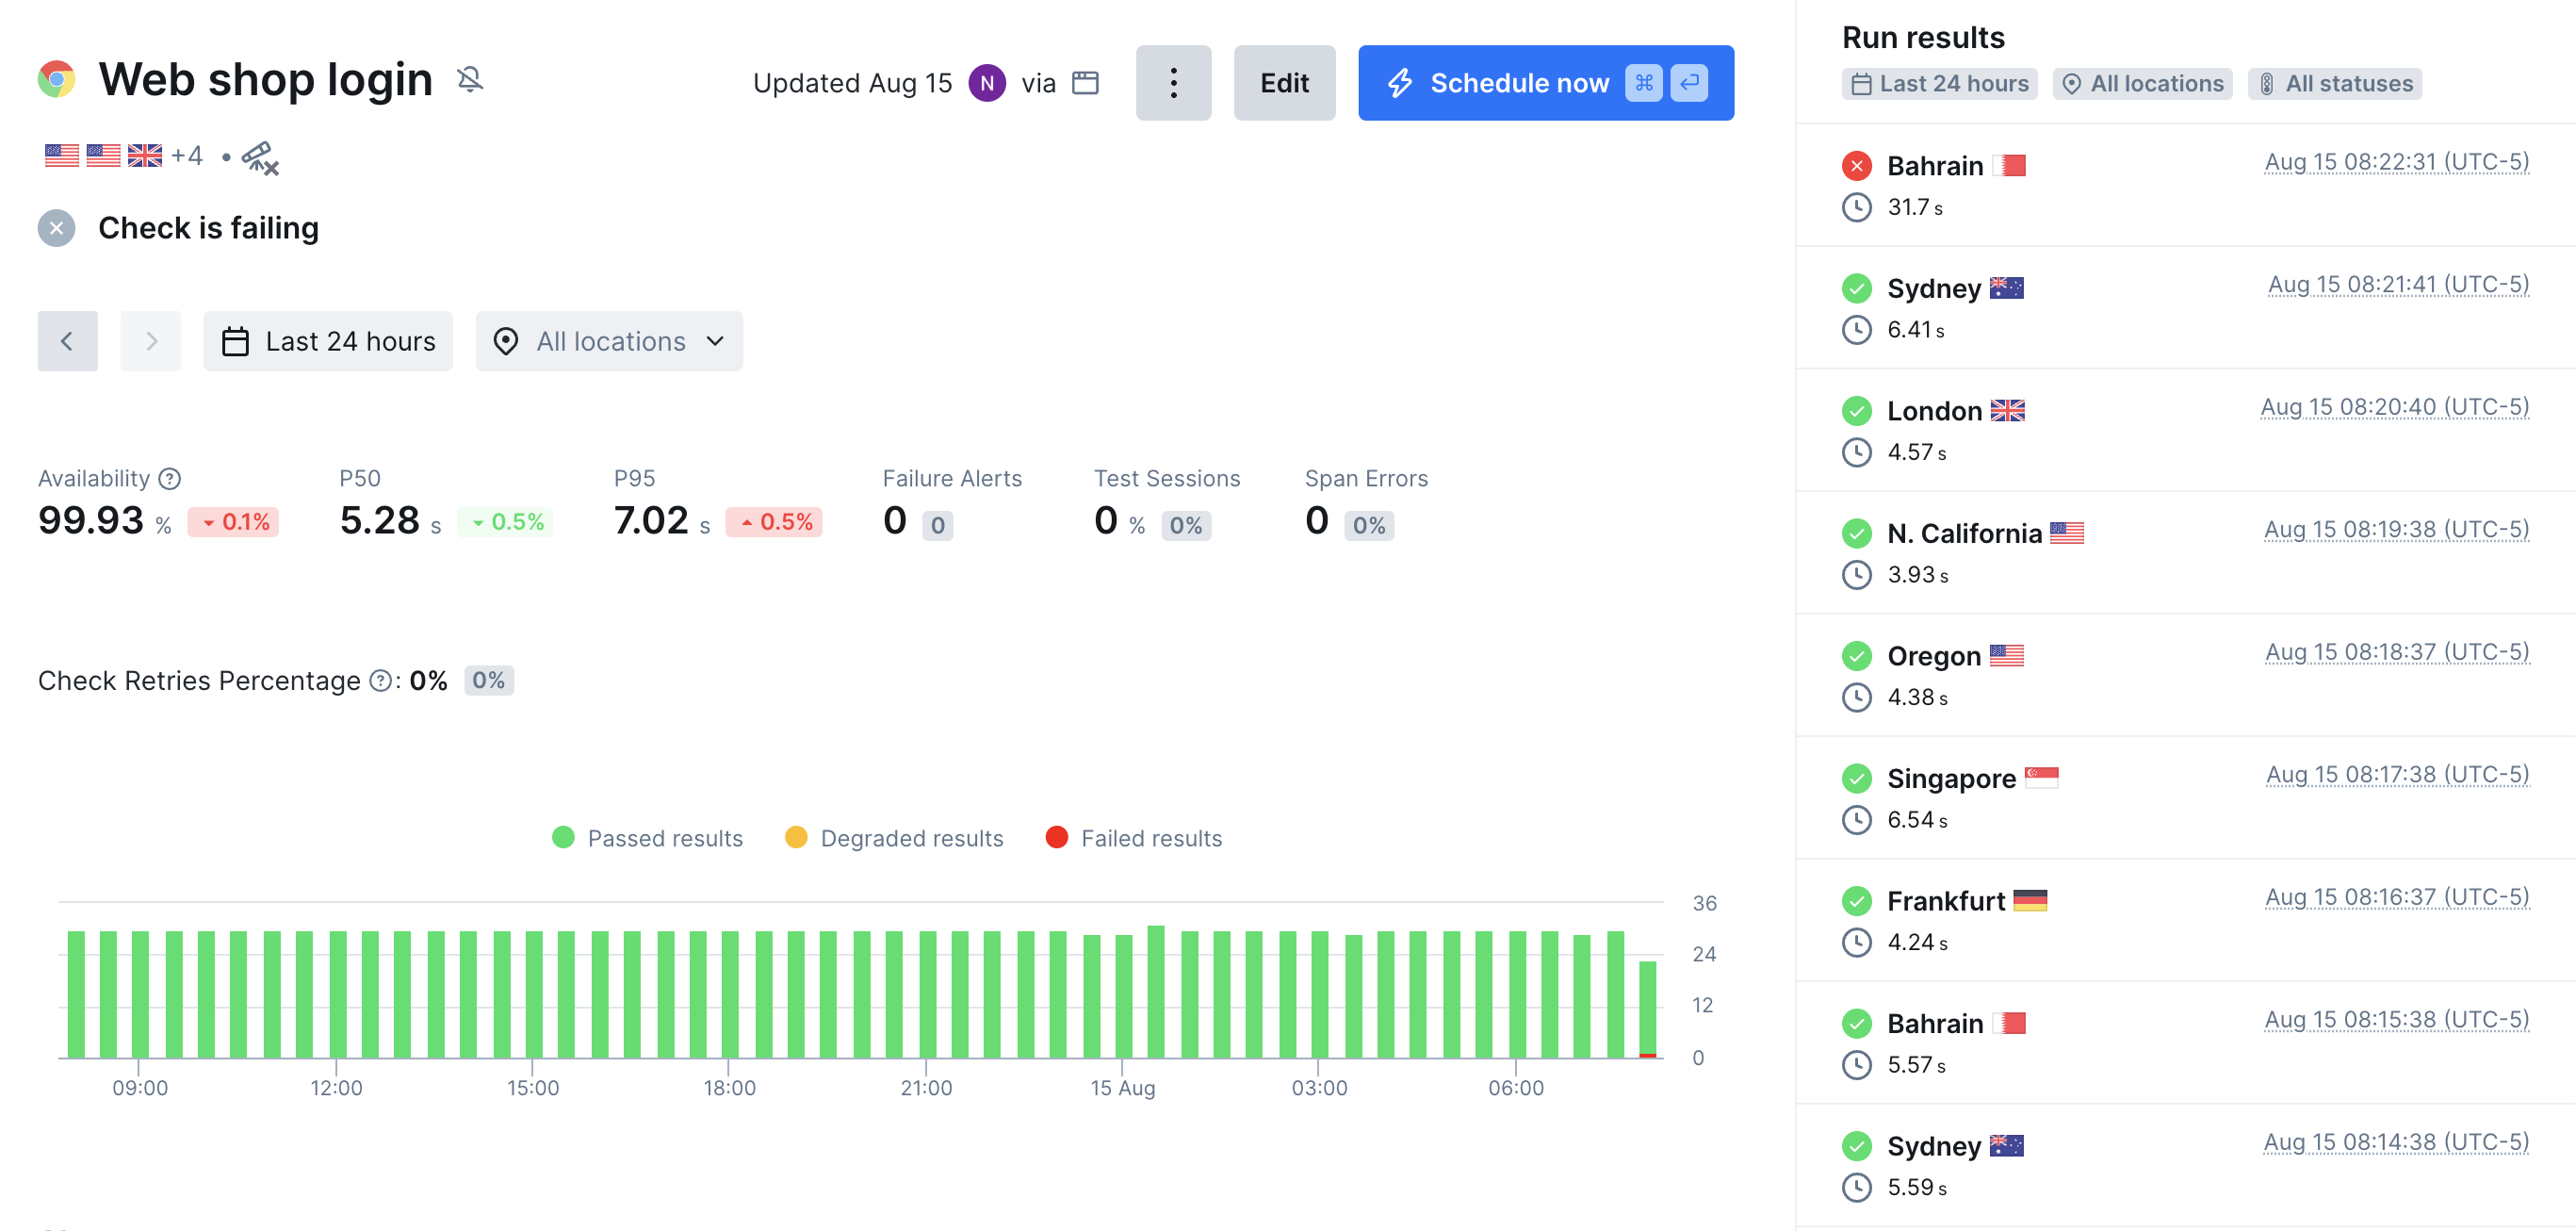
Step 1: Detect Problems
This section will guide you through:- Setting up the Checkly CLI and your monitoring repository
- Creating uptime monitors with URL checks
- Building synthetic monitoring with API monitoring and Playwright browser checks (no prior Playwright experience needed)
Set up the Checkly CLI and your project
Start by creating a new project with:Adding Uptime Monitoring for Every Endpoint
All monitors are created as.check.ts files implementing the Checkly CLI construct. Here’s an example URL Monitor:
url-monitor.check.ts in the __checks__/ directory. Import UrlMonitor and UrlAssertionBuilder from checkly/constructs, then instantiate a new monitor with a unique logical ID, name, and request configuration. The monitor will send GET requests to your specified URL and validate HTTP status codes with UrlAssertionBuilder.statusCode().equals(200) to ensure the endpoint returns successful responses.
URL monitors have limited assertion features, they’re primarily there to guarantee uptime with a broad reach. Uptime monitoring also includes low level checks like TCP monitors, and Heartbeat monitors which listen for pings from your automated tasks. For deeper synthetics monitoring of your endpoints, to test and monitor correctness of responses in depth, reach for synthetics checks like API checks. Thankfully, the constructs signature is very similar:
AssertionBuilder section of the constructs API. You can go even further with API checks: from running scripts before each check to evaluating JSON responses. These advanced options are covered in detail in our documentation site. With Checkly CLI constructs you can create and configure every type of monitor, and feed it any variation of configuration. Some extensions of API checks include:
- Using variables and secrets to configure checks at runtime. Environment variables can be scoped to your whole account, or specific to a group of checks.
- Execute arbitrary code (e.g. to fetch and assign session tokens), and clean up after yourself (e.g. to remove any new records created as part of the check), with setup and teardown scripts for API checks.
Create and Manage Multiple Monitors at Once
We can extend the principles here to create multiple monitors from a single file. In this example we provide an array of URLs to monitor and create as many URL monitors as we need.Notice that the check above isn’t configured with aWe can test this file (and the others added above) with themaxResponseTime,alertChannels, and several other settings. Without these settings the project defaults incheckly.config.tswill be used. We could also assign checks to a group to manage a subset of checks with one configuration. More detail on groups is covered in the Checkly documentation. There’s more detail on alert thresholds and how alerts are communicated in part 2, below.
npx checkly test command, which will scan the /__checks__ directory and run all of our checks through the Checkly monitoring network.
- Open
checkly.config.tsand edit theprojectNameandlogicalIdvalues in the config file. You’ll also want to look at the other defaults set here to make sure they make sense as global defaults for your Checkly project. - Run
npx checkly deploy -pto see a preview of what checks will be created, make sure this list is consistent with what you expect to change in your Checkly project. - Now you’re ready to run your
npx checkly deploycommand.
Create Synthetic Monitors with Playwright
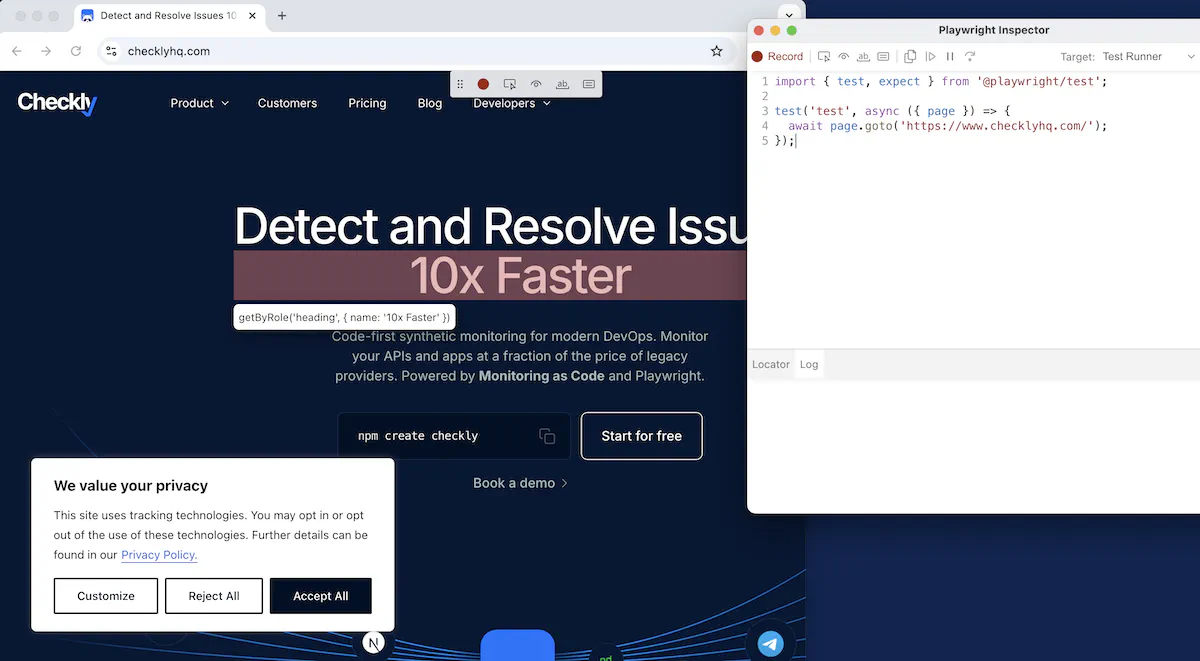
While uptime monitors will ensure that our services are responding and their responses contain valid-looking data, to really test every edge case and user path through our application, we want synthetic monitoring. With Playwright, we can simulate a user’s behavior in a browser, and get consistent, traceable results back from our checks. If you haven’t written any Playwright tests before, don’t worry. This tutorial will show you how to go from simple button clicking to simulating complex user behavior without having to learn a whole new framework. To create our first Playwright check, we’ll use the Playwrightcodegen tool to capture our behavior in a browser:
codegen generating the test script that will follow your path.
codegen captures your inputs and lets you add assertions, the process is fully documented on our documentation site.
Once you’re happy with the scripted test, copy the code into a .spec.ts file, and create a construct for your check as a .check.ts file, based on the CLI constructs; this time for browser checks. Here’s an example of a check for the demo site Danube Web Shop:
.check.ts file will look familiar by this point, as much of this configuration is shared by all check types. If you’ve not used Playwright tests before, all of homepage-browse.spec.ts will be new. Playwright’s codegen tool will generate best practices Playwright, using the preferred type of locators for each element you click.
Playwright Best Practices
You can see in the script one of the many advantages of the Playwright framework by noticing what’s missing: there are nowait() lines for the check to pause and wait for the site to load! Playwright’s auto-waiting makes it unnecessary to add manual waiting to have our script work. Instead, Playwright will continually attempt to click the item, and do so as soon as it’s available.
In this first check, we’ve made only straightforward assertions of visible page elements, but this script will run in a full environment when deployed to Checkly, so we can do any type of scripted assertion we like: compare the page contents to the result of an API request, or parse the page in detail to compare to configuration value, it’s all possible. Our documentation site goes very deep into Playwright fundamentals and advanced use cases.
Once our check looks right, it’s time to run
/__checks__ directory, but we can specify a file or part of a name to only run matching tests.
Part 2. Communicate Outages With Your Team
Now that issues have been detected with proactive monitoring, we need to plan how our team will find out about problems. Checkly lets you customize what notifications your team receives, the information in those notifications, and the thresholds where a monitor decides that a particular check is failing.Configure When Alerts Go Out
By setting up alert rules, you can define conditions—such as consecutive failures or specific error responses—that trigger alerts. You can also configure how to handle retries before generating an alert, and whether reminder messages go out for an ongoing alert. This is particularly useful for handling transient network issues or brief API hiccups. Well-tuned alerting policies allow your DevOps or SRE team to quickly identify and investigate issues before they escalate, without burdening the team with many false alarms. All of these settings are covered in thealertSettings portion of the construct for any monitor.
checkly.config.ts file.
Manage alert channels
Along with carefully controlling when alerts go out after detecting failure, it’s important to control alert channels. To ensure your team is promptly notified of outages, configure Checkly alerts to send notifications through channels like email, Slack, PagerDuty, or webhooks. In your Checkly CLI constructs, you can create alert channels like this example which creates an SMS alert channel:Part 3. Resolve Issues Faster with Checkly Dashboards
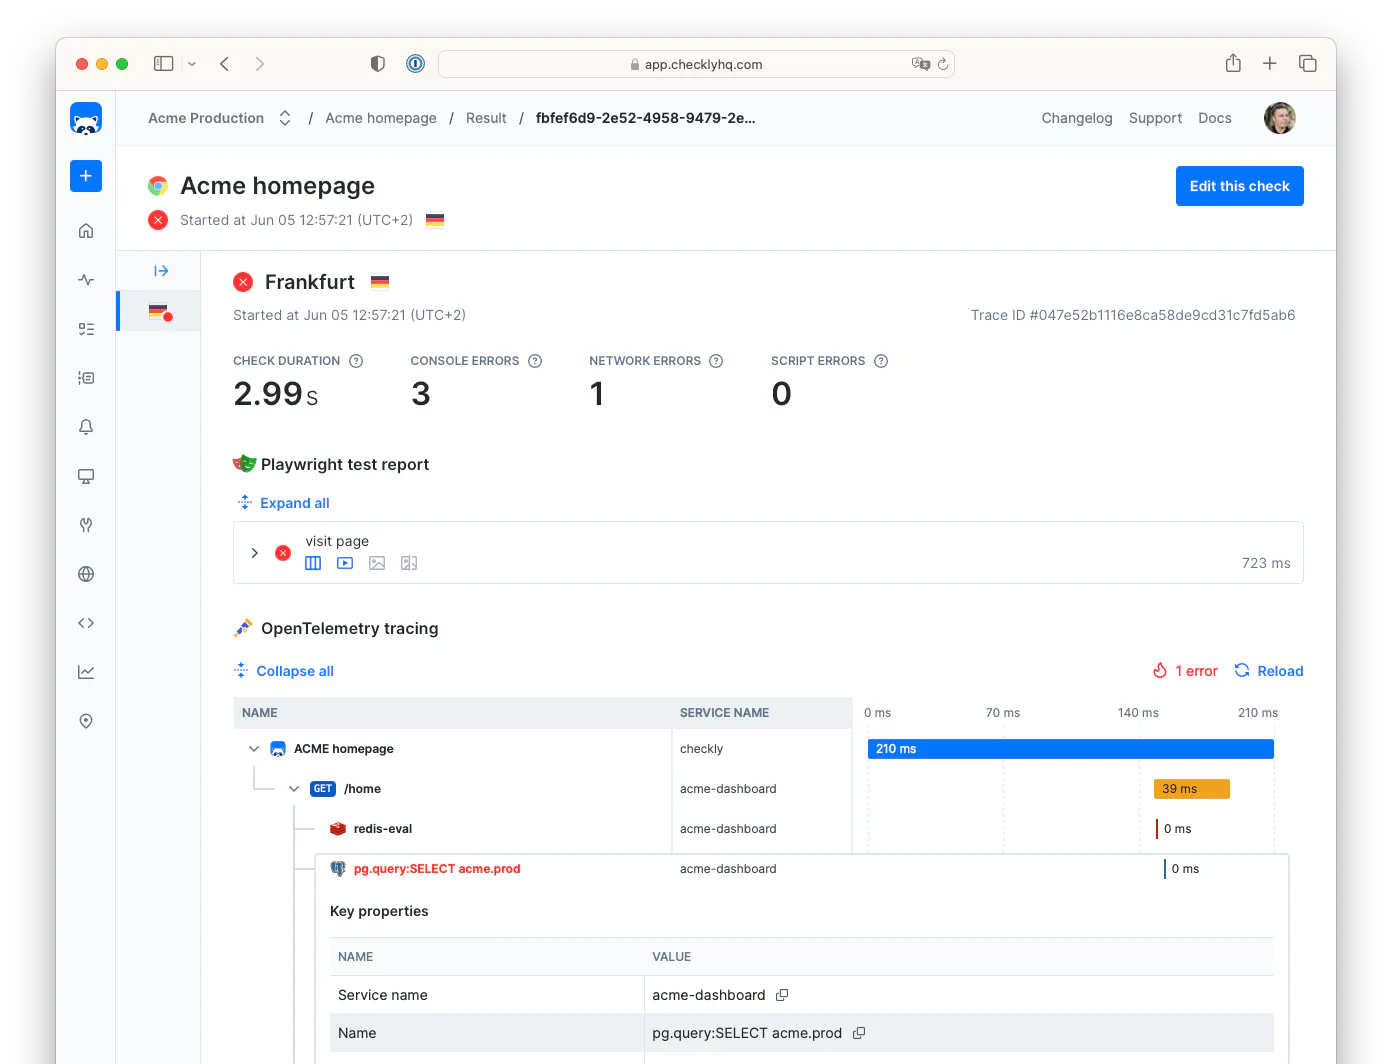
Now that the problem is detected and our team has been alerted, it’s time to repair the issue. This will take us away from Monitoring as Code and into the Checkly dashboard UI where we can get a high level view of monitor performance, then zoom in to individual failures and their causes.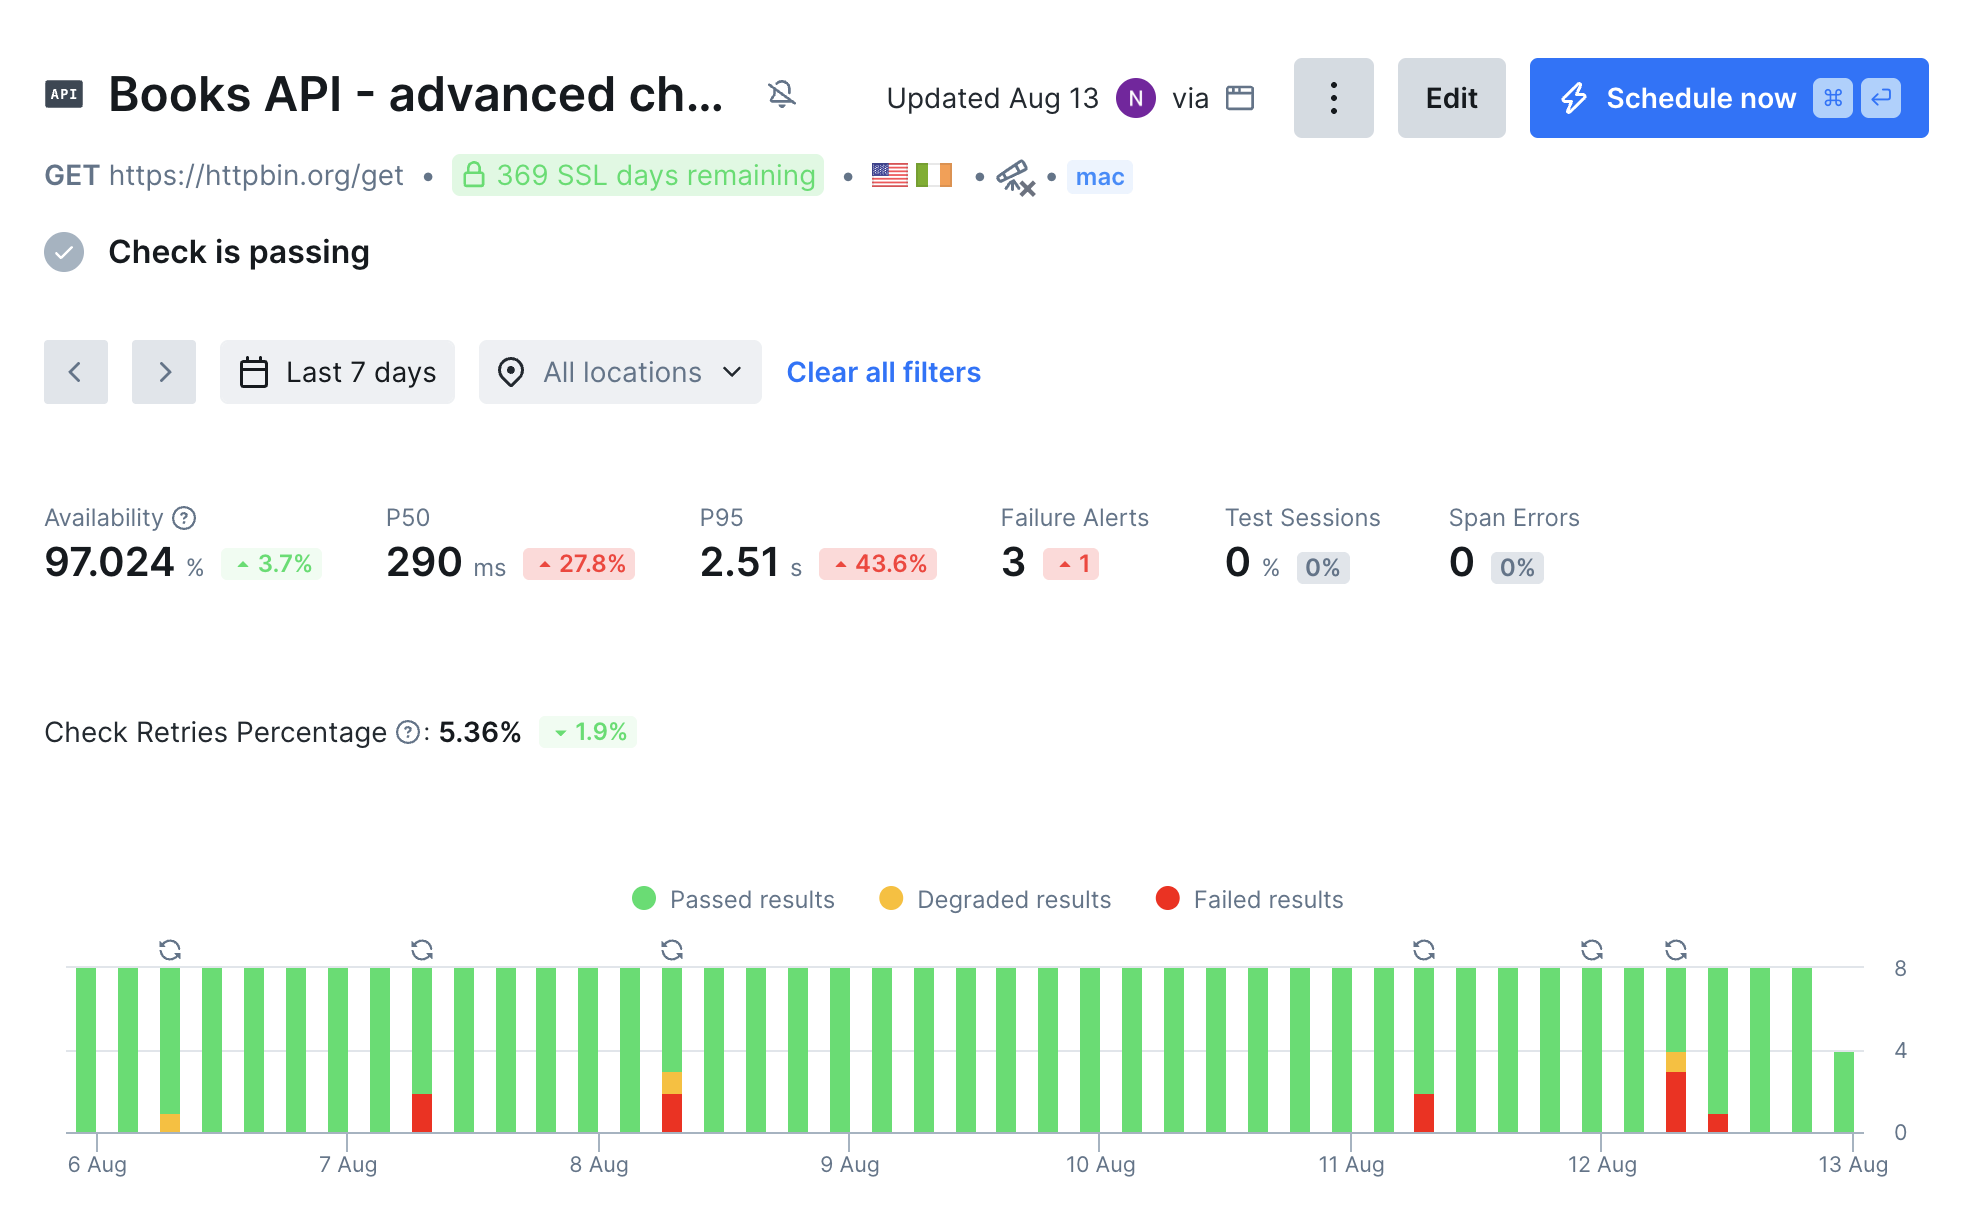
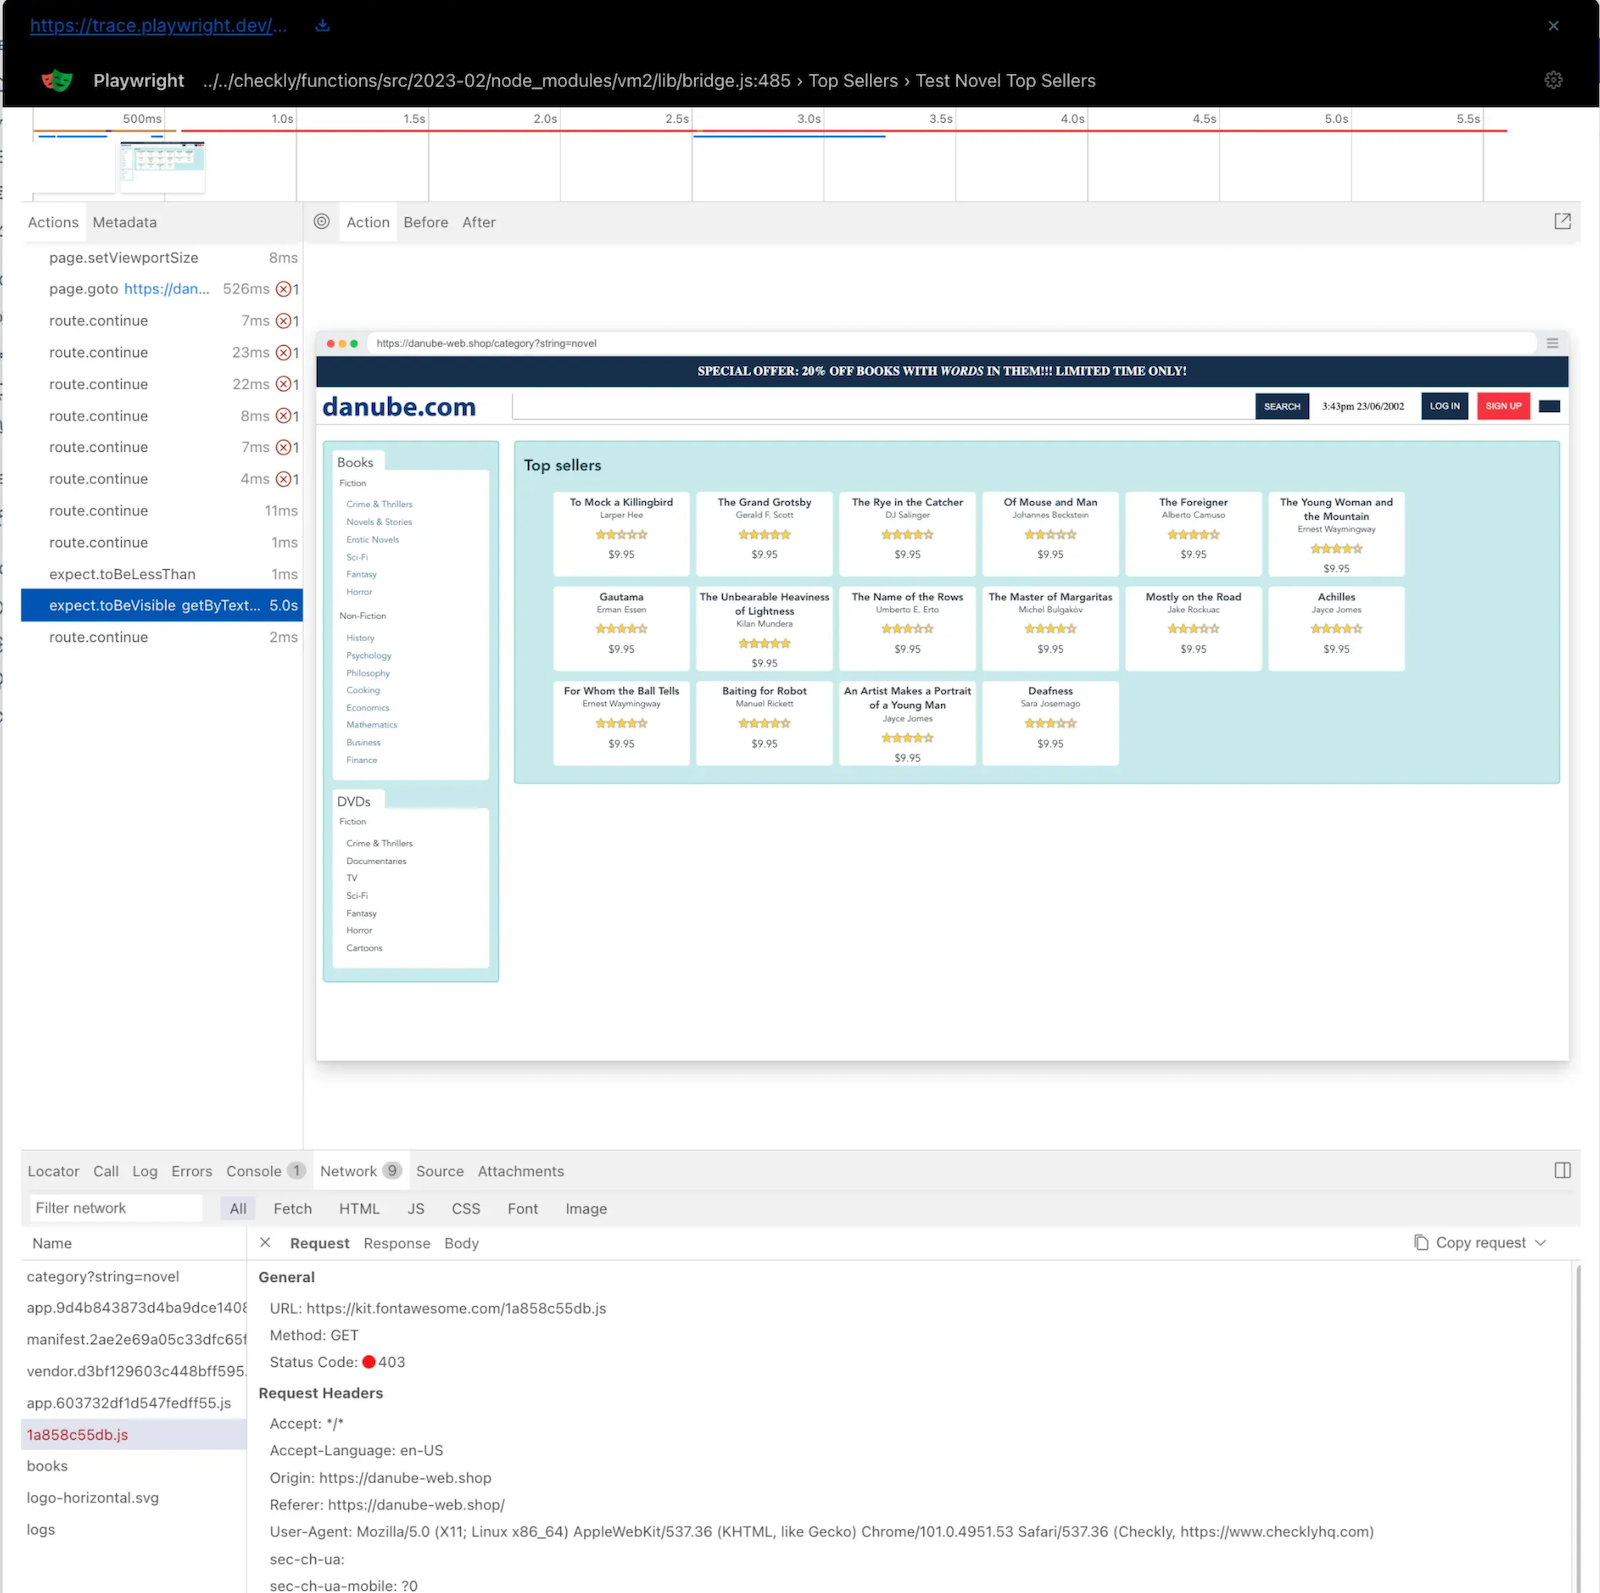
Conclusion: Detect, Communicate, Resolve
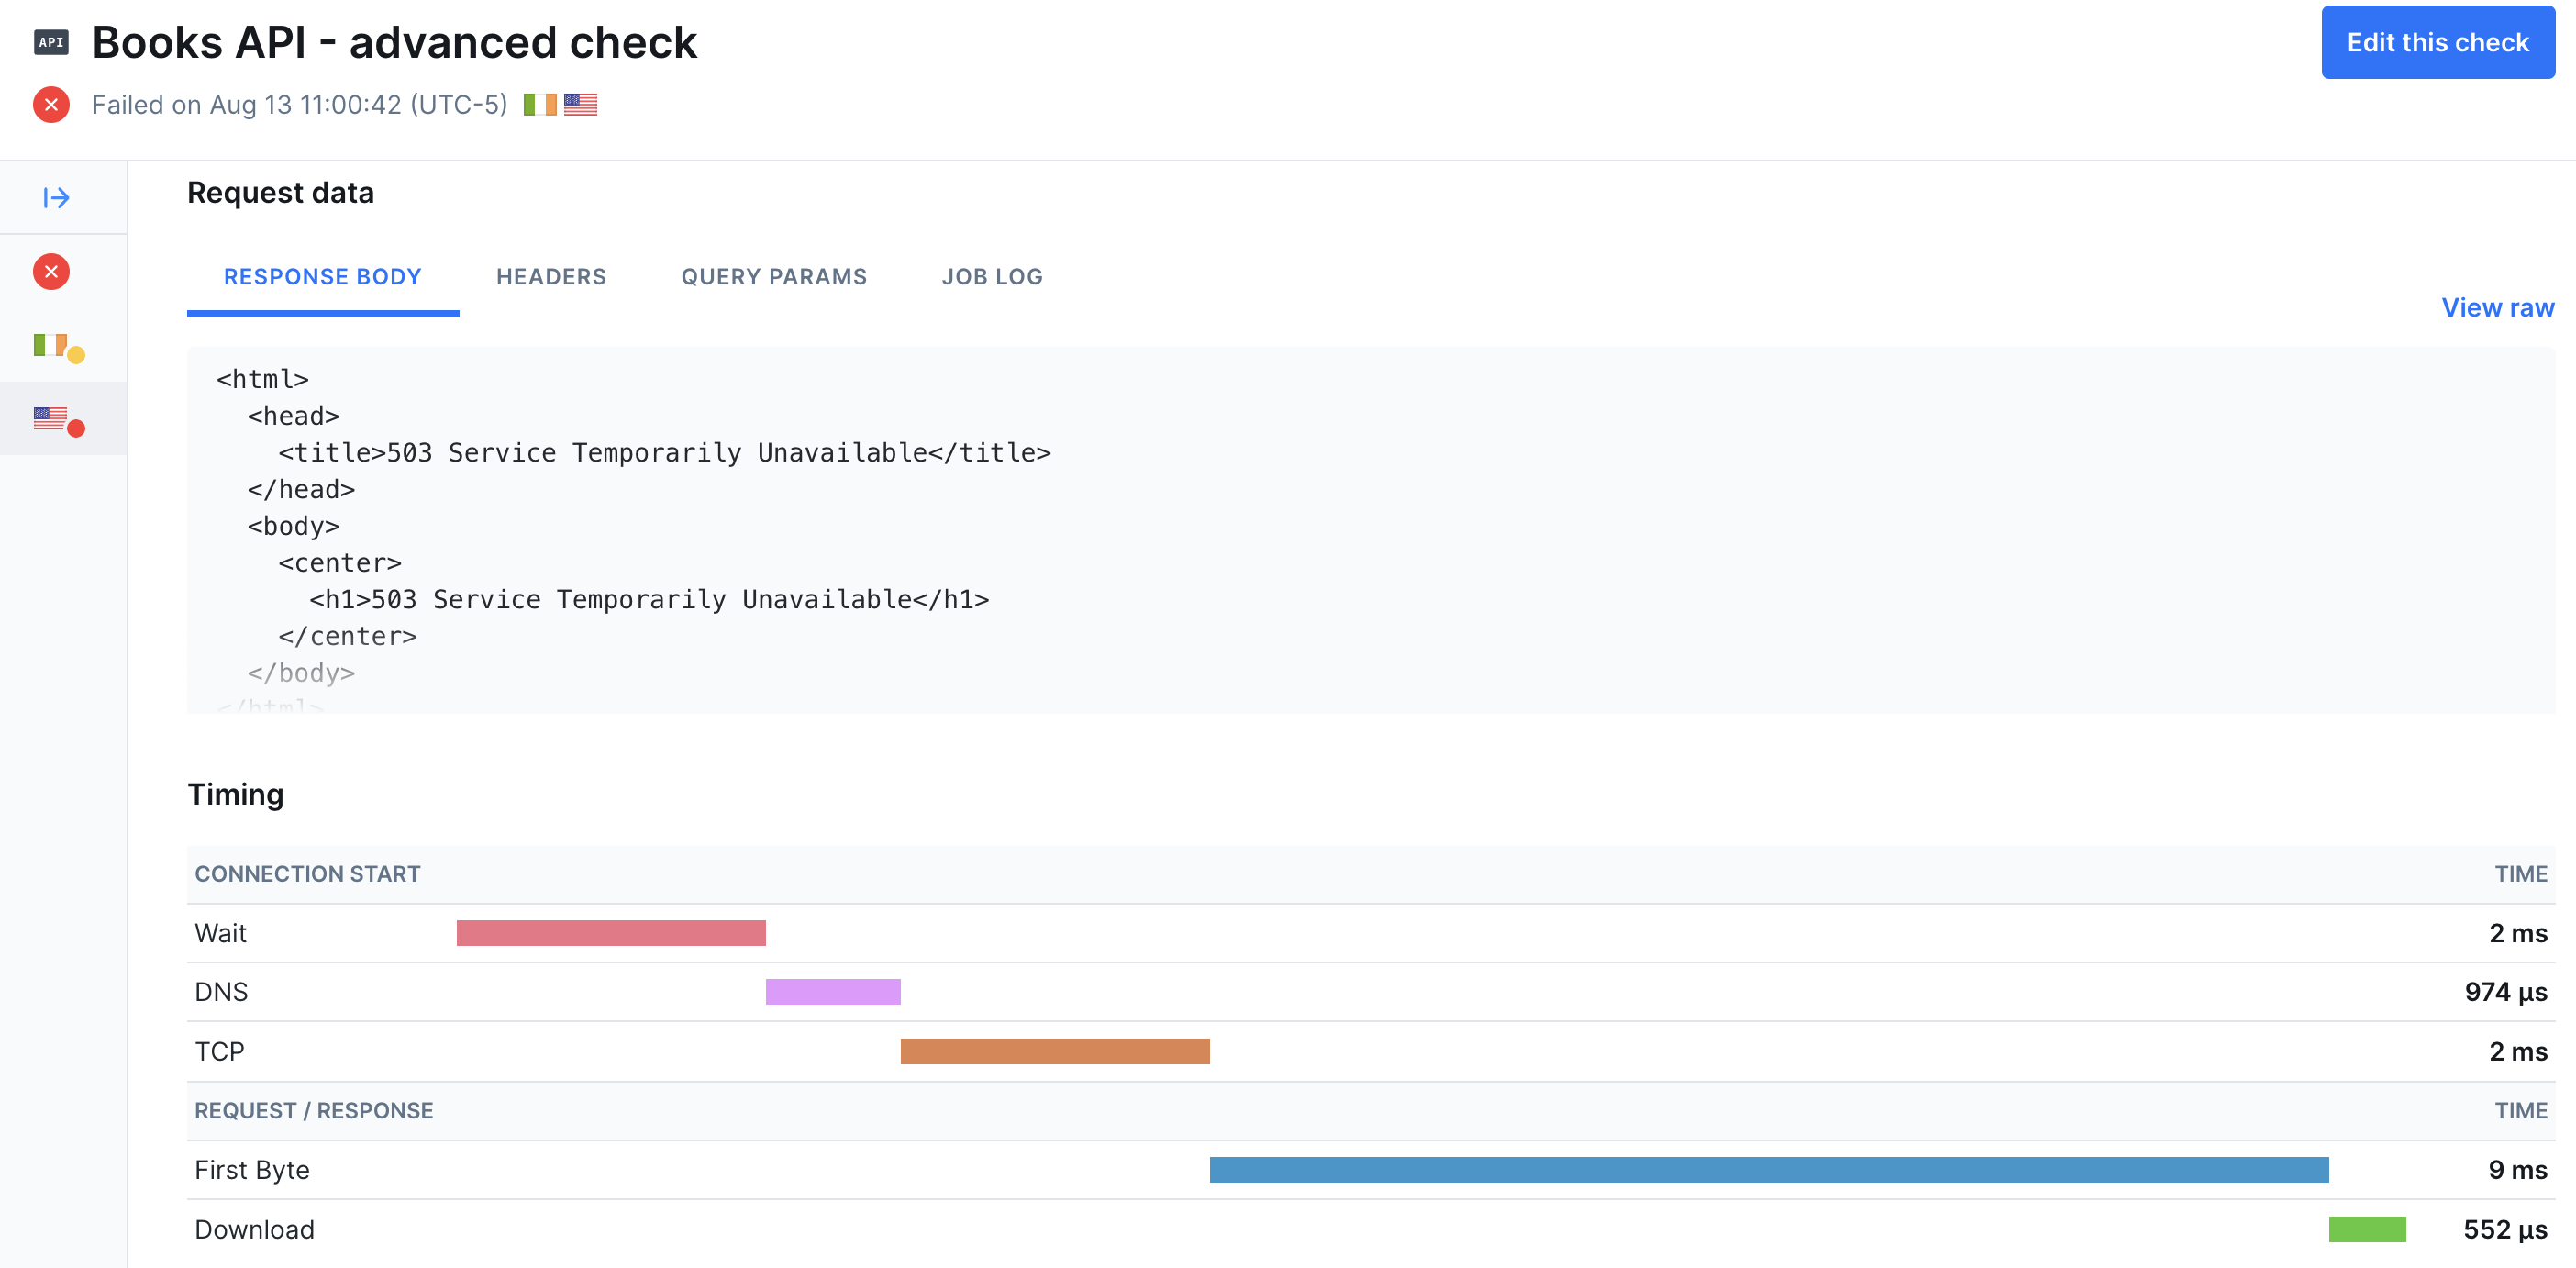
Technical failures are inevitable, but with Checkly, your team can minimize their impact by quickly detecting issues, communicating them effectively, and resolving them before users are affected. Detect Problems Before Users Do Checkly’s monitoring tools—from simple uptime checks to complex Playwright-based synthetic tests—ensure you catch issues early. By implementing Monitoring as Code, you maintain consistency, version control, and scalability across your monitoring setup. Communicate Clearly During Outages With customizable alerting policies and multiple notification channels (Slack, PagerDuty, SMS, and more), your team stays informed the moment an issue arises. Well-tuned alerting reduces noise while ensuring critical failures get immediate attention. Teams can use status pages to communicate directly with their users. Resolve Issues Faster with Deep Insights All checks offer high-level views of the status of your monitors, which can show patterns of performance over time. For API checks, you can see failed check’s full responses and the timing of the requests. Browser checks offer the most insight into failures with detailed Playwright traces, screenshots, and logging from the check execution.Further Reading
- Learn: Playwright - Go deep on the best web automation framework.
- Use Checkly With an AI IDE - For writing your monitoring faster and more consistently.
- Environment Variables - To configure checks at runtime.
- Use Setup Scripts for Better API Monitoring - Advanced techniques for keeping monitoring code DRY.
- Monitoring as Code with Terraform & Pulumi - The Checkly CLI isn’t the only way to do Monitoring as Code.