

Table of contents
Two weeks ago we released the public API for Checkly. This post is about what parts we needed to refactor, what parts we added and how we handled generating API documentation. More specifically, we'll dive into:
- Refactoring the existing Hapi.js based API
- API key based authentication
- Refactoring models with Objection.js
- Validating plan limits
- Generating Swagger & Slate based documentation
Refactoring the existing API
I developed Checkly initially as a Vue.js based Single Page App frontend with a Hapi.js API backend. After launch last year, more and more customers wanted to access Checkly's data using their own internal tooling using some API. The "build public API" ticket quickly rose to the top of the pile.
I decided to add a completely new set of API endpoints and not leverage the existing API. The existing API was built to be consumed by a web app. The new, public API has a different audience.
Web app API
- Uses an OAuth 2.0 based authentication, using Google / Github login or a username / password scheme. Also enforces user roles like admin, read only etc.
- Evolves as new features are exposed in the web app, making a strict V1, V2 etc. numbering cumbersome.
- Has many endpoints that are "convenience endpoints", mixing REST and RPC style patterns.
- Does not hard guarantee the schema of the response objects.
- Enforces plan limits.
Public API
- Authenticates using a long-lived API token or key.
- Provides a stable, predictable and versionable set of endpoints.
- Uses one paradigm as much as possible, in our case REST.
- Hard enforces the response objects and provide correct schema documentation.
- Enforces plan limits.
Both APIs will still use the same underlying models and data layers, but their routes and controllers will evolve separately.
API key based authentication
Every developer probably has API keys coming out of their ears. Mostly, these are long-lived, never expiring keys that should be handled with the same care as a password.
For Checkly, the spec for the API keys functionality was as follows:
- Create / destroy an API key. Functions also as a revocation mechanism in case s key is compromised.
- Track usage and show last used date. This helps users determine if a key is actually still in use somewhere.
- Store key encrypted in the database. Heroku Postgres actually takes care of that.
- Create a tab in the account settings to manage all of this.

Some providers (Github and AWS come to mind) allow you to grant specific rights to specific keys. We didn't really need that for now.
Our implementation uses the hapi-auth-bearer-token NPM module, see the slightly redacted code below.
// Register an authentication strategy in the Hapi server
server.auth.strategy('publicAPI', 'bearer-access-token', {
  accessTokenName: 'access_token',
  validateFunc: validatePublicApiAccess
})

// The actual validation logic
function validatePublicApiAccess (apiKey, cb) {
  this.server.apiKeyCache // Does the key exist?
    .get(apiKey)
    .then(res => {
      if (!res) {
        return cb(null, false, { apiKey }, {}) // Nope, deny access
      } else {
        this.server.apiKeyCache
          .bumpUsageDate(res.accountId) // Yes, bump the usage date
          .then(() => {
            const { accountId } = res   // and return the accountId
            return cb(null, true, { accountId }, {})
          })
      }
    }, () => {
      return cb(null, false, { apiKey }, {})
    })
}
The gist is as follows:
- Grab the key from the
Authorizationheader, the plugin does this. - See if it exists in our dedicated
apiKeycache. If not, deny access. If yes, bump the usage date and return the accompanying account ID.
You get it. Onwards.
Refactoring models
Because we started out with just one API, there was some logic in the controller code that probably/actually/really should have been part of the model code. Not reusing those models in other controllers never exposed this software architecture faux pas until we added the new public API.
The best example of this is our Check model. We do a bunch of things when saving and retrieving a check, for example:
- Calculate a frequency offset. This prevents thundering herd problems, e.g. all checks running at the 5 minute interval don't run at the exact same time.
- Encrypt some fields.
- Some more stuff I won't bore you with.
We just had this code inlined in the controller, just before saving the actual check object. This was ripe for refactoring.
Using model lifecycle hooks
We use the psuedo ORM Objection.js for almost all data access. Sometimes we dip into straight SQL, but all entities of the broader Checkly data model have a corresponding Objection.js model.
For refactoring, we used the $beforeInsert and $beforeUpdate hooks provided by the Model class and basically copy & pasted in the previously inlined code. This now looks as follows.
const Model = require('objection').Model

class Check extends Model {
  static get tableName () {
    return 'checks'
  }

  async $beforeInsert (context) {
    let check = this
    await super.$beforeInsert(context)

    check.frequencyOffset = Check._calculateFrequencyOffset(check.frequency)
    check = Check._encryptCheckProperties(check)
  }

  async $beforeUpdate (opt, context) {
    let check = this
    await super.$beforeUpdate(opt, context)

    check.frequencyOffset = Check._calculateFrequencyOffset(check.frequency)
    check = Check._encryptCheckProperties(check)
  }
}
The code speaks for itself and works similar to Ruby on Rails' Active Record callbacks. Before saving and updating, two methods are called — _calculateFrequencyOffset() and _encryptCheckProperties() — to populate a field directly and to encrypt the Check object respectively.
Nothing too special, but it cleaned up the data model and the access patterns quite nicely. All in all, I refactored about four models and avoided a lot of duplicated code.
Also, the controller code got a lot thinner and the separation of concerns got better. The router code routes, the controller handles all glue between HTTP and database interactions and the model handles the domain logic for the entity in question. Just look at how clean the create method on the controller now is...
class ChecksController {
  create (request, reply) {
    // there used be all kinds of other code here...
    Check
      .query()
      .insertGraph(request.payload)
      .where({ accountId: request.currentUser.accountId })
      .then(res => { return reply(res) })
      .catch(err => reply.badImplementation(err))
  }
}
Validating plan limits
We already did a quite some blog posts on how we deal with plan limits and most of that code was instantly reusable in this public API context: we still need to check if users stay within their plan limits and if they are allowed to access specific features.
All of this logic is handled at the routing level using pre-routing handlers and plugins specific to the Hapi.js ecosystem. A typical route definition looks as follows, with some minor details left out.
  {
    method: 'POST',
    path: '/v1/checks',
    config: {
      tags: ['api'],
      auth: 'publicAPI',
      handler: PublicChecksController.create,
      pre: [
        { method: fraudBuster.checkFraudulentContent }
      ],
      plugins: {
        policies: [
          isWithinPlanLimits('CHECKS')
        ]
      }
    }
  }
- Note the
fraudBusterobject with thecheckFraudulentContentmethod being called on theprehook. This calls some super secret code that prevents users submitting coin mining scripts and other silly stuff. - Note the
policiesarray with theisWithinPlanLimits()function. It validates if a user is within a specific "policy". More on how that works in a previous post.
Generating Swagger & Slate based documentation
OK, so generating docs was WAY harder than I imagined and took a lot of trial & error. I'll show you the end result first 👇
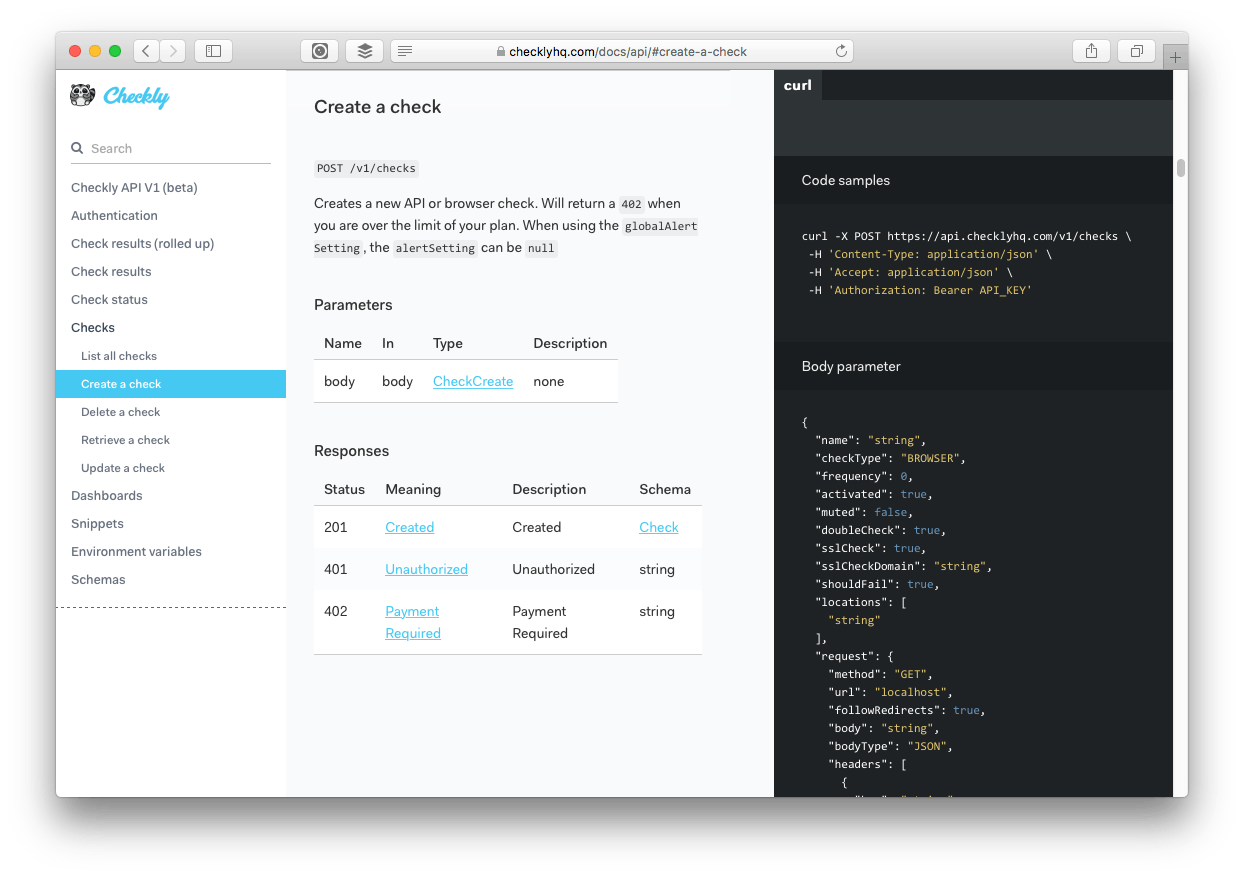
Pretty sweet for a V1. This page is the end result of quite a lot of code annotations and open source modules in the Hapi and general Node.js space.
In short, we generate an as detailed as possible Swagger specification. We then convert that to Markdown using Widdershins and then render it to a Node.js clone of the Slate documentation using Shins (also a great band). Shins in the end provides the HTML, JS and CSS you actually publish as your API docs.
Joi schemas
Request and response validation in the Hapi ecosystem is generally done with the Joi package. Using Joi based schemas, the Hapi Swagger plugin can generate a fully fledged Swagger definition. Also, you can add meta data like names, labels, notes and descriptions to your Joi schemas.
Here's the POST /v1/checks route again we saw earlier, but now fully equipped with the necessary properties, objects and schemas that are used to generate the documentation.
  {
    method: 'POST',
    path: '/v1/checks',
    config: {
      tags: ['api', 'Checks'],
      description: 'Create a check',
      notes: 'Creates a new API or browser check. Will return a `402` when you are over the limit of your plan.',
      auth: 'publicAPI',
      handler: PublicChecksController.create,
      validate: {
        payload: createCheckSchema
      },
      pre: [
        { method: fraudBuster.checkFraudulentContent }
      ],
      plugins: {
        policies: [
          isWithinPlanLimits(f.CHECKS)
        ]
      },
      response: {
        options: {},
        modify: true,
        status: {
          201: checkResponseSchema,
          402: Joi.only(null),
          401: Joi.only(null)
        }
      }
    }
  },
- The
tags,descriptionandnotesproperties are used to provide headers and help info. - The request payload is validate by the
createCheckSchema, more on that below. - The response object details the possible responses for this endpoint and their respective schema of which the
checkResponseSchemais the most interesting
Both the create and response schemas are annotated with applicable validation rules and extra meta information to give users more context on what each field means or does. Here is an abbreviated example
const createCheckSchema = {
  name: Joi.string().max(64).min(2).description('The name of the check'),
  frequency: Joi.number().description('how often the check should run in minutes')
}.label('CheckCreate')
The end result is that we have nice and correct examples of all input & output for the public API in our API reference docs.
From Swagger to Slate (Shins really...)
After a ton of tagging, labeling and coming up with descriptions, the hard part was done.
The Hapi Swagger plugin takes care of generating a swagger.json file which you can feed into the Widdershins -> Shins tool chain. What comes out is usable and technically correct. It just wasn't very friendly and had a lot of auto generated names, repeated warnings about the API endpoint needing validation, weird sorting decisions and a lot other things take make you go "mwoah...meh...ok".
This is not meant as a swipe at the authors of these packages. Just a reminder that their defaults might not work for you. Here is a list of the tweaks I did to end up with the final result.
- Remove the "this route needs authentication" warning in the Widdershins template.
- Tweak the required parameters tables in the templates to leave out unnecessary items.
- Experiment a lot with the Swagger plugin to get the right amount of referenced schemas and inlined schemas. For instance, the response schema were referenced but I wanted them visible inline.
- Override the theme CSS to match the design of the rest of the documentation.
Finally, I created a Gulp task that automates the whole rendering pipeline and moves the resulting docs into a directory of the main Checkly site, ready for pushing live as the Checkly public API reference.
banner image: The Fuji reflects in lake Kawaguchi, Hokusai, ca. 1830. source