

With an ever-growing market of digital products, it is becoming increasingly important for every business to ensure a high level of customer satisfaction. In the past, companies might have been able to get away with slow or messy websites. Today, if a customer gets frustrated even once, they will likely abandon your product in search of a better replacement.
A high quality standard is a source of business success now more than ever, and ensuring the availability and performance of APIs and critical user flows is a key part of quality in digital products.
Synthetic monitoring plays a vital role in this scenario by simulating user interactions and monitoring API workflows. Multistep Checks, a cornerstone of advanced synthetic monitoring, enable businesses to monitor complex user transactions and identify performance bottlenecks.
In this blog post, I look at how to implement Multistep Checks using Checkly to strengthen your synthetic monitoring strategy and ensure your API is available and performant.
What are Multistep Checks
Multistep Checks involve executing a series of API calls that mimic end-user transactions or workflows. Unlike simple uptime monitors or single API calls, a Multistep Check navigates through a sequence of steps, such as logging in, adding items to a cart, and checking out, providing a comprehensive overview of the API's performance and functionality.
Similar to our Browser checks and unlike traditional implementation using form builders, Checkly’s Multistep Checks are fully programmable. They allow you to test API calls in sequence, manipulate any data returned from a call before using it in the next request, and simulate actual user interactions in detail.
Benefits of Multistep checks:
- Realistic Monitoring: A Multistep Check accurately represents a user’s entire journey through your product or mimics a realistic interaction with your API. This provides you with more insights into potential bottlenecks and performance problems.
- End-to-End Visibility: A Multistep Check result provides detailed test data on each step executed, highlighting potential interaction problems between API calls and allowing you to see the whole picture when troubleshooting a failed check.
- Eased Maintenance: Even if you want to monitor a single endpoint instead of an entire user flow, you can do a POST, GET, PUT, DELETE sequence in a single Multistep Check, lowering the overhead of maintaining several checks for that endpoint. It also simplifies creating and removing test data, as it can all be done within the same check.
Implementing Multistep Checks With Checkly
Like Checkly’s Browser Checks, a Multistep Check is a fully programmable Playwright test script at its core. It uses Playwright's API testing framework to mimic real user journeys and actions. The flexible nature of the check allows you to change, delete, or add new data between requests, simulating any user action.
To create your first Multistep Check in the Checkly web app, click the + icon in the left sidebar and choose ‘Multistep Check.’

You can code multistep checks in the Web App or your own environment with monitoring as code:
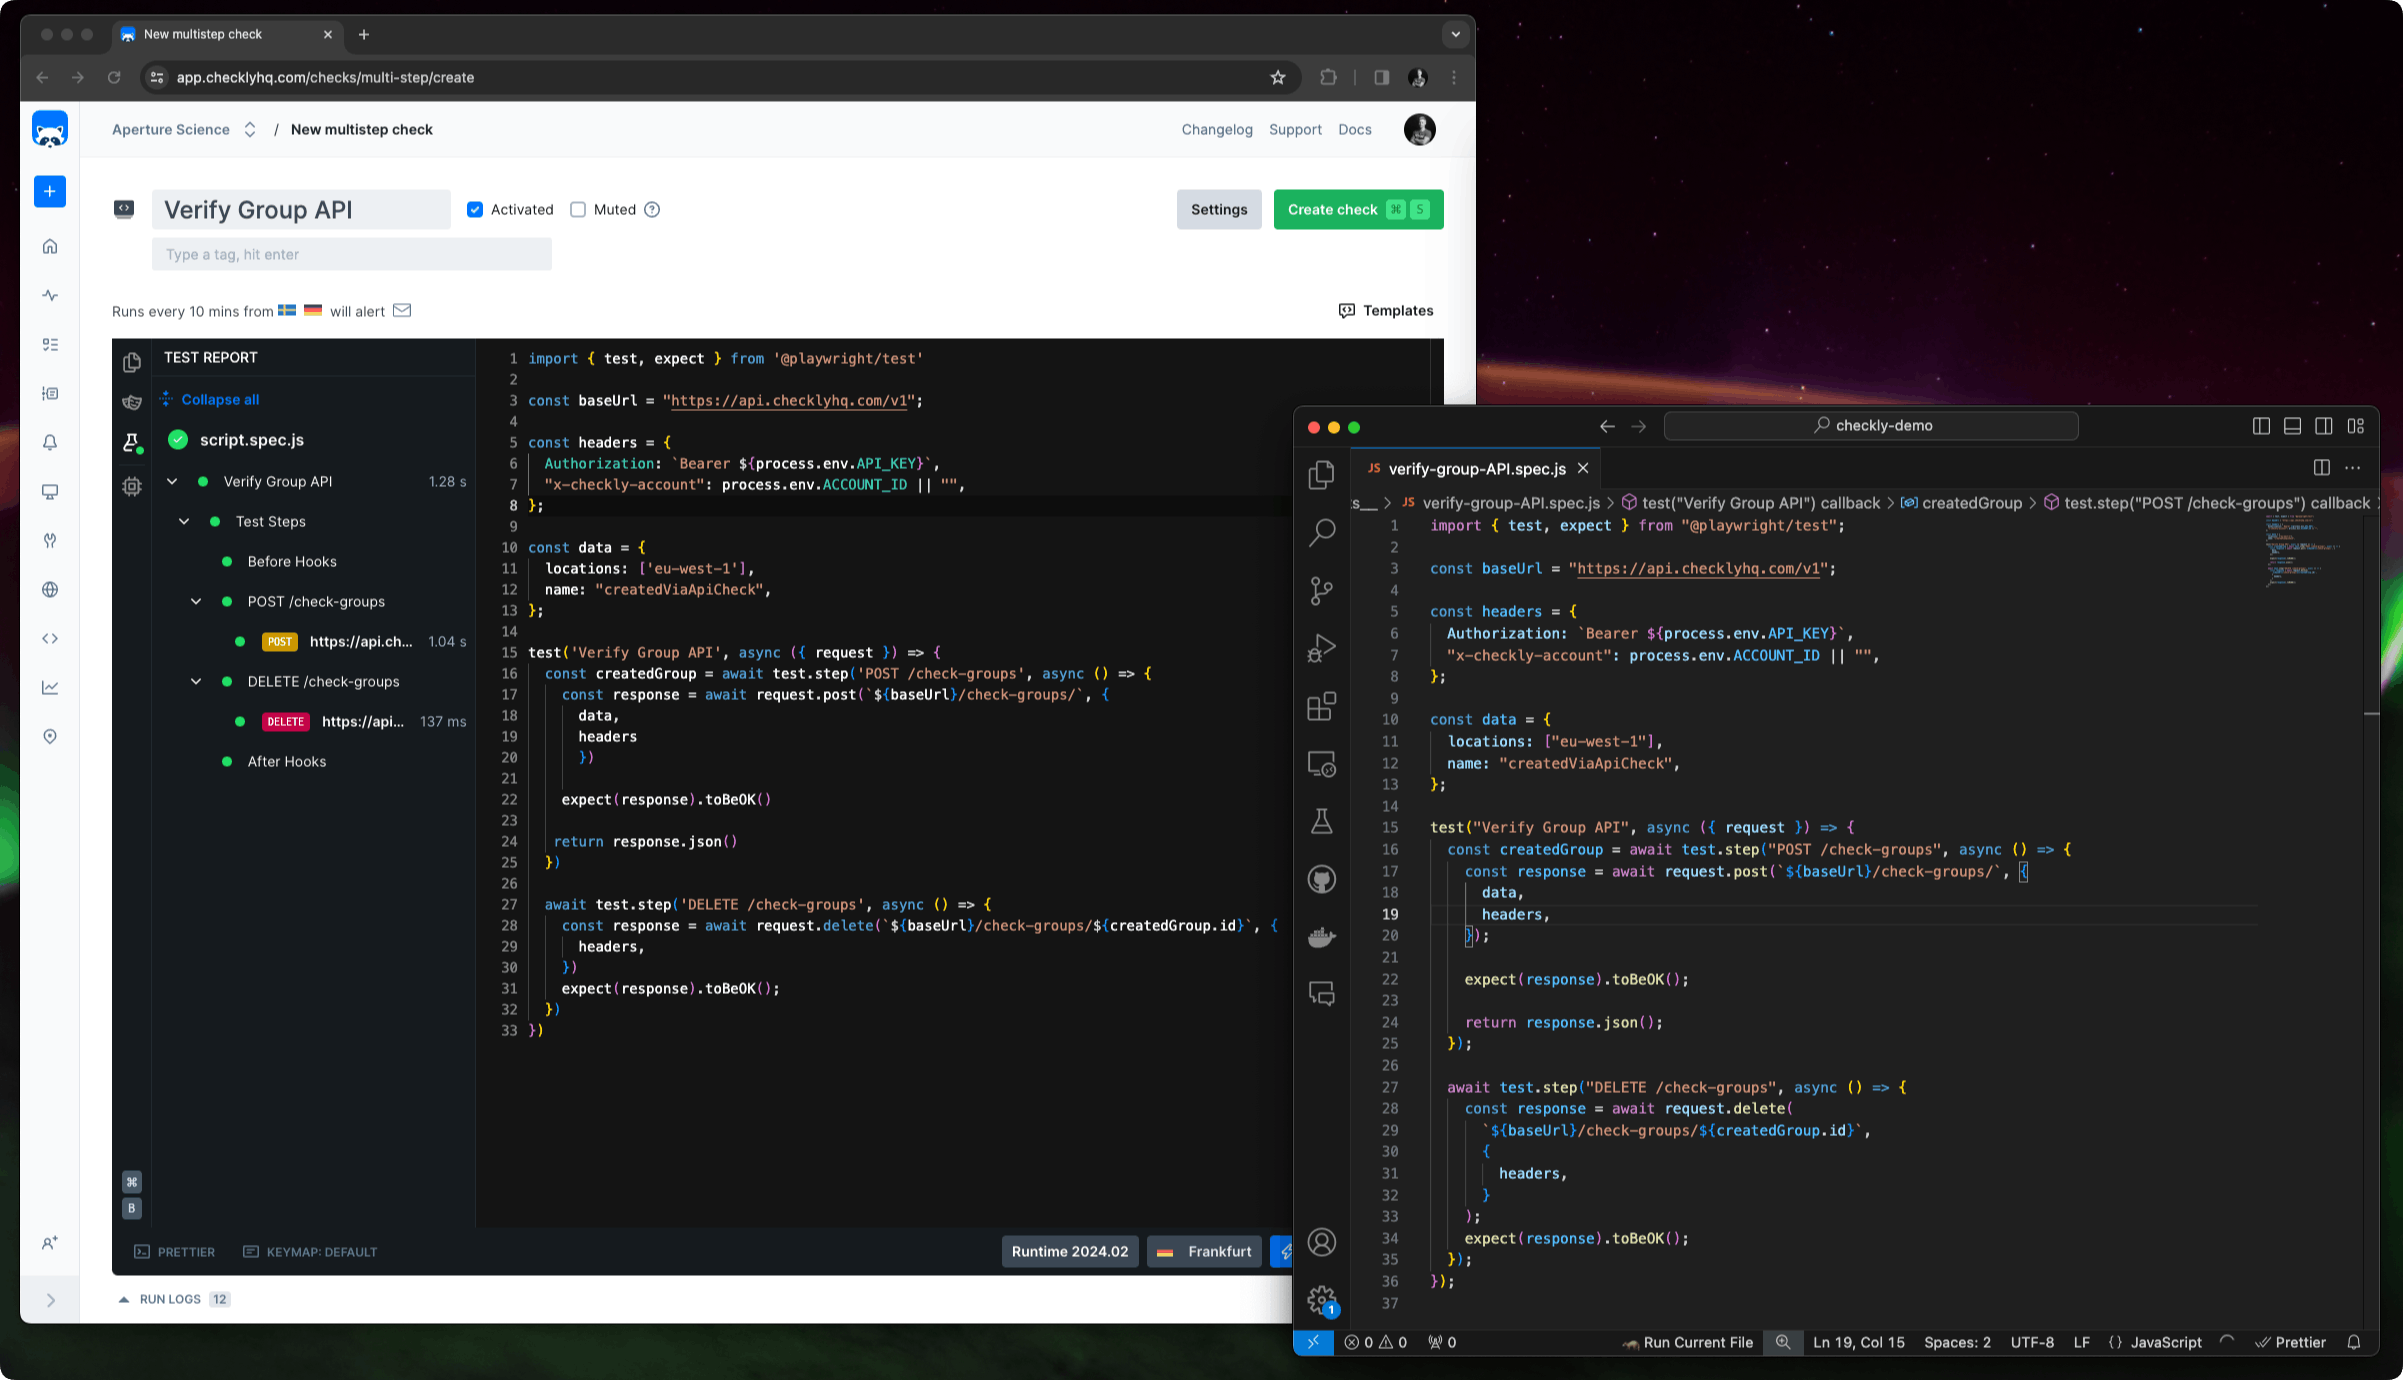
Multistep Checks rely on Playwright’s test.step method to provide clear and actionable information. When writing a Multistep Check, I recommend having a test step with a descriptive label for each required request and any assertions related to the request inside the same test step. Here is a simple example using Checkly’s API to create a group and then remove it in the same test:
import { test, expect } from '@playwright/test'

const baseUrl = "https://api.checklyhq.com/v1";

const headers = {
  Authorization: `Bearer ${process.env.API_KEY}`,
  'x-checkly-account': process.env.ACCOUNT_ID
};

const data = {
  locations: ['eu-west-1'],
  name: "createdViaApiCheck",
};

test('Verify Group API', async ({ request }) => {
  const createdGroup = await test.step('POST /check-groups', async () => {
    const response = await request.post(`${baseUrl}/check-groups/`, {
      data,
      headers
      })

    expect(response).toBeOK()

   return response.json()
  })

  await test.step('DELETE /check-groups', async () => {
    const response = await request.delete(`${baseUrl}/check-groups/${createdGroup.id}`, {
      headers,
    })
    expect(response).toBeOK();
  })
})
Let’s break down this check in detail to understand what is going on.
After importing and defining the base URL, I define our headers the API uses. In this example I use environment variables stored in Checkly to avoid exposing sensitive information in plain text. I also set up the data our POST request will need
The test block is the main block in a Playwright test script. This test contains two steps. The first executes a POST request to create a group and that has an expect that fails if the response doesn’t contain a status code in the range 200 - 299. The POST request test step returns the response data, allowing us to use it in the next step.
The second test.step is a DELETE request. This step uses data from createGroup to get the id of the group to remove. This serves as both a way to check that the DELETE method works as intended, but also cleans up any test data the first request created. Lastly, I use the same assertion as in the first step to check if this request was executed successfully.
If any of the asserts fail the check will be considered failing and will trigger any alerts that the check have been configured to use.
It’s easy to quickly test this check directly in the Checkly editor by pressing ‘Run script’. The check will then be executed and any errors can be viewed from the in-editor check report:

This check can easily be extended to also monitor the GET and PUT methods on the same endpoint by simply adding two new test steps inside our test, between the two steps initially created:
await test.step('GET /check-groups', async () => {
    const response = await request.get(`${baseUrl}/check-groups/${createGroup.id}`, {
    headers
    })

    expect(response).toBeOK()
    const receivedGroup = await response.json()
    expect(receivedGroup.id).toEqual(createGroup.id)
  })
and
  await test.step('PUT /check-groups', async () => {
    const response = await request.put(`${baseUrl}/check-groups/${createGroup.id}`, {
      data: {
        tags: ['added-by-check'],
      },
      headers,
    })

    expect(response).toBeOK()
    const responseBody = await response.json();
    expect(responseBody.tags).toContain('added-by-check');
  })
With this added, the script will monitor all four methods on the /check-groups endpoint in a single check, making it easy to maintain whenever the API changes.
Using the CLI
Of course, Multistep Checks support Checkly’s monitoring-as-code workflow. This allows you to maintain your synthetic monitoring setup from your preferred IDE and use our CLI to automatically update your monitors as part of your CI/CD process.
To create your first check using our CLI, here’s how to get started. The Multistep Check construct is similar to the one for Browser Checks:
import { MultiStepCheck, Frequency } from 'checkly/constructs'
import * as path from 'path'

new MultiStepCheck('check-groups', {
  name: 'Check groups API',
  runtimeId: '2023.09',
  frequency: Frequency.EVERY_10M,
  locations: ['us-east-1', 'eu-west-1'],
  code: {
    entrypoint: path.join(__dirname, 'check-groups.spec.ts')
  },
})
The degraded check state and using soft assertions
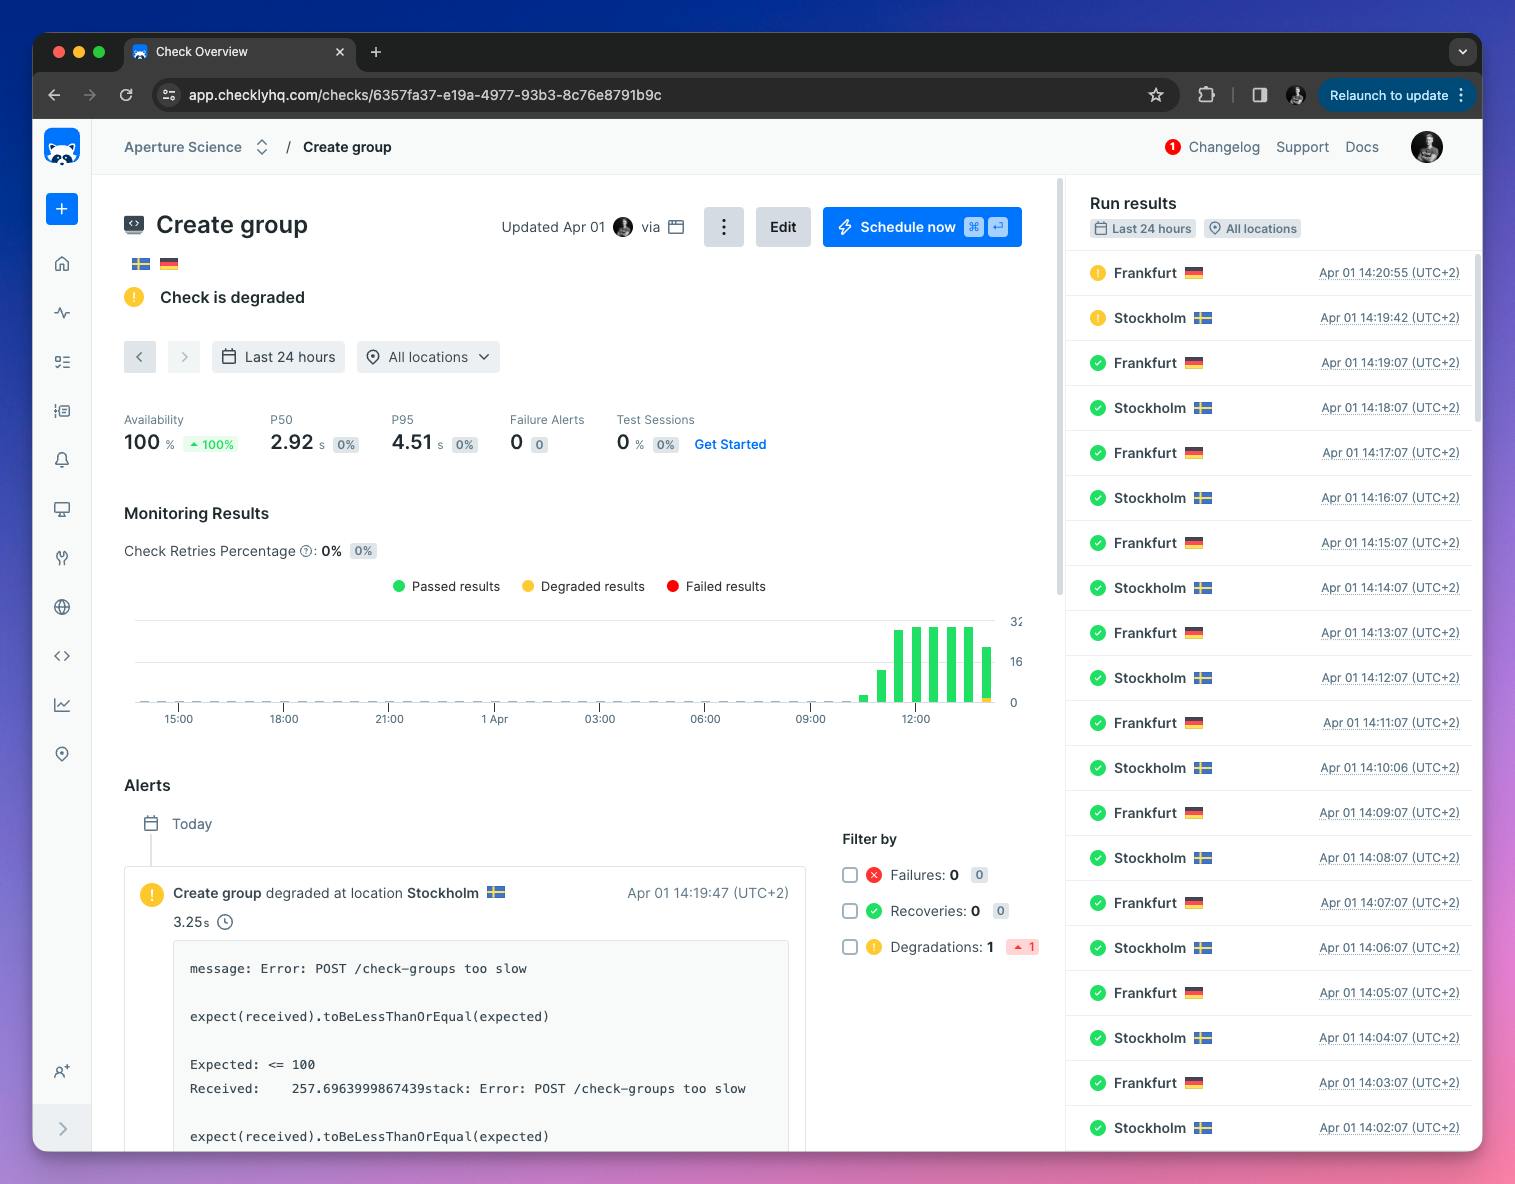
Sometimes a service is not performing as intended, but it’s not considered broken or failing. To identify such states we are introducing the degraded state to Multistep and Browser Checks. A check might be considered degraded when the response time of a request is too high, or when a certain assertion is triggered.
To use the degraded state you need two things; a new helper library introduced in runtime 2024.02 and Playwright’s soft assertions. Soft assertions behave just as regular assertions except they do not terminate the test execution, letting us catch potential failures later on in the check. Let’s extend our earlier example to also check for the request response time and have the check marked as degraded if it’s too slow.
First, import the new helper library:
import { getAPIResponseTime, markCheckAsDegraded } from "@checkly/playwright-helpers"@checkly/playwright-helpers includes two methods, getAPIResponseTime which lets me get the response time from a Playwright request response, and markCheckAsDegraded that sets the check state to degraded.
Next, I add a soft assertion to check the POST request response time, using the method from the Checkly helper library:
const createGroup = await test.step('POST /check-groups', async () => {
    const response = await request.post(`${baseUrl}/check-groups/`, {
      data,
      headers
      })
    // Check degraded status
    expect.soft(getAPIResponseTime(response), 'POST /check-groups too slow').toBeLessThanOrEqual(300)
    expect(response).toBeOK()

   return response.json()
  })
The soft assertion will be triggered if the response time is over 300 ms, but the script will continue to run. If you have a global service, and you expect the response time to be greater from e.g Tokyo compared to Frankfurt, you can use the built in REGION runtime variable to assert on different response times depending on where in the world the check is running from.
Just using soft assertions are not enough to differentiate between a failed and degraded check, I also need to trigger markCheckAsDegraded. This I can do at the end of the script by checking if any assertions were triggered. If the check get to this point I know that any assertions triggered must be soft, otherwise the script would have terminated earlier:
    if (test.info().errors.length) {
      markCheckAsDegraded('Check degraded due to soft assertion failure.')
  }
This final check is placed outside of the test steps, at the very end of the test. In the end, the full test now looks like this:
import { test, expect } from '@playwright/test'
import { getAPIResponseTime, markCheckAsDegraded } from "@checkly/playwright-helpers"

const baseUrl = "https://api.checklyhq.com/v1";

const headers = {
  Authorization: `Bearer ${process.env.API_KEY}`,
  'x-checkly-account': process.env.ACCOUNT_ID
};

const data = {
  locations: ['eu-west-1'],
  name: "createdViaApiCheck",
};

test('Verify Group API', async ({ request }) => {
  const createGroup = await test.step('POST /check-groups', async () => {
    const response = await request.post(`${baseUrl}/check-groups/`, {
      data,
      headers
    })

    // Check degraded status
    expect.soft(getAPIResponseTime(response), 'POST /check-groups too slow').toBeLessThanOrEqual(150)
    expect(response).toBeOK()

    return response.json()
  })

  await test.step('DELETE /check-groups', async () => {
    const response = await request.delete(`${baseUrl}/check-groups/${createGroup.id}`, {
      headers,
    })
    expect(response).toBeOK();
  })

  if (test.info().errors.length) {
    markCheckAsDegraded('Check degraded: Response time was too slow.')
  }
})
A degraded check’s status badge is yellow in the UI, making it easy to separate degraded check runs from successful or failed ones:
Monitoring using Multistep Checks
Now that you know how Multistep Checks work, let’s have a look at when you should add them to your synthetic monitoring suite.
The obvious use case would be for a scenario like the one discussed earlier where you have an API endpoint that you want to monitor. Instead of maintaining several distinct API checks to test each method, you can have a single CRUD Multistep Check that monitors each method, reducing overhead and making your monitoring setup easier to understand.
Multistep Checks are also very useful for monitoring advanced API user flows. My colleague Alex wrote a great blog post on how to monitor open banking API’s using Checkly’s Multistep Checks. Open banking API’s are very complex, due to the security required for any financial transaction, and monitoring them can be a challenging task. With Checkly you can reuse your existing E2E Playwright tests in your monitoring suite, ensuring that as long as your E2E tests are passing, your monitoring is also up to date and keeping an eye on your critical API flows.
Even if your API flows aren’t as complex as the open banking example, having a Multistep Check that regularly goes through your user login flow to ensure it is working, or verifies your store’s check out process can prevent unnecessary downtime and reduce the time to detection significantly.
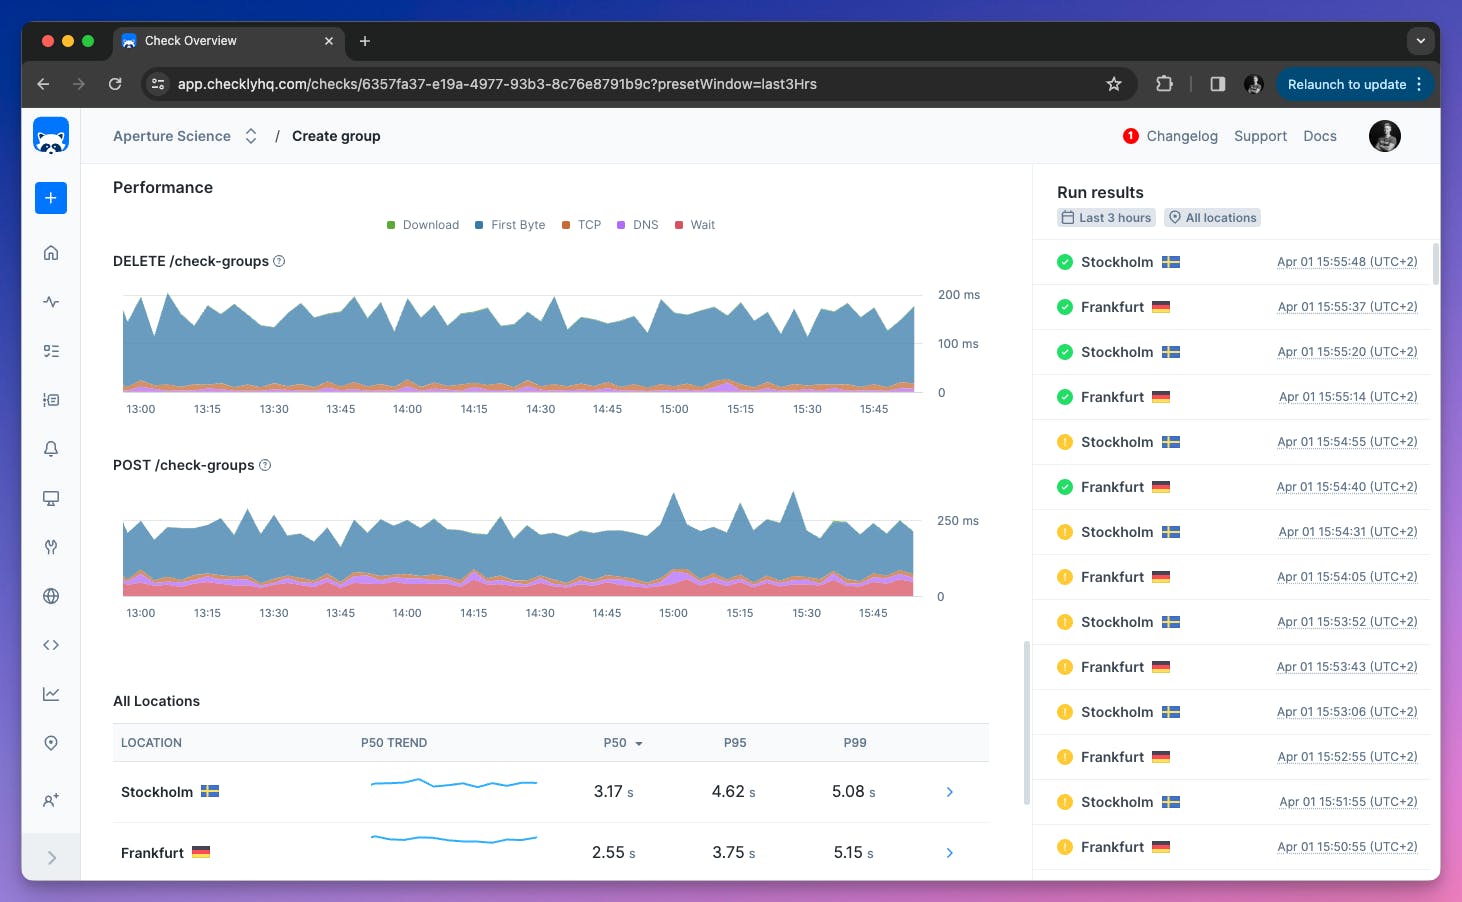
Multistep Checks also give you detailed performance data for each test.step, giving you actionable information throughout the day:
Regardless if you are building a small web shop on your own, or are part of a team maintaining a large and complex API, Multistep Checks can be a great tool to help you react faster to outages and to identify potential problems.
Conclusion
Multistep Checks are a powerful tool in the arsenal of synthetic monitoring. They can quickly alert you to any issues with your service’s API, and give you detailed error messages to speed up the recovery process. The continuous nature of synthetic monitoring also gives you in-depth historical data on performance and availability, making it easy to identify bottlenecks and areas of improvement.
Using Checkly’s Monitoring as code workflow and Playwright for your Multistep Checks lets you manage checks directly from your IDE and repository, making creating and maintaining these checks easier than ever, and turning them into a must-have tool.