I'm happy to announce that visual regression & snapshot testing for our Playwright powered browser checks is now GA. If you have used these capabilities with your Playwright tests on your local machine or in your CI/CD pipeline, you can now use them 1:1 on Checkly.
This new addition to our monitoring stack can help you:
- Verify that the appearance of your user interface aligns with its planned design
- Detect issues with visual aspects such as layout, color scheme, headlines, etc.
- Identify elements that are missing on some of your web pages
- Prevent problems caused by third-party tool elements, like interstitials, promotional CTAs, ads, popups, etc.
Some of our customers already used visual regression testing while it was in beta and were very happy with it:
“I was really looking forward to Checkly’s visual testing feature. Once it became available, we started using it to visually monitor one of our web applications. I think it's a very good addition to the Checkly monitoring features and is very helpful in alerting and proactively addressing any unwanted design or breaking changes,” Sree Wupendram, Test Automation Consultant, Nando’s.
Let’s have a look at how this new feature works and how you can integrate it into you CI/CD workflow using the Checkly CLI.
Visual Regression Testing
Visual regression testing is now part of any browser check by adding just one extra expect() line of code that takes the page as an argument and calls the toHaveScreenshot() method.
import { test, expect } from '@playwright/test';

test('Checkly homepage', async ({ page }) => {
   await page.goto('https://checklyhq.com')
   await expect(page).toHaveScreenshot()
})
After adding this oneliner to your browser check, you click the Run Script button with the extra Run script and update golden files option and hey presto; you just created a golden image which you can inspect in the new Golden files section in the editor.

On each check run, Checkly will now use that golden image to match against a snapshot taken on each check run. When Checkly detects a visual difference, you will get an alert and you can inspect the visual difference as part of the check result.
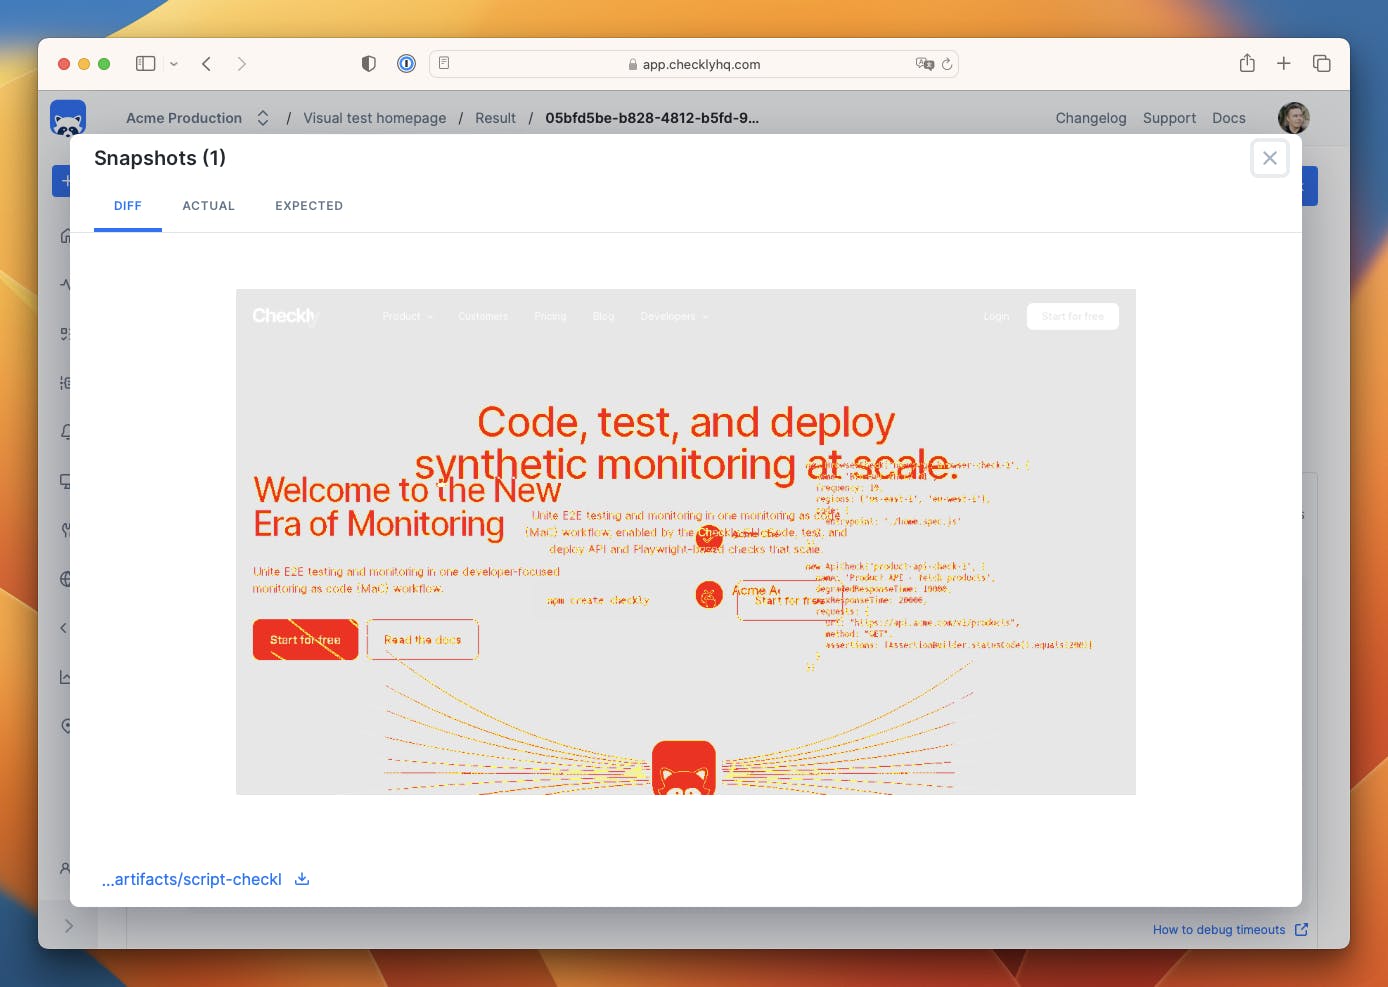
This should make clear if text has shifted, some component is missing or any other visual layout issues.
Sometimes you will allow certain small visual changes, or you expect things to be slightly different based on locale or some specific user setting. For these cases, Playwright allows you to tweak some options on how strict the algorithm should be and what screen elements it should take into account.
The example below shows two things:
- We allow a maximum of 1000 pixels to be different between the golden image and the snapshot.
- We disable any CSS animations which might skew snapshot.
import { test, expect } from '@playwright/test';

test('Playwright homepage', async ({ page }) => {
   await page.goto('https://checklyhq.com')
   await expect(page).toHaveScreenshot({ maxDiffPixels: 1000 })
   await expect(page).toHaveScreenshot({ animations: 'disabled' })
})
Read more about these options in our docs.
Use visual regressions for your sites, apps, component libraries or specific fragments of any page. No extra tokens, wrappers or confusing config needed.
Snapshot Testing
With snapshot testing — the little cousin of visual regression testing — you can have a similar workflow for text or binary payloads: essentially anything non-visual. This should be very familiar to people who have used Jest or similar test frameworks.
The example below checks if the hero text on the Checkly landing page matches with a snapshot.
import { test, expect } from '@playwright/test';

test('example test', async ({ page }) => {
  await page.goto('https://checklyhq.com');
  expect(await page.textContent('h1')).toMatchSnapshot('hero-text.txt');
});
The workflow here is the same as with visual regression testing. Just create the golden image, save the check and you’re done.
Use snapshot testing for matching HTML elements, long lists of text or json or even binary payloads.
Using the CLI in your CI/CD pipeline
You can drive this workflow completely using our monitoring as code workflow powered by the Checkly CLI. The magic is in the new flag --update-snapshots for the test command.
npx checkly test --update-snapshotsAdding this flag will record and upload any golden images you create locally to the Checkly cloud. You can read more about this workflow in our docs.
Visual regression and snapshot testing is now available on all Team and Enterprise plans.