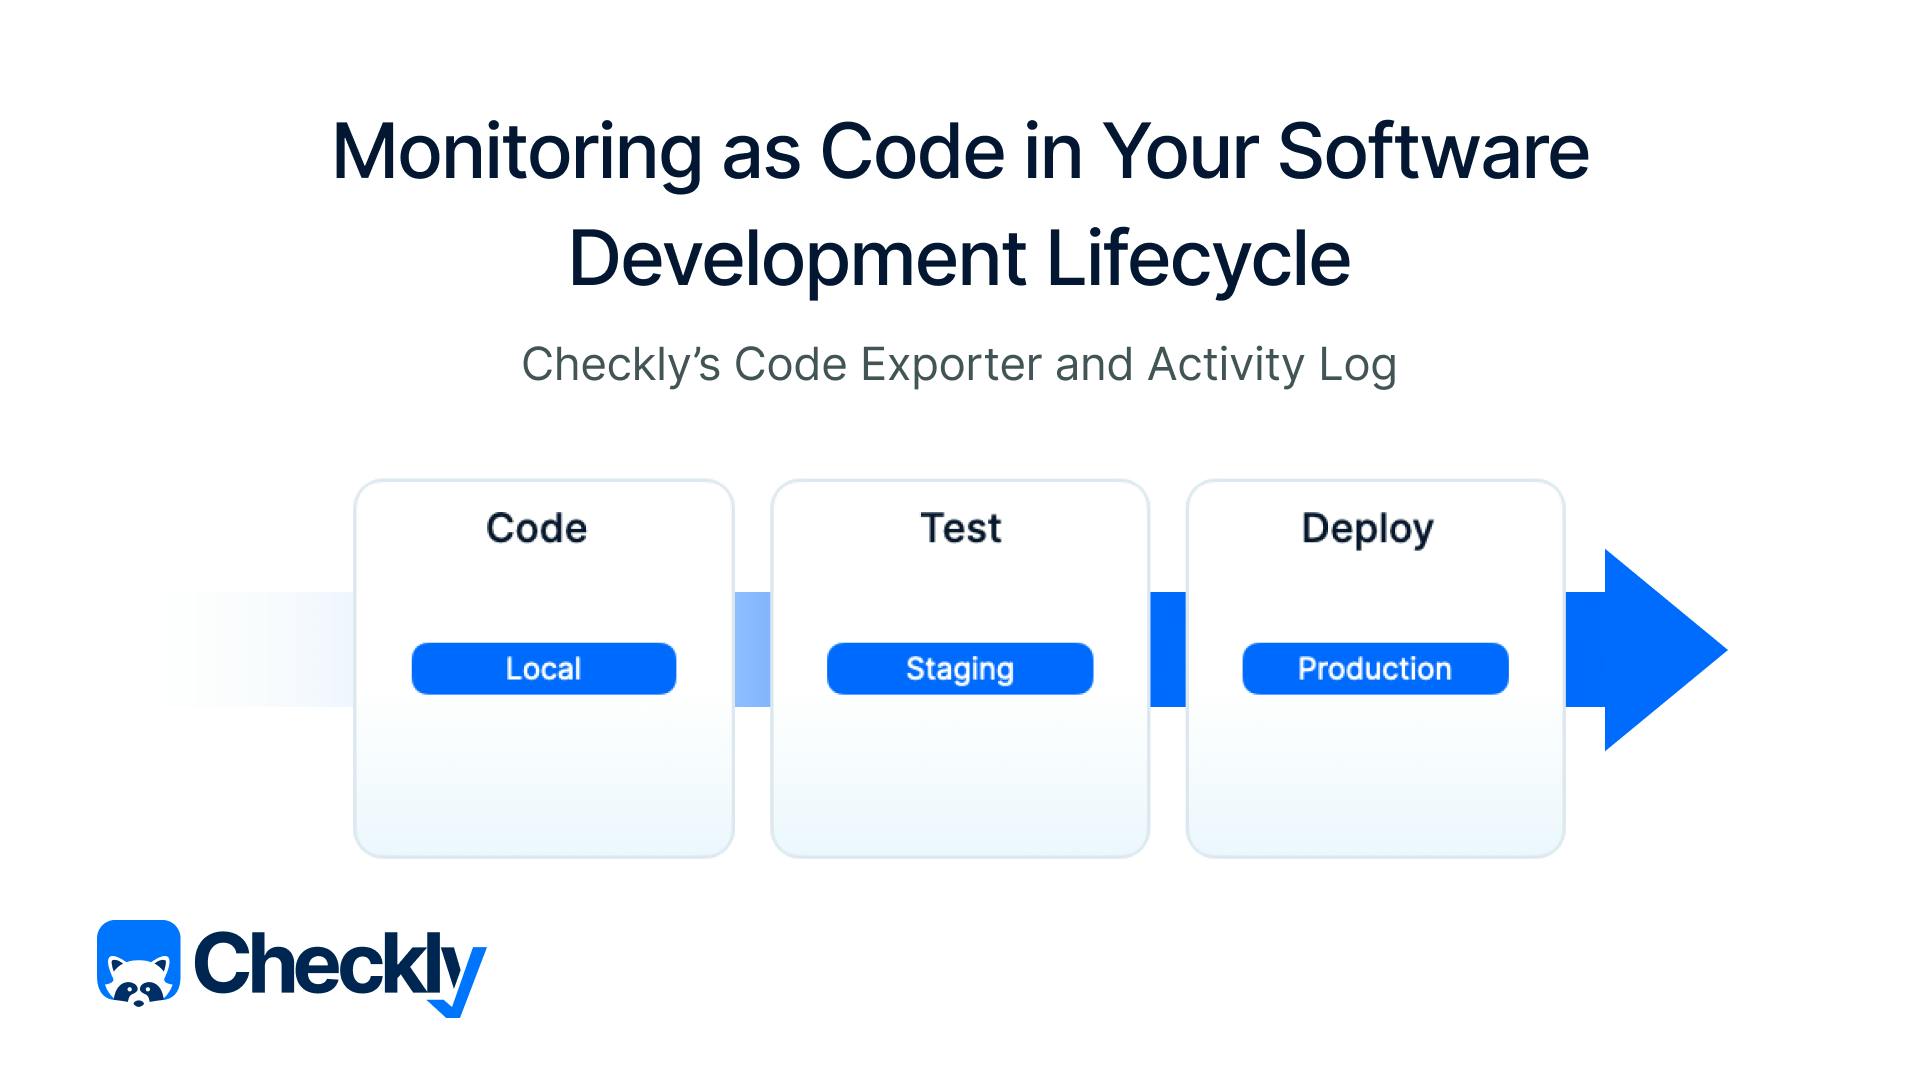
When we launched the Checkly CLI and Test Sessions last May, I wrote about the three pillars of monitoring as code.
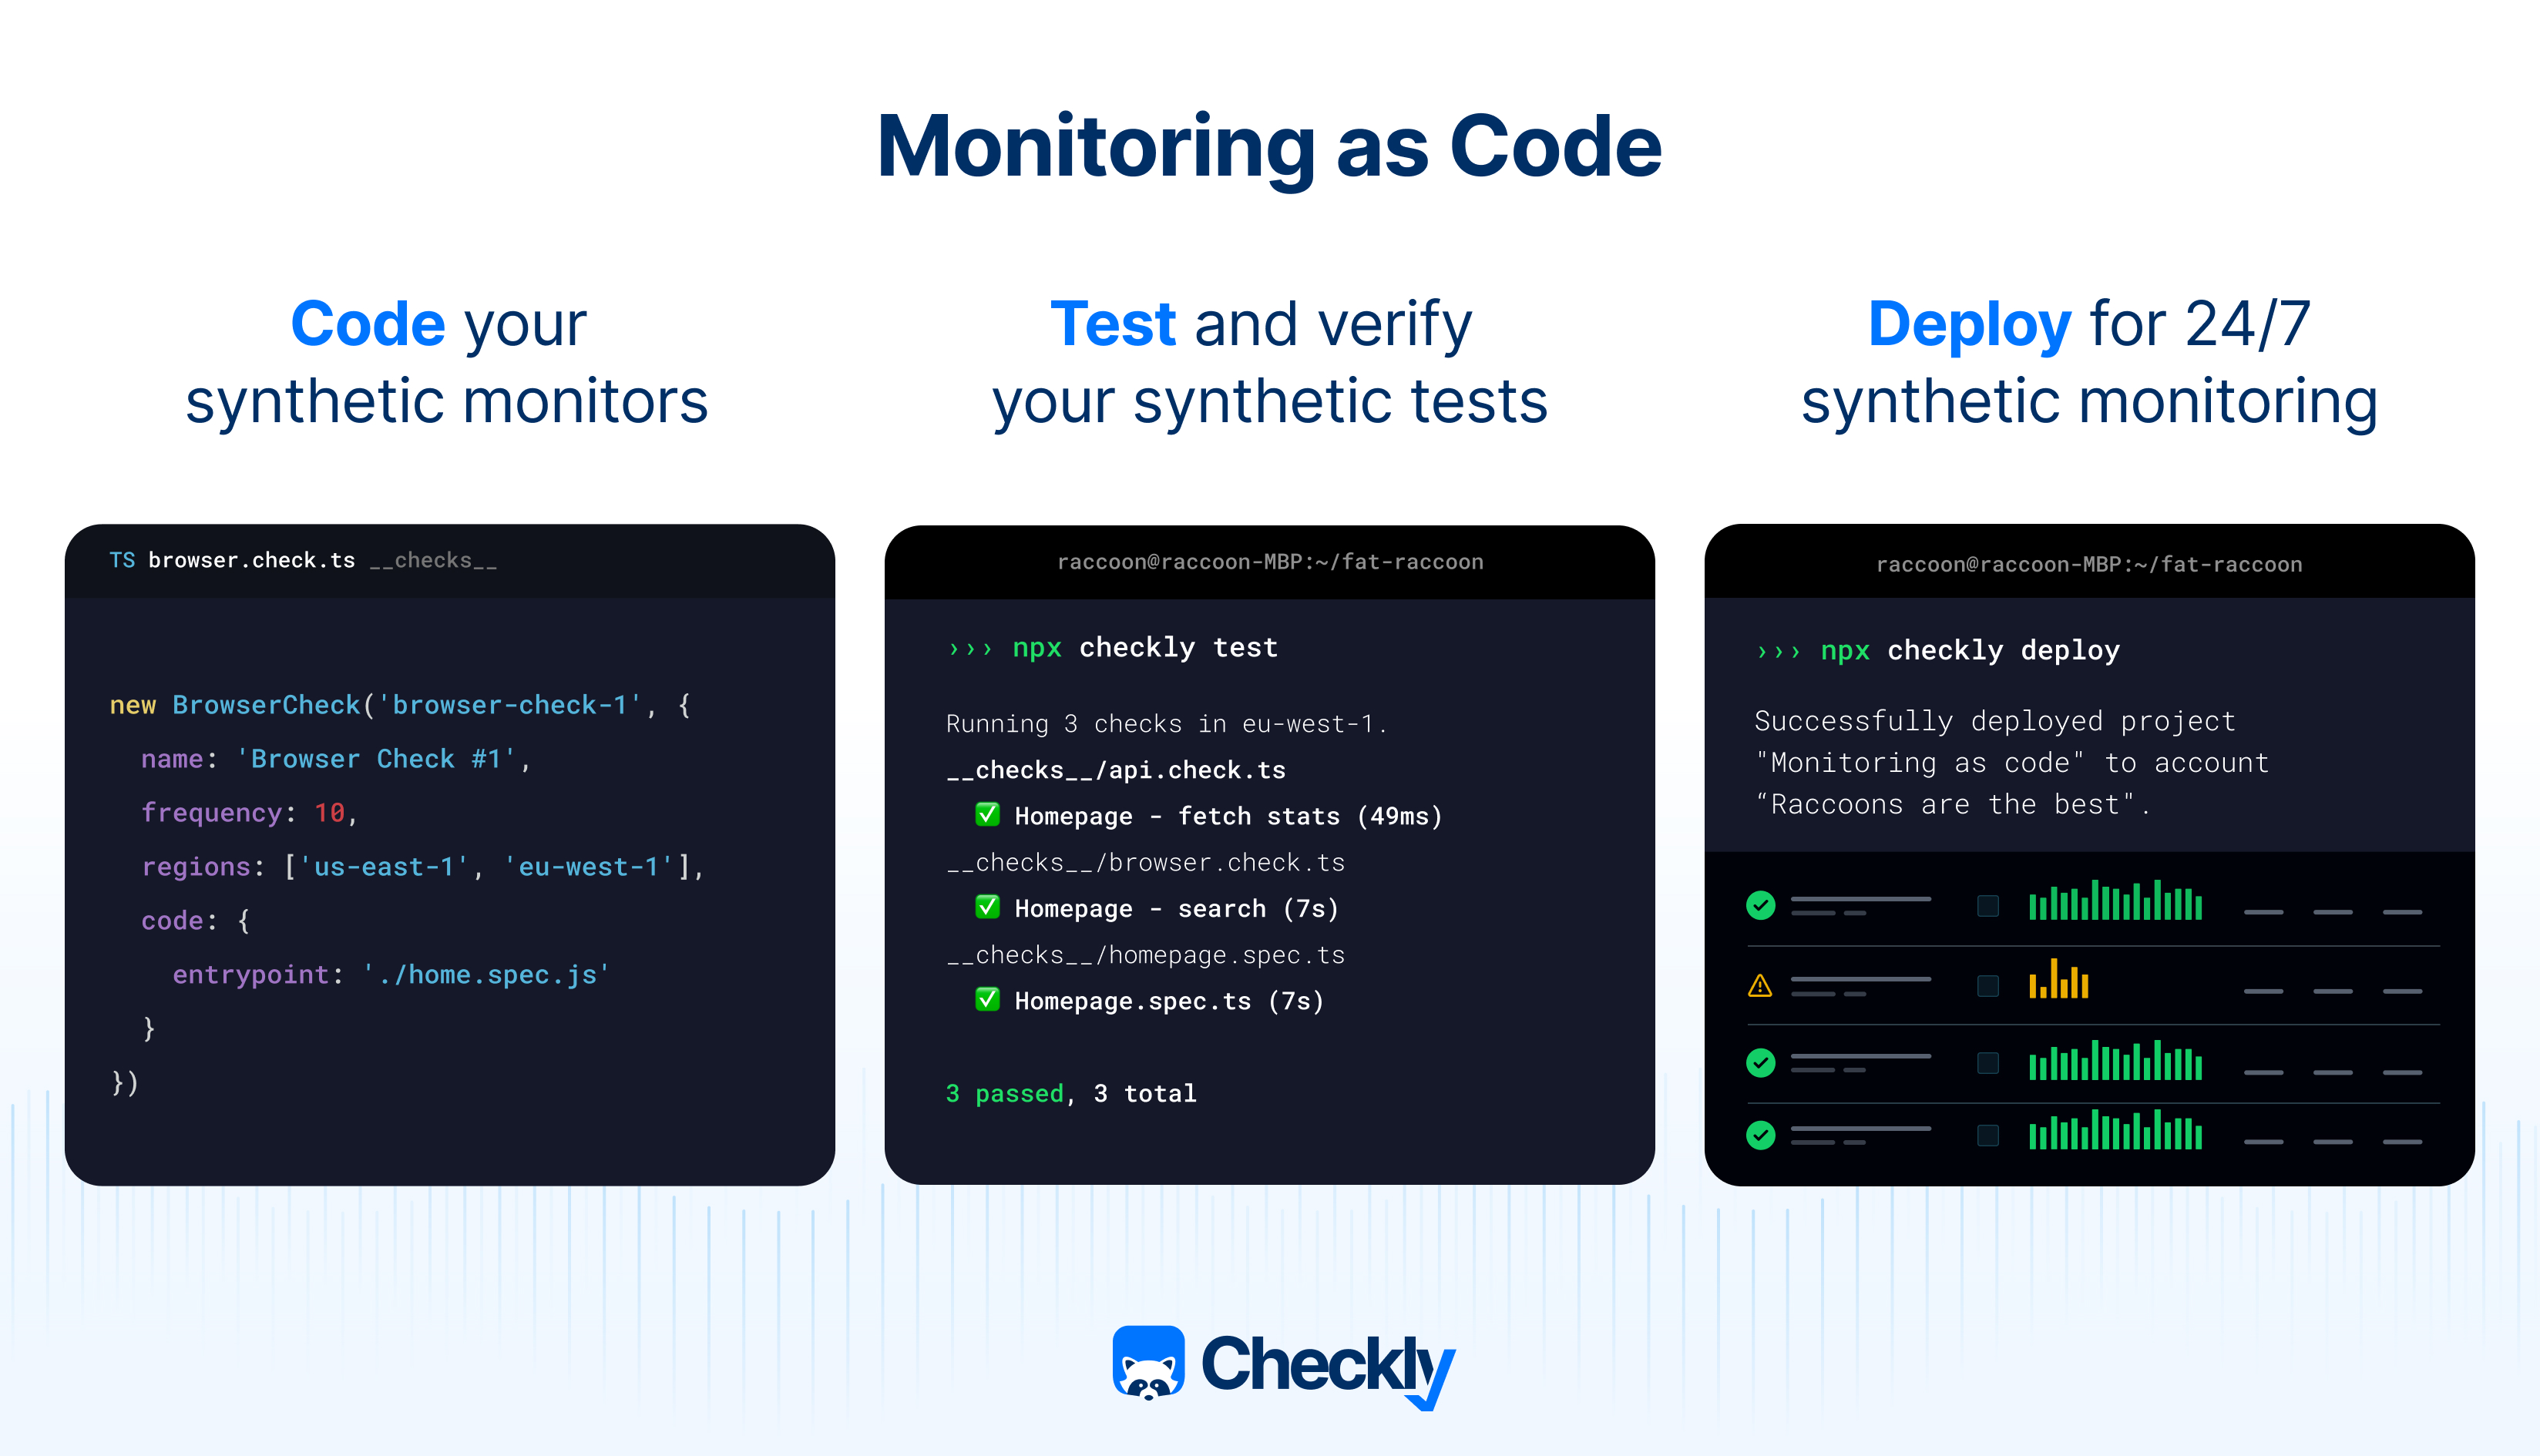
Code — write your monitoring checks as code and store them in version control.
Test — test your checks against our global infrastructure and record test sessions.
Deploy — deploy your checks from your local machine or CI to run them as monitors.
These three pillars still stand firmly and hundreds of teams are now using the Checkly CLI to put monitoring as code (MaC) into practice.
However, to extend the metaphor a bit, these pillars support a lot more of the architecture around MaC. This is especially true since we released two features that tie together the full MaC workflow.
- Checkly Code Explorer: export any Checkly resource created via the Web UI to either a CLI construct or a Terraform manifest.
- Checkly Activity Log: track the origin and update history of any resource with git commit attribution.
Let’s see how these features fall into place when we look at the broader monitoring as code workflow and how it ties into your typical software development lifecycle (SLDC).
Shifting left
The typical software development lifecycle process breaks down into a couple of phases: analysis, design, development, testing, deployment, maintenance.
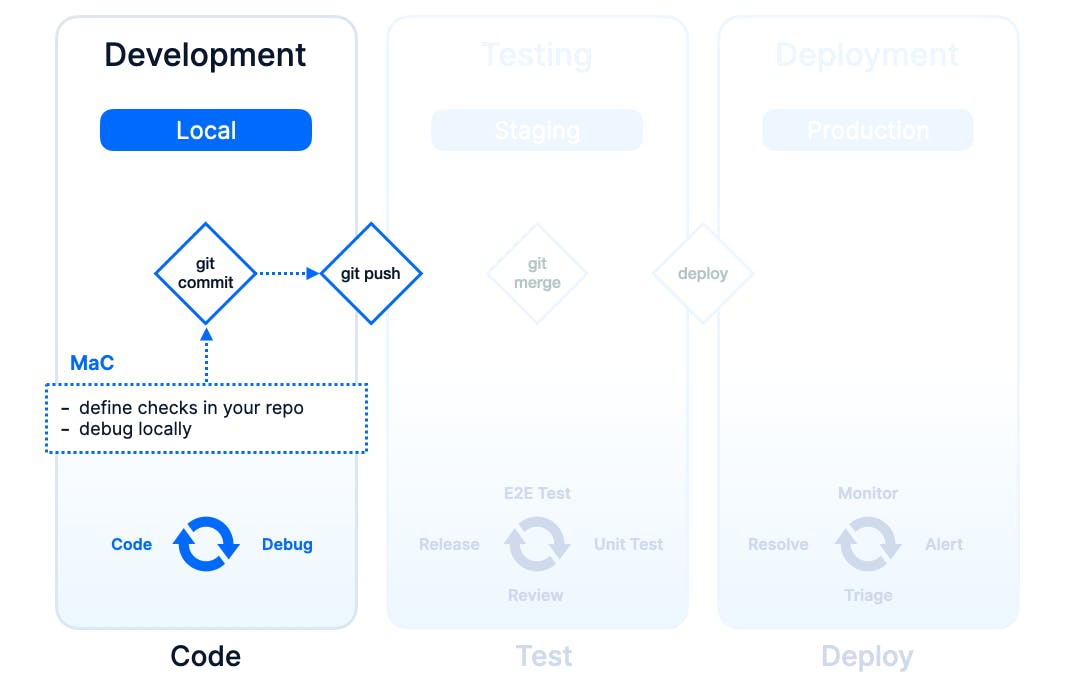
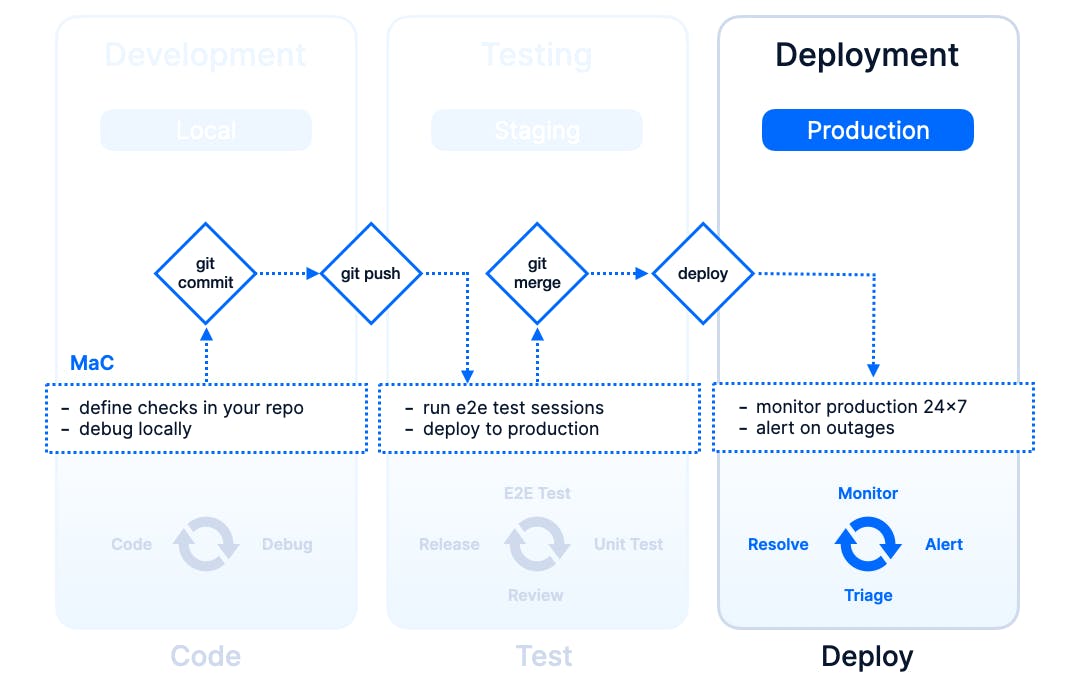
In the diagram below, we are zooming in on the development, testing and deployment phases and adding two extra dimensions or swim lanes if you will: the environment and the core events that trigger transitioning from one phase to the next.
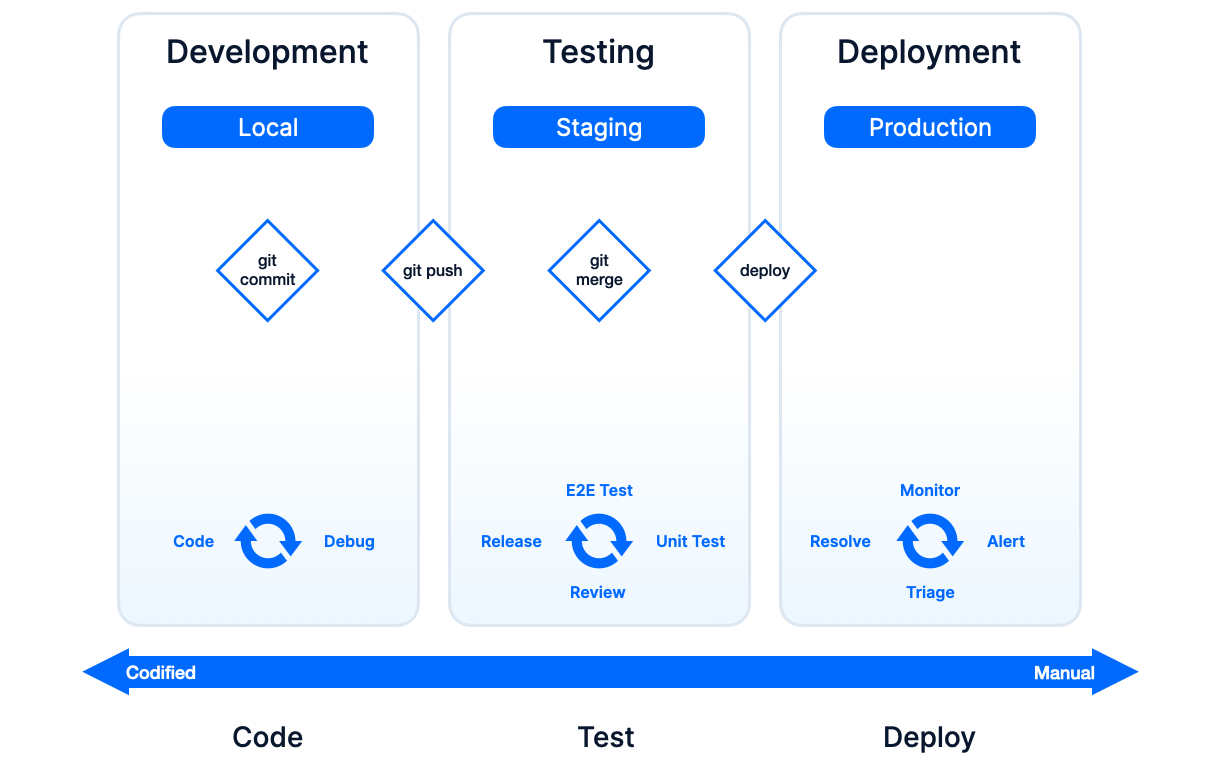
As you probably have noticed in your own day-to-day as a software engineer or ops-person, the more you get to the right side of the diagram, the more manual tasks you have, less is codified and things are generally not trackable, reviewable or rollbackable (yes, this is a word now).
For traditional unit and acceptance testing, this problem has already been addressed in the “shift left” movement and in general by just committing tests to your source code repository. Easy.
But for monitoring, and especially synthetic monitoring, we were still kinda stuck in the dark ages of clickops. The question then arises, how do we get from the dark ages to the Renaissance, or even into modernity?
Introducing the Checkly CLI
The Checkly CLI gives you a JavaScript/TypeScript-native workflow for coding, testing and deploying synthetic monitoring at scale, from your code repository. Ideally, it solves all the problems you’ll encounter when shifting your synthetic monitoring practices to the left.
The CLI works with two basic principles:
- Resource constructs, written in JavaScript or TypeScript, e.g. an
ApiCheck,BrowserCheckorSlackAlertChannel, that represent resources to be executed or created on the Checkly cloud backend. - Two core commands:
testto, respectively, run your monitoring checks as tests in CI or on your local machine, anddeployto push your resources to the Checkly cloud and run them around the clock.
For browser-based testing and monitoring (what we call browser checks), Checkly and the Checkly CLI use Playwright Test. This means you can just write a .spec.ts file, use it as a test and then promote it to a monitor on deployment.
Let’s see how we can use the CLI in the context of our SDLC.
Breaking down the workflow
Let’s move from abstract diagrams to a practical example with some Checkly CLI code snippets to break down how MaC ties into your SDLC, moving from left to right.
We’re going to pretend we are working on adding a feature to a web application that also requires some updates to our API backend. We will assume we already bootstrapped our repository with a Checkly CLI project using...
npm create checkly@latestThis commands sets up all the basics to kickstart your MaC workflow in your repo.
Development
In the dev phase, we are building and debugging a new feature that requires updates in the Web UI and the API. After a set of git commits, we git push our development branch, triggering our CI pipeline.
We should already introduce MaC and think about tests and monitoring for the API and new UI features. We do this by adding a CLI construct (just a TypeScript class under the hood) with a couple of lines of code directly to our application’s repo. Just like adding a unit test.
A typical check for our web app uses stock Playwright Test and could look like this. Note we are just writing Playwright code. The CLI will pick this up and turn it into a monitoring automatically!
const { expect, test } = require('@playwright/test')

test('visit page and take screenshot', async ({ page }) => {
  const response = await page.goto(process.env.ENVIRONMENT_URL || 'https://app.acme.com')

  await page.screenshot({ path: 'screenshot.jpg' })

  expect(response.status(), 'should respond with correct status code').toBeLessThan(400)
})
Similarly, an API check could look as follows:
import { ApiCheck, AssertionBuilder, Frequency } from 'checkly/constructs'

new ApiCheck('acme-api-1', {
  name: 'Acme API',
  frequency: Frequency.EVERY_30M,
  request: {
    method: 'GET',
    url: 'https://api.acme.com/v1/products`
    assertions: [
      AssertionBuilder.statusCode().equals(200)
    ],
  }
})
You might already have set up some checks in the Web UI. To get started even quicker, you can now just click export to code on any existing check, copy the TypeScript code and paste it into your repo.
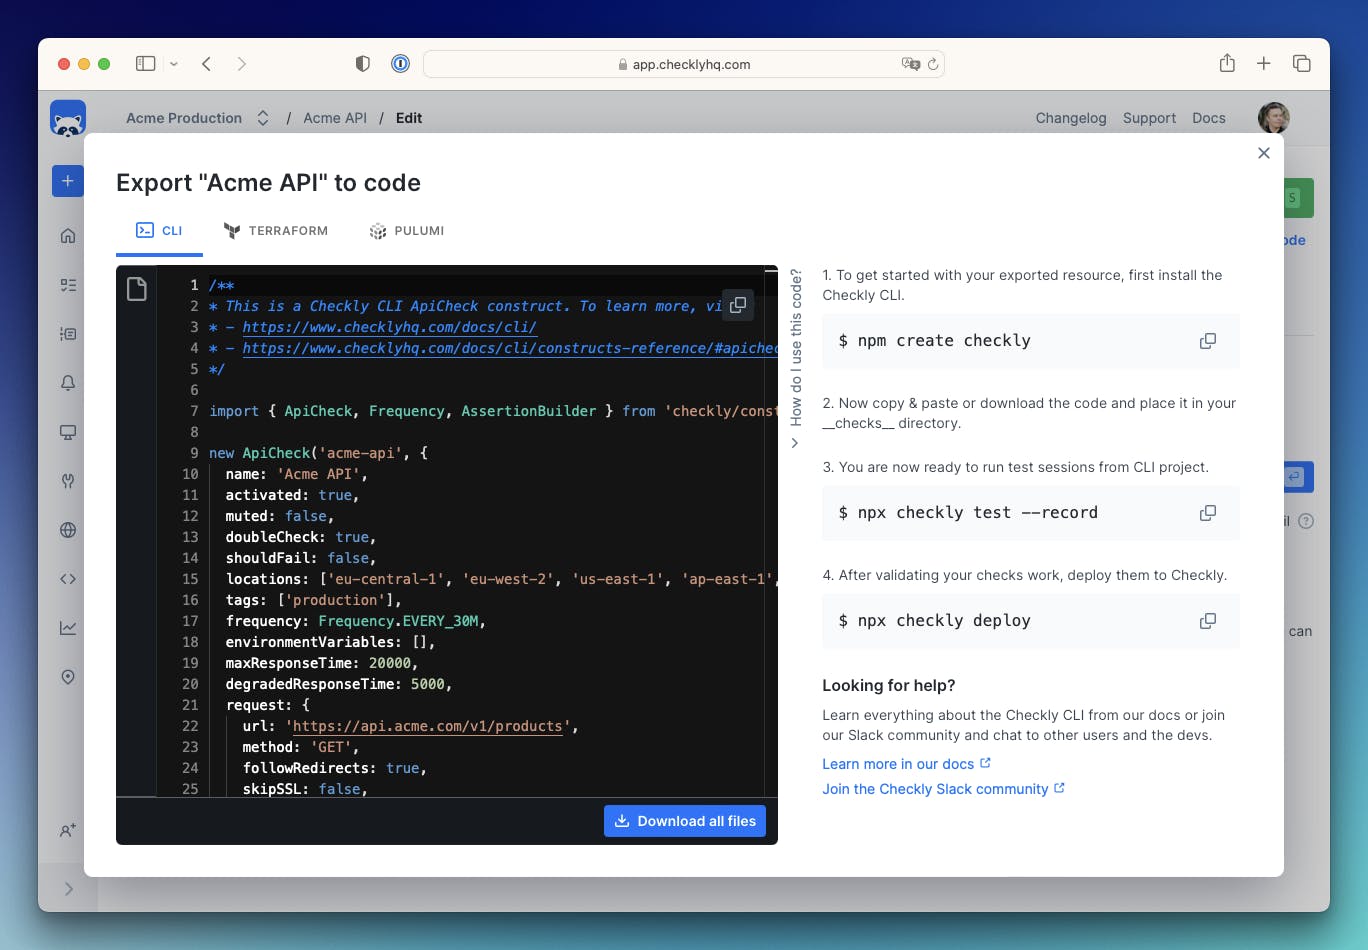
Note, that you can also export your resources to Terraform HCL or Pulumi code. The choice is yours.
For a smoother local dev workflow that translates well to our staging and production environments, we can use environment variables to replace any hostnames, credentials or other environment specific variables in our code.
For instance, we can infer the hostname by setting the ENVIRONMENT_URL to determine the staging or production hostname. Even more, we can already introduce:
- Any alerting channels that should be notified when our new feature breaks. Think Slack, SMS or Pagerduty using the respective
SlackAlertChannel,SMSAlertChannelorPagerdutyAlertChannelconstructs. - Any updates to our public dashboard or status page that should show the status of our new feature once live using the
Dashboardconstruct.
Suddenly, we are thinking about how we can support the Monitor, Alert, Triage and Resolve activities typically happening after the Deployment phase. Talk about shift left! Talk about thinking “Day 2” on “Day 1”!
Note, we can add / update the above by just using TypeScript code and both underpinning resources are also directly exportable from the Checkly Web UI.
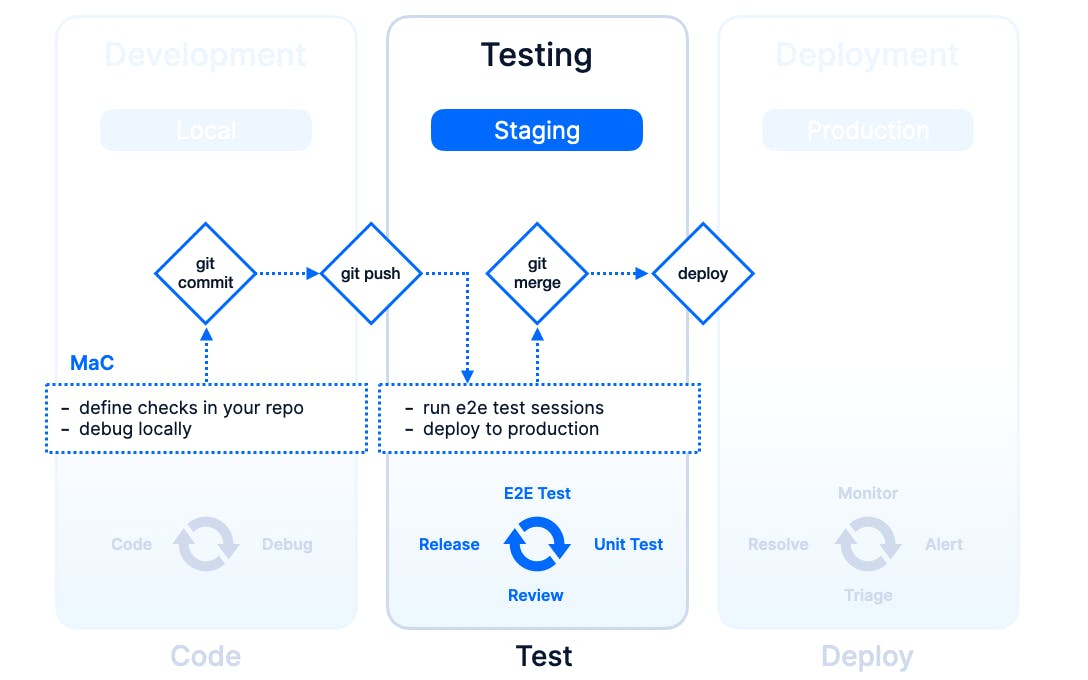
Testing
Ok, so we pushed our branch. Our CI pipeline runs our standard unit tests — Keep doing those BTW, not too many, not too little.
The pipeline kicks off a Checkly Test Session with all the checks in our repo, runs them against our staging environment, recording the results for inspection if something fails. We use the following command for this.
$ npx checkly test --recordWe can track this execution with the relevant git info and environment info in our Test Session overview.
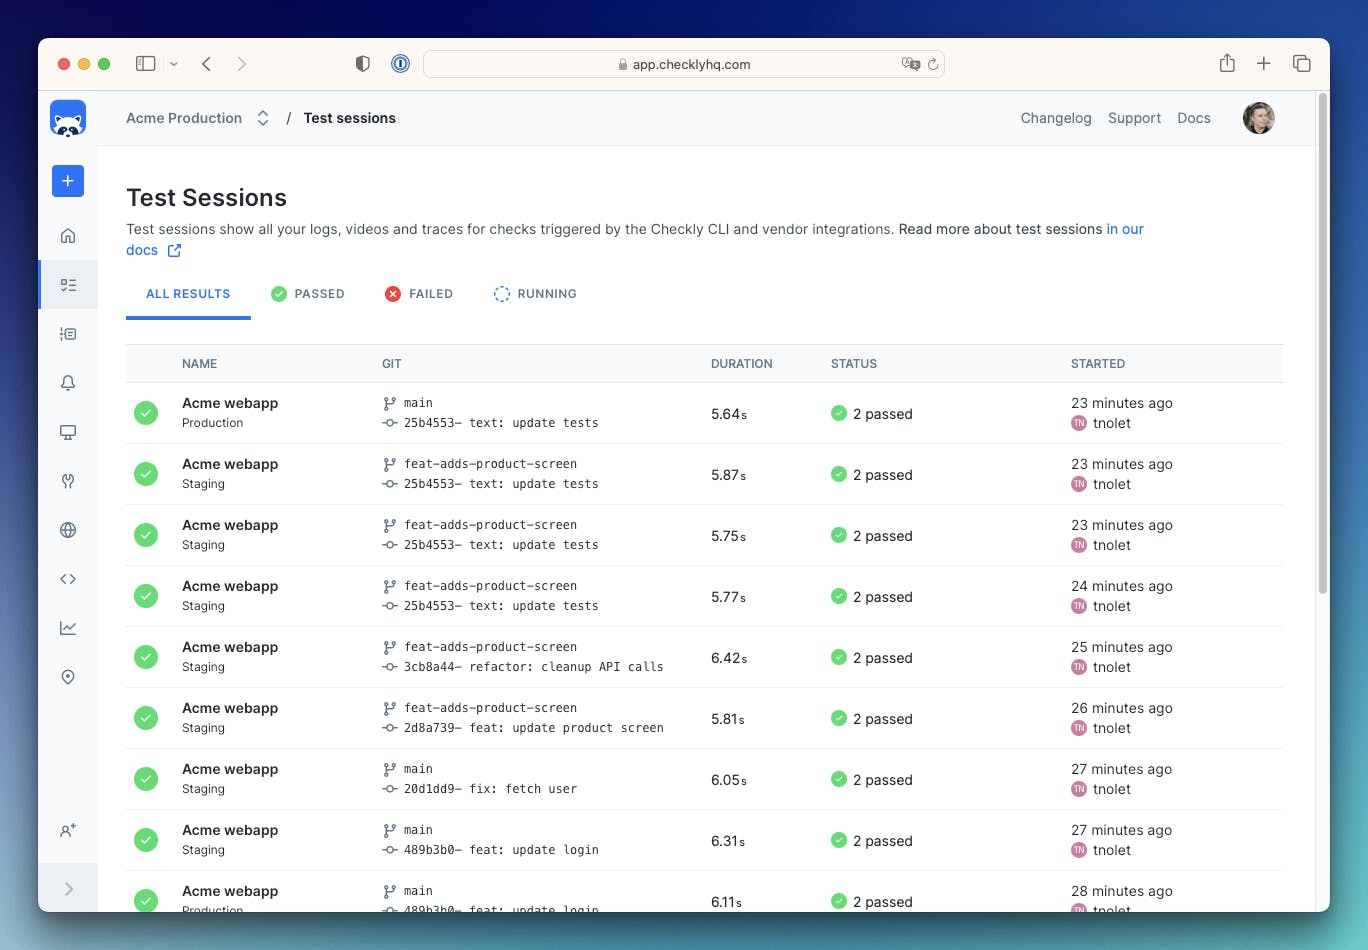
For our Playwright Test powered browser checks, we get a full video and trace right to assist debugging.
If all lights are green, we can merge and deploy to production.
Note that testing against staging as if it is production works best with per branch or preview environments or a Staging environment that closely resembles production. Conversely, using MaC makes it much easier to actually find drift and discrepancies between production and staging.
Deployment
All code has been reviewed, other branches have been git merged and staging looks fine. We cut a release — or we skip that part and just do continuous deployment — promote our main branch to production.
This is where we deploy our MaC setup and promote it to production, effectively updating and / or creating all checks as monitors and all related resources like alert channels and dashboards.
$ npx checkly deployThis effectively updates and / or creates all checks as monitors and all related resources like alert channels and dashboards.
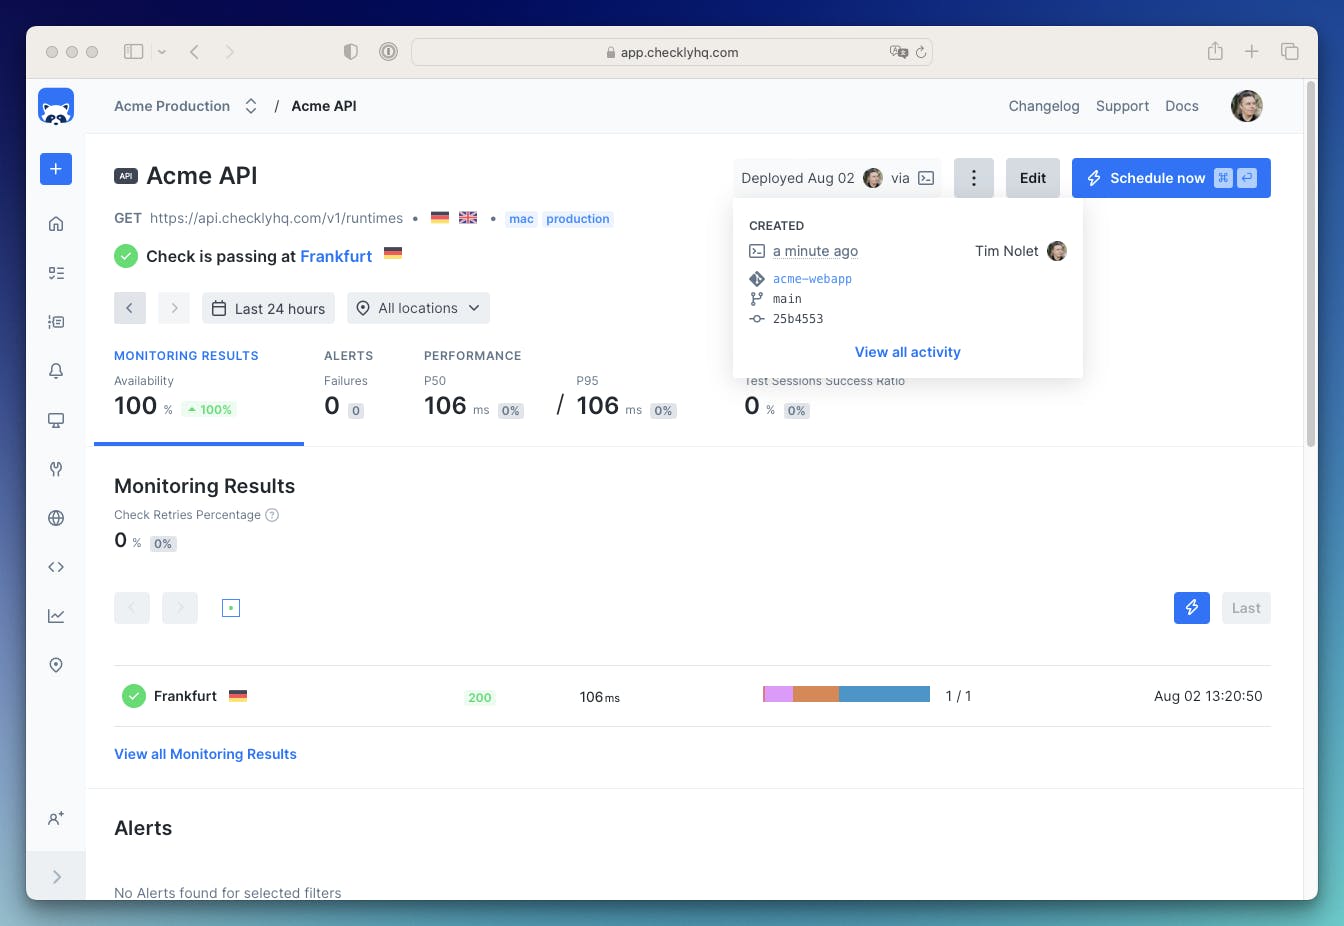
Even more, the new activity log shows me — just as with our Test Session — exactly who deployed to production and at which git commit a resource was created! This also works for Terraform, Pulumi and the Checkly public API.
What just happened and why is this important?
Hopefully, some of the key learnings already landed by reading through the above SDLC scenario. Let’s still summarize them:
- Key learning 1: We created a single source of truth for our synthetic monitoring that is versioned, reviewable and rollbackable in the Development phase.
- Key learning 2: In the Testing phase, we E2E tested our changes against Staging using checks that we can turn into around-the-clock monitoring by replacing some environment variables and executing deploy.
- Key learning 3: In the Deployment phase, we are now monitoring, alerting and providing insights via dashboards right after the code goes live. It’s debugged, reviewed, up-to-date and 100% attributable to a recent release of our production code branch.
Next steps
Learn more about setting up a MaC workflow by checking out the docs on: