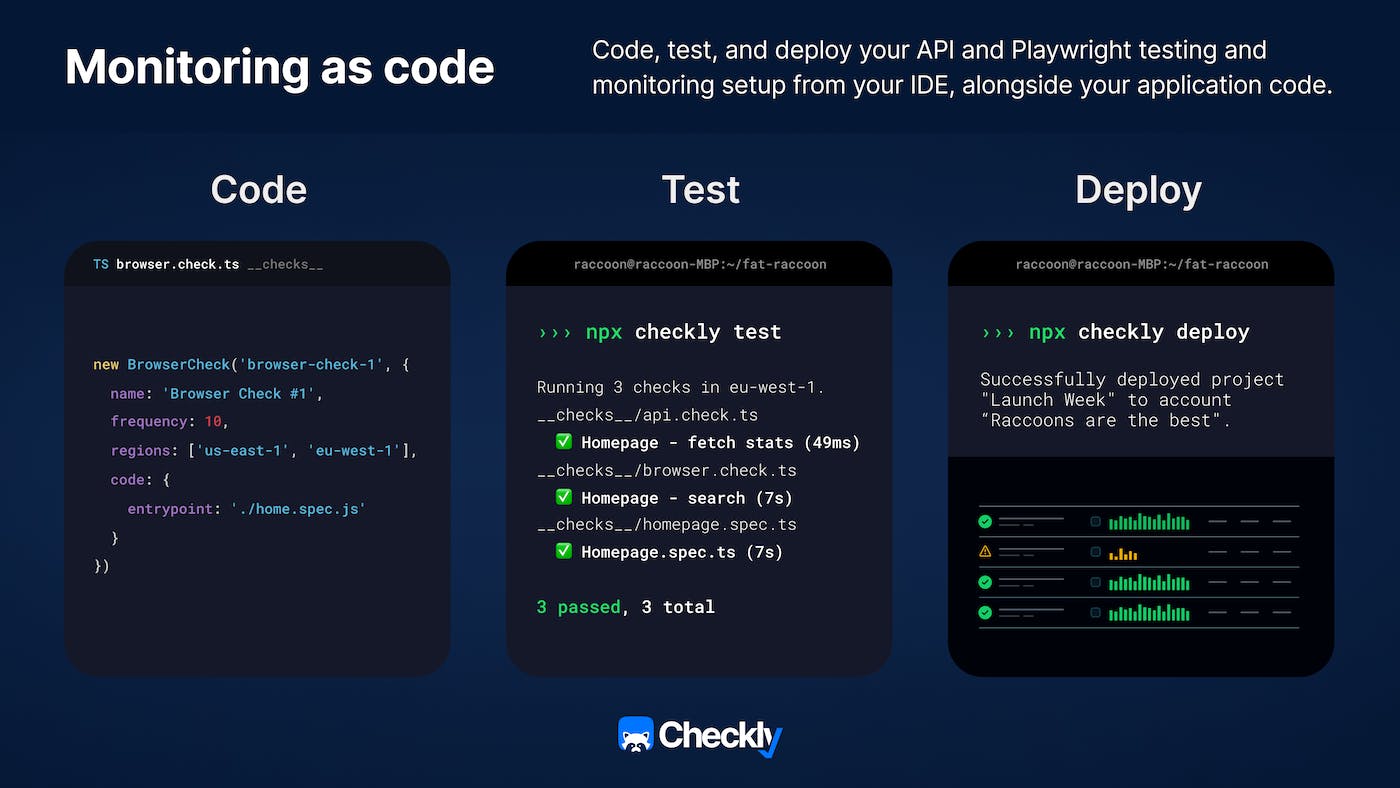

Managing large numbers of website monitoring checks by hand quickly becomes cumbersome. Luckily, Checkly's REST API allows us to automate most of the repetitive steps. Building on that API, the Checkly Terraform Provider takes automation one step further, enabling users to specify their synthetic transaction monitoring setup as code.
In this article, we will be building on top of John Arundel's great intro from a few months back and showing how to manage multiple checks using groups and shared code snippets.
Creating multiple transaction monitoring checks
Since our previous post on Terraform showed how to create API checks already, this one will use browser checks for website transaction monitoring as examples instead. The setup is similar: we only need to change the check type and add our Puppeteer or Playwright script rather than the API check's request. Let's create two browser check resources in our main.tf file:
variable "checkly_api_key" {}

terraform {
  required_providers {
    checkly = {
      source = "checkly/checkly"
      version = "0.7.1"
    }
  }
}

provider "checkly" {
  api_key = var.checkly_api_key
}

resource "checkly_check" "checkout" {

  name                      = "Checkout Flow"
  type                      = "BROWSER"
  activated                 = true
  should_fail               = false
  frequency                 = 10
  double_check              = true
  ssl_check                 = false
  use_global_alert_settings = true
  locations = [
    "us-west-1",
    "eu-central-1"
  ]

    script = file("${path.module}/scripts/checkout.js")

}

resource "checkly_check" "coupon" {

  name                      = "Coupon Flow"
  type                      = "BROWSER"
  activated                 = true
  should_fail               = false
  frequency                 = 10
  double_check              = true
  ssl_check                 = false
  use_global_alert_settings = true
  locations = [
    "us-west-1",
    "eu-central-1"
  ]

  script = file("${path.module}/scripts/coupon.js")

}
Notice that we are loading the scripts from external files to keep things nice and tidy. In this case we are using E2E examples from theheadless.dev. Here is checkout.js:
const puppeteer = require("puppeteer");
const productsNumber = process.env.PRODUCTS_NUMBER;

(async () => {
  const browser = await puppeteer.launch();

  const page = await browser.newPage();

  await page.goto("https://danube-webshop.herokuapp.com/");

  await page.setViewport({ width: 1200, height: 800 });

  for (i = 1; i <= productsNumber; i++) {
    await page.waitForSelector(`.preview:nth-child(${i}) > .preview-author`);
    await page.click(`.preview:nth-child(${i}) > .preview-author`);

    await page.waitForSelector(".detail-wrapper > .call-to-action");
    await page.click(".detail-wrapper > .call-to-action");

    await page.waitForSelector("#logo");
    await page.click("#logo");

  }

  await page.waitForSelector("#cart");
  await page.click("#cart");

  await page.waitForSelector(".cart > .call-to-action");
  await page.click(".cart > .call-to-action");

  await page.waitForSelector("#s-name");
  await page.click("#s-name");

  await page.type("#s-name", "Max");
  await page.type("#s-surname", "Mustermann");
  await page.type("#s-address", "Charlottenstr. 57");
  await page.type("#s-zipcode", "10117");
  await page.type("#s-city", "Berlin");
  await page.type("#s-company", "Firma GmbH");

  await page.waitForSelector(".checkout > form");
  await page.click(".checkout > form");

  await page.waitForSelector("#asap");
  await page.click("#asap");

  await page.waitForSelector(".checkout > .call-to-action");
  await page.click(".checkout > .call-to-action");

  await page.waitForSelector("#order-confirmation", { visible: true });

  await browser.close();
})();
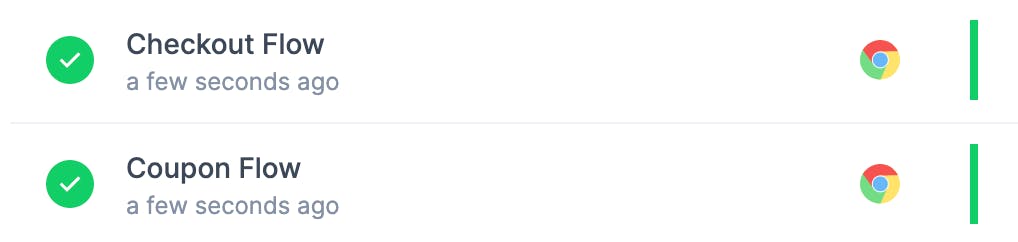
Supposing we have already run the terraform init command to prepare our local directory, we can now go ahead and first create a new plan with terraform plan -out tf.plan, then subsequently apply it with terraform apply tf.plan. This is the result on Checkly:
To see our changes applied, we will be running the same sequence of commands after each update to our main.tf file.
Grouping checks together
If our scripts are somehow related, we might want to group them together to make them easier to manage. We will see the whys and hows in the following paragraphs.
To group our checks, we need to do two things:
- Create an additional resource for the group.
- Include our checks in the group by adding the
group.idproperty set to the ID of the group resource.
After our changes, the main.tf file will look like this:
variable "checkly_api_key" {}
...
resource "checkly_check" "checkout" {
...
script = file("${path.module}/scripts/checkout.js")
group_id = checkly_check_group.key-shop-flows.id
}
resource "checkly_check" "coupon" {
...
script = file("${path.module}/scripts/coupon.js")
group_id = checkly_check_group.key-shop-flows.id
}
resource "checkly_check_group" "key-shop-flows" {
name = "Key Shop Flows"
activated = true
muted = false
locations = [
"eu-west-1",
"eu-central-1"
]
concurrency = 2
environment_variables = {
USER_EMAIL = "user@email.com",
USER_PASSWORD = "supersecure1",
PRODUCTS_NUMBER = 3
}
double_check = true
use_global_alert_settings = false
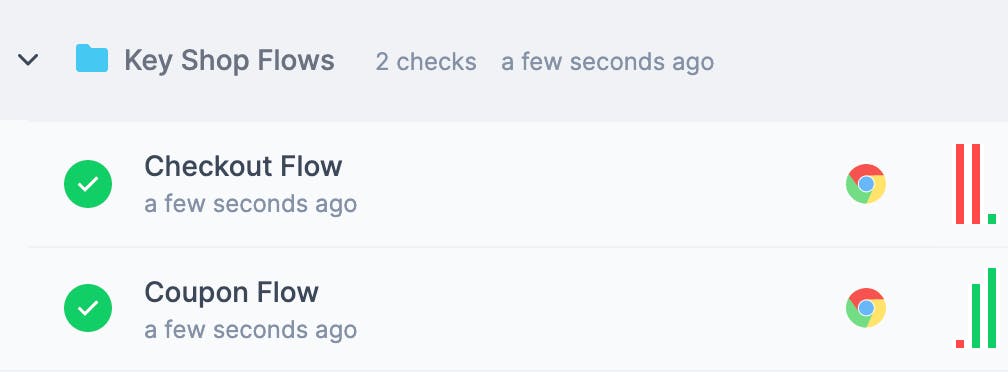
}We are now provisioning two browser checks as part of a single group:
Why use groups
Aside from providing a conceptual abstraction that can be helpful in handling larger numbers of checks, groups override and centralise the following check settings:
- API check defaults: base request config, assertions and setup & teardown scripts.
- Environment variables, adding to the existing global environment variables that might be set.
- Data center locations, fully overriding the check's own config.
- Alert setting and alert channels, fully overriding the check's own config.
- CI/CD triggers, which enable running all checks in one group with the same trigger.
Additionally, having all checks grouped together allows us to activate or mute them all in one go (see activated and muted within the group in the code block above).
When to group
When creating a group, you are free to include whichever checks you like. Ultimately, you will want to find a structure that works for you. Some examples from Checkly users:
- Based on the target (website, webapp, API) being checked, when multiple ones are in scope, e.g.: each webapp being monitored has a dedicated group.
- Based on the component, endpoint or flow that is being checked, e.g.: all checks checking for checkout functionality are grouped together; all checks running against the
/usersendpoint of an API are in the same group. - Based on the function of the check, e.g. all checks focusing on load time are grouped together, same with the ones checking functional flows.
Iterating through scripts for shorter config
When we have multiple checks which share most of their configuration, we do not need to declare one resource per check. In the case of our example, we are creating checks that differ only in their name and script. Therefore, we will place our script files in a separate directory, then we will use the foreach construct to iterate through them.
variable "checkly_api_key" {}

...

resource "checkly_check" "browser-check" {
  for_each = fileset("${path.module}/scripts", "*")

  name                      = each.key
  type                      = "BROWSER"
  activated                 = true
  should_fail               = false
  frequency                 = 10
  double_check              = true
  ssl_check                 = false
  use_global_alert_settings = true
  locations = [
    "us-west-1",
    "eu-central-1"
  ]

  script = file("${path.module}/scripts/${each.key}")
  group_id = checkly_check_group.key-shop-flows.id

}

...
The result looks familiar:
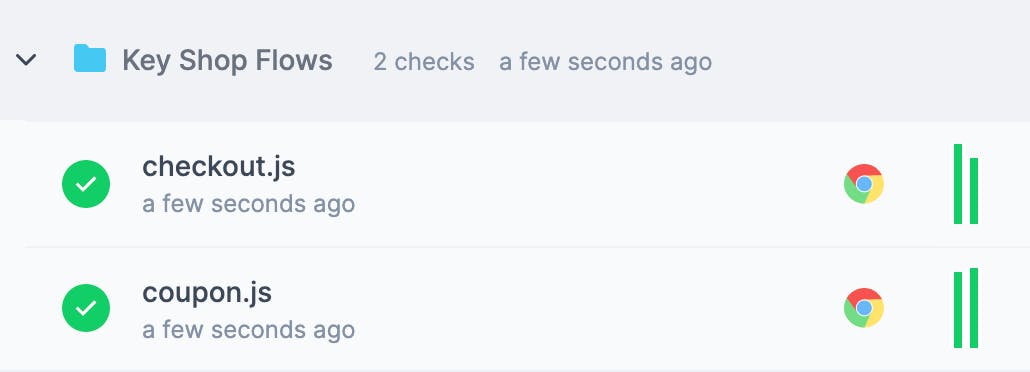
We are now creating as many checks as there are scripts in our folder, while specifying a single resource in our Terraform file. This is particularly helpful when the number of checks is significant.
Reducing code duplication with snippets
We still have another opportunity for improvement: our scripts include duplicated code, namely the "add-to-cart" procedure at the beginning. Code duplication makes maintenance expensive (not to mention tedious) and creates room for error. We can avoid this issue by wrapping the duplicated code in a snippet:
for (i = 1; i <= productsNumber; i++) {
    await page.waitForSelector(`.preview:nth-child(${i}) > .preview-author`);
    await page.click(`.preview:nth-child(${i}) > .preview-author`);

    await page.waitForSelector(".detail-wrapper > .call-to-action");
    await page.click(".detail-wrapper > .call-to-action");

    await page.waitForSelector("#logo");
    await page.click("#logo");
}

await page.waitForSelector("#cart");
await page.click("#cart");
This way, if the "add-to-cart" procedure changes at some point the future, we will only need to apply changes in one place.
Code snippets have their own resource. Here we are importing the snippet from an external file:
resource "checkly_snippet" "fill-cart" {
  name = "fill_cart"
  script = file("${path.module}/snippets/fill_cart.js")
}
Using the partials notation, it is enough to add the {{> snippet_name }} call to have the same code snippet imported into one or more script.
This is what checkout.js looks like with the snippet:
const puppeteer = require("puppeteer");
const productsNumber = process.env.PRODUCTS_NUMBER;

(async () => {
  const browser = await puppeteer.launch();

  const page = await browser.newPage();

  const navigationPromise = page.waitForNavigation();

  await page.goto("https://danube-webshop.herokuapp.com/");

  await page.setViewport({ width: 1200, height: 800 });

  {{> fill_cart }}

  await page.waitForSelector(".cart > .call-to-action");
  await page.click(".cart > .call-to-action");

  await page.waitForSelector("#s-name");
  await page.click("#s-name");

  await page.type("#s-name", "Max");
  await page.type("#s-surname", "Mustermann");
  await page.type("#s-address", "Charlottenstr. 57");
  await page.type("#s-zipcode", "10117");
  await page.type("#s-city", "Berlin");
  await page.type("#s-company", "Firma GmbH");

  await page.waitForSelector(".checkout > form");
  await page.click(".checkout > form");

  await page.waitForSelector("#asap");
  await page.click("#asap");

  await page.waitForSelector(".checkout > .call-to-action");
  await page.click(".checkout > .call-to-action");

  await page.waitForSelector("#order-confirmation", { visible: true });

  await browser.close();
})();
After applying all the above changes, our main.tf will look as follows:
variable "checkly_api_key" {}

terraform {
  required_providers {
    checkly = {
      source = "checkly/checkly"
      version = "0.7.1"
    }
  }
}

provider "checkly" {
  api_key = var.checkly_api_key
}

resource "checkly_check" "browser-check" {
  for_each = fileset("${path.module}/scripts", "*")

  name                      = each.key
  type                      = "BROWSER"
  activated                 = true
  should_fail               = false
  frequency                 = 10
  double_check              = true
  ssl_check                 = false
  use_global_alert_settings = true
  locations = [
    "us-west-1",
    "eu-central-1"
  ]

  script = file("${path.module}/scripts/${each.key}")
  group_id = checkly_check_group.key-shop-flows.id

}

resource "checkly_check_group" "key-shop-flows" {
  name      = "Key Shop Flows"
  activated = true
  muted     = false

  locations = [
    "eu-west-1",
    "eu-central-1"
  ]
  concurrency = 2
  environment_variables = {
    USER_EMAIL = "user@email.com",
    USER_PASSWORD = "supersecure1",
    PRODUCTS_NUMBER = 3
  }
  double_check              = true
  use_global_alert_settings = false
}

resource "checkly_snippet" "fill-cart" {
  name = "fill_cart"
  script = file("${path.module}/snippets/fill_cart.js")
}
What have we learned?
- How to manage multiple checks
- Why, how and when to group checks
- How to avoid script and config code duplication
As is almost always the case with automation, a good setup needs a certain amount of future-proofing: we put a bit of additional work in today to save ourselves from putting in a lot of work tomorrow. Terraform allows us to do just that and easily manage our synthetic transaction monitoring setup on Checkly, be it ten or ten thousand checks.
Would like to see a more complex, fully working example, along with the full code nicely packaged in an example repository? Stay tuned for our next post! In the meantime, be sure to play around with the Terraform Provider and find the setup that works for you. Have fun!
banner image: "Futago Island - Moonlight at Matsushima". Kawase Hasui, 1933, Japan. Source