
Table of contents
Today the Checkly CLI is generally available. Together with its companion — the new test sessions screen (in beta) — this marks a big milestone for us at Checkly and our users.
We already talked about monitoring as code and the CLI during its alpha and beta testing phases but here is a short recap.
With the Checkly CLI you have the most powerful monitoring as code workflow at your fingertips:
- Code your Playwright-based E2E Checks and API checks using plain TS/JS and store them in version control.
- Test your checks against our global infrastructure and record test sessions.
- Deploy your checks from your local box or from CI to run them as monitors.
Want to get started now? Just run npm create checkly or check out the docs. Otherwise, let’s go through all updates, changes and new features.
Code
First of all: The CLI now lives under the checkly package name. All docs have been updated to npm create checkly or npm install -D checkly. New versions of the CLI will only be published to that package, the old @checkly/cli will keep working.
Note, we are starting at version 4.0.5 as we inherited that package from an earlier owner.
We added the following new commands to further optimize the local development workflow and make migration to the CLI easier:
The new trigger command
The new trigger command allows anyone to trigger checks using the CLI, whether you are storing checks in your code base or not. A typical invocation would look like this:
npx checkly trigger --tags=api,production --recordThe above command would trigger any checks tagged with api and production. You can use multiple --tags flags to target multiple sets of checks. This deprecates the CMD line trigger. See the updated docs.
The new env command
The new env command allows you to do CRUD on environment variables. You can also pull variables into an .env file you can use secrets stored in your account locally, i.e.
npx checkly env pull .env.productionThis makes it a ton easier to quickly debug and iterate on your monitoring setup that has some secrets stored as environment variables in Checkly. Don't forget to add any .env.* files to your .gitignore file.
Construct updates
- The new
Frequencyconstruct allows a simple way to add high and normal frequencies without the guesswork. e.g.frequency: Frequency.EVERY_1M - The new
fromId()function on all for alert channels allows referencing an alert channel that is already defined. We’ll revisit this below. See the updated docs.
Test
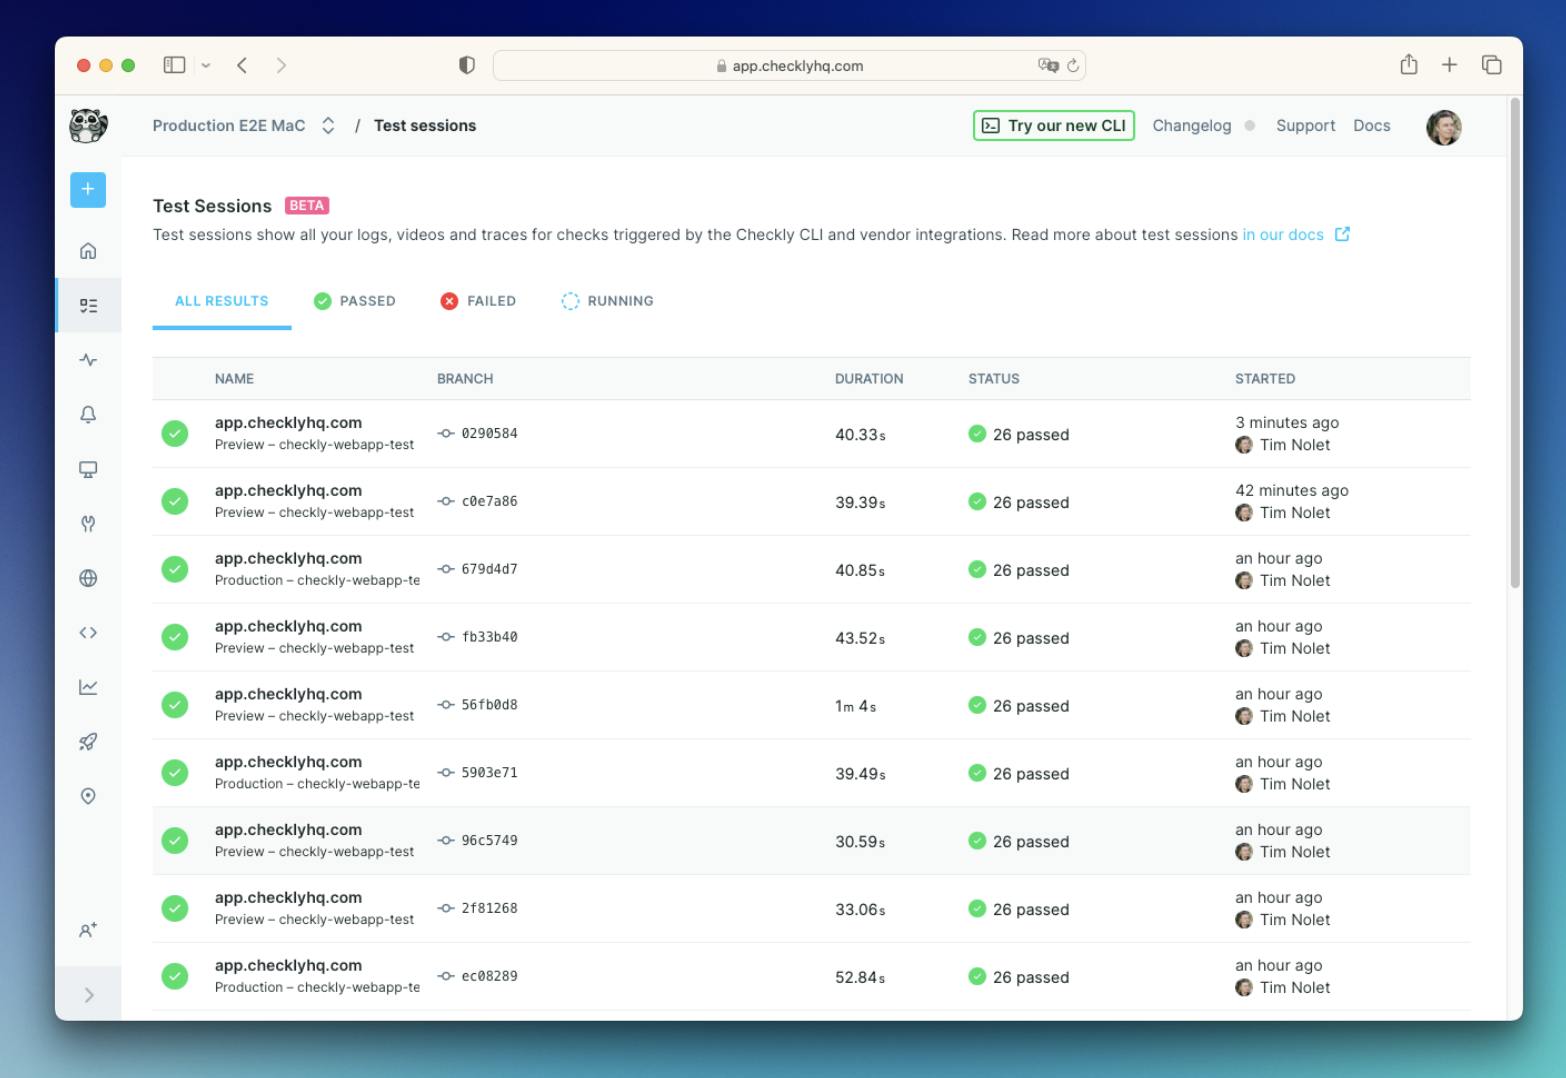
Anytime you run a check or a set of checks from a local CLI command, or trigger a set of checks from a vendor integration like GitHub or Vercel, we now record a test session.
To make it more explicit, you record a test session when:
- You execute
test --recordand / ortrigger --record. - We receive a webhook from a vendor integration like Vercel or GitHub.
A test session gives you all logs, traces, videos, screenshots and any other assets related to any checks you just ran inside the session, but does not impact the checks running as monitors.
Whenever possible, we show related git info in the session like git user, branch name, commit message and commit SHA. You can exactly define what values the test and/or trigger command uses here. Check our updated CI/CD integration docs.
This is a drop-in replacement for our deployments screen and deployment triggers which are now deprecated.
New reporters
The test and trigger commands now also have multiple reporters using the --reporter flag, like list, dot and ci. Special mention is the GitHub Actions Markdown report, which creates a MD based report in a GitHub Action summary by adding the --reporter=github flag.

Check our extensive GitHub Actions documentation on how to get this report as a summary in your workflow.
Deploy
Moving your checks from the testing stage to the monitoring stage normally involves setting alert channels and picking the right point in your CI/CD pipeline to actually trigger the deploy command.
Using fromId() to share alert channels between projects
You might run into the following scenario, at least we did:
- You have multiple repositories / projects using the Checkly CLI and they all deploy to the same account.
- You have a bunch of credentials for OpsGenie, Pagerduty one of the other alert channels we support and you don’t want to save their credentials in your CI/CD pipeline.
Enter the fromId() function. Just create your alert channel via the web UI, or from one of your CLI driven projects, and connect any other ApiCheck, BrowserCheck, or CheckGroup in other projects using just the ID.
Import { EmailAlertChannel } from ‘checkly/constructs’

export const emailChannel = EmailAlertChannel.fromId(20)
Integrating into your CI/CD pipeline
Deploying your project to Checkly transforms your test setup into a monitoring setup. It’s fine to do that from your local box by just invoking npx checkly deploy but you probably want to do that from your CI/CD pipeline.
We’ve update updated our docs with detailed guides to get you started with the top three CI providers among our users:
All three guides talk you through the basic, vendor agnostic principles, and show you example scripts and configurations to get you started.
Next steps
We’ve just scratched the surface on what’s possible with the CLI and the monitoring as code workflow and I can’t wait to show you what we have cooking very soon.