

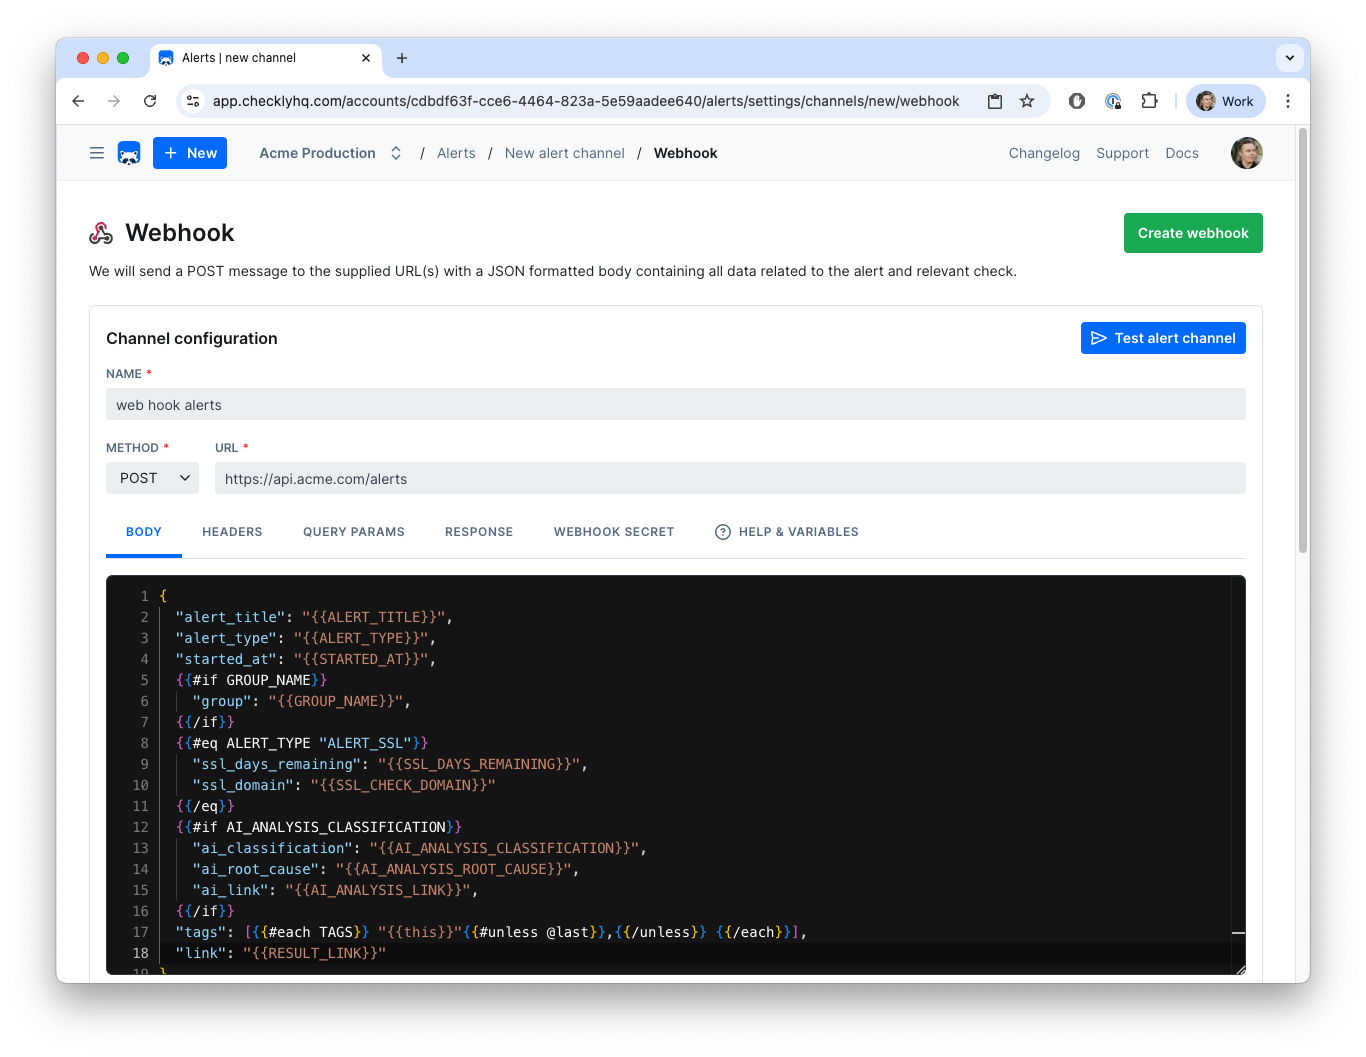
- Create a custom URL by adding in authentication tokens or other secrets.
- Create a custom payload body using any environment variables and specific instance variables per event. If the check that triggers the alert belongs to a Group, you can also use the Group’s variables, whether the webhook is attached to the check or to the Group.
- Debug and test the webhook in the editor by sending test messages.
Using Variables
The example above shows a webhook configured to create a Jira ticket on each event. Notice the following:- We use the variable
JIRA_INSTANCE_URLin the URL. We previously stored this variable in the environment variables section. Alert-channel configurations accept both environment variables and secrets using the same{{NAME}}syntax. When a check has its own environment variable with the same name as an account variable, the alert uses the check’s value. - We use the variable
CHECK_IDin the payload. This is one of many event-based variables that will change with each call. See below for the complete list.
{{ }} to insert the variable.
In the URL, header values and query parameter values,
{{NAME}} inserts the value of a variable or secret as stored, so a variable or secret can hold a whole URL with a query string. In the payload body, double brackets HTML-escape the value: & arrives as & and = as =. To insert the raw value in the body, use triple brackets, i.e. {{{USER_API_KEY}}}. Triple brackets work in the URL, headers and query parameters too.{{CHECK_NAME}} a double quote arrives as ", with {{{CHECK_NAME}}} as \"; a line break arrives as \n in both cases.
Using environment variables and secrets in this channel’s configAny literal-secret field in this alert channel — webhook URL, API key, bearer token, service key, etc. — accepts a variable or secret reference using the familiar Handlebars syntax:
{{MY_VARIABLE}}.You can also promote a value to a secret directly from the field: type the literal value, click the lock icon next to the input, and choose a name. The value is stored as an encrypted account secret and is never re-displayed in the UI.{{NAME}} reference. This also works for a whole URL with a query string.
You can use the following event-related variables in the payload, and in the URL, header values and query parameter values. Outside the payload, they are filled in only when the webhook has a payload template, and they are encoded so that they cannot change the request:
- In the URL, the value is percent-encoded, e.g. a check named
a/b & carrives asa%2Fb%20%26%20c. - In header values, line breaks and other control characters become spaces, and non-ASCII characters are percent-encoded as UTF-8, e.g.
Caféarrives asCaf%C3%A9. - In query parameter values, the value is percent-encoded like any other query parameter value.
Which variables are filled per check type
Not every variable has a value for every check type. An empty variable renders as an empty string.
For API checks and URL monitors,
CHECK_ERROR_MESSAGE is filled when the request itself fails, for example with a refused connection. For API checks, it’s also filled when the run fails before the request, for example in a setup script. It stays empty when the request succeeds but an assertion fails, for example on an unexpected status code. Use API_CHECK_RESPONSE_STATUS_CODE for that case.
For Browser checks, CHECK_ERROR_MESSAGE holds the first error of the run. It is cut to its first 300 characters, then its line breaks are removed, so the lines of the error run together.
When a heartbeat monitor misses a ping, ALERT_TYPE is ALERT_FAILURE and STATE is FAILING. For example, this template:
CHECK_DESCRIPTION.
Body format
If the rendered template is valid JSON, Checkly sends it withContent-Type: application/json. Otherwise it sends the rendered text as is, with Content-Type: application/x-www-form-urlencoded. To send plain text, add a Content-Type: text/plain header to the webhook. Adding Content-Type: application/json doesn’t fix a template that renders invalid JSON, for example because of a missing comma: Checkly then sends the whole text as one JSON string.
Using AI analysis data in alerts
When automatic Rocky AI analysis is enabled, you can include AI-generated root cause and user impact data in your webhook payloads. Use{{#if}} guards so the payload works whether AI analysis data is available or not.
Handlebars Helpers
Webhook templates support Handlebars built-in helpers, such asif, unless, and each, as well as these Checkly helpers:
Get a value from a tag
UsetagValue when your tags store key-value metadata. Given these tags:
payments. Both : and = separators are supported. If neither team:... nor team=... exists, the template renders the fallback UNKNOWN. If multiple tags match, Checkly returns the first one.
Render tags as an array or a string
TAGS is an array. Some receivers want a JSON array, others a single string. For the tags team:payments and env=prod, this template:
{{this}} or {{TAGS}}, a tag like env=prod arrives as env=prod.
Format dates and times
Thedate and moment helpers support Day.js-compatible format tokens. You can format the current time, an absolute date, or relative phrases such as yesterday, 2 days ago, and last week.
{{date "YYYY-MM-DD"}}formats the current date, for example as2026-07-24.{{date "2026-07-24" "MMMM DD, YYYY"}}rendersJuly 24, 2026.{{moment "2 days ago" "YYYY-MM-DD"}}formats the date from two days ago.{{moment "last week" "X"}}formats last week as a Unix timestamp.
Compare values
Use comparison helpers as blocks or subexpressions where applicable. Available helpers include:- Equality and ordering:
eq,is,isnt,gt,gte,lt,lte, andcompare. - Boolean logic:
and,or,not,neither,isTruthy, andisFalsey. - Value checks:
contains,has, anddefault. - Numeric conditions:
ifEven,ifOdd, andifNth. - Inverse comparisons:
unlessEq,unlessGt,unlessGteq,unlessLt, andunlessLteq.
{{#eq}} helper to execute the logic
If the ALERT_TYPE variable equals ‘ALERT_FAILURE’, print ‘DOWN’, if it equals ‘ALERT_RECOVERY’ print ‘UP’
So in the case of a failure event, the body would render to:
- You only need to create one webhook to inform a 3rd party system.
- You can translate Checkly terms to your 3rd party tool’s term for the same concept, i.e. the “up status” of a check.
Webhook Secrets
You can validate each webhook we deliver to your endpoint(s). Using the optional webhook secret, you can:- Check if the webhook was sent by Checkly.
- Check if the payload was not altered in any way during transmission.
x-checkly-signature contains the HMAC-SHA256 of the raw request body, keyed with your secret and hex-encoded. The signature covers the exact bytes we send, for JSON and plain text bodies alike.
On the receiving end, compute the same HMAC over the raw request body, before parsing it, and compare it with the x-checkly-signature header to assert the validity and authenticity of the webhook and its payload. Parsing and re-serializing the body can change its bytes and break the comparison.
Have a look at the code examples below on how to use the header and your favourite web framework.
Webhook Retries
Checkly will retry your webhook up to 5 times if the request fails, for example with an HTTP response higher than 399 (such as a 404 or 503), a network error, or no response within 5 seconds. Retries back off exponentially: 10, 20, 40, 80 and 160 seconds, about 5 minutes in total. This means that for checks on a 1 minute schedule, there is a potential overlap between a failure alert and recovery alert. For this reason every webhook we send has a timestamp in thex-checkly-timestamp header. You can use this timestamp on the receiving end to ignore any webhooks that come in “late”.
A retry sends the same body, x-checkly-timestamp and x-checkly-signature as the first attempt. A response that takes longer than 5 seconds counts as a failure, so a slow endpoint can receive the same webhook again even though it processed the first request. Respond quickly and deduplicate on the receiving end.
Failures, recoveries and reminders
Every webhook is about one check result. These variables tell you how notifications relate to each other.Match a recovery to its failure
A failure and the recovery that follows it shareCHECK_ID. CHECK_RESULT_ID and STARTED_AT belong to the run that triggered each notification: the recovery carries the first passing run. To close the incident a failure opened, match the recovery on CHECK_ID, and compare the two STARTED_AT values to get the duration.
ALERT_TYPE depends on the state change:
A degraded notification is sent only to channels with a check degrades turned on. If your receiver closes incidents on
ALERT_RECOVERY only, a check that failed, degraded and then passed still closes them.
Reminders
A reminder repeats theALERT_TYPE of the alert it reminds you about, with IS_REMINDER set to true and REMINDER_SEQUENCE counting up from 1. CHECK_RESULT_ID and STARTED_AT belong to the latest failing run, so they change from one reminder to the next while the check keeps running.
Deduplicate notifications
To recognize a webhook you already processed, for example after a retry, combineCHECK_RESULT_ID, ALERT_TYPE and REMINDER_SEQUENCE. Together they identify one notification, and retries resend the same values.
Webhook Examples
The following examples give an idea how to integrate Checkly with 3rd party alerting and issue tracking systems.Opsgenie and Jira Service Management
Checkly has no dedicated Jira Service Management (JSM) alert channel. JSM Operations accepts the same alert body as the Opsgenie alerts API, so the webhook below works for both. For JSM, create an API integration in JSM Operations, POST tohttps://api.atlassian.com/jsm/ops/integration/v2/alerts, and send the integration’s key in the Authorization: GenieKey {{JSM_API_KEY}} header.
You can create an Opsgenie
alert by POST-ing the following body
alerts API endpoint
CHECK_GROUP_TEAM variable with a different value for each Group, then modify the above snippet with the following:
PagerDuty
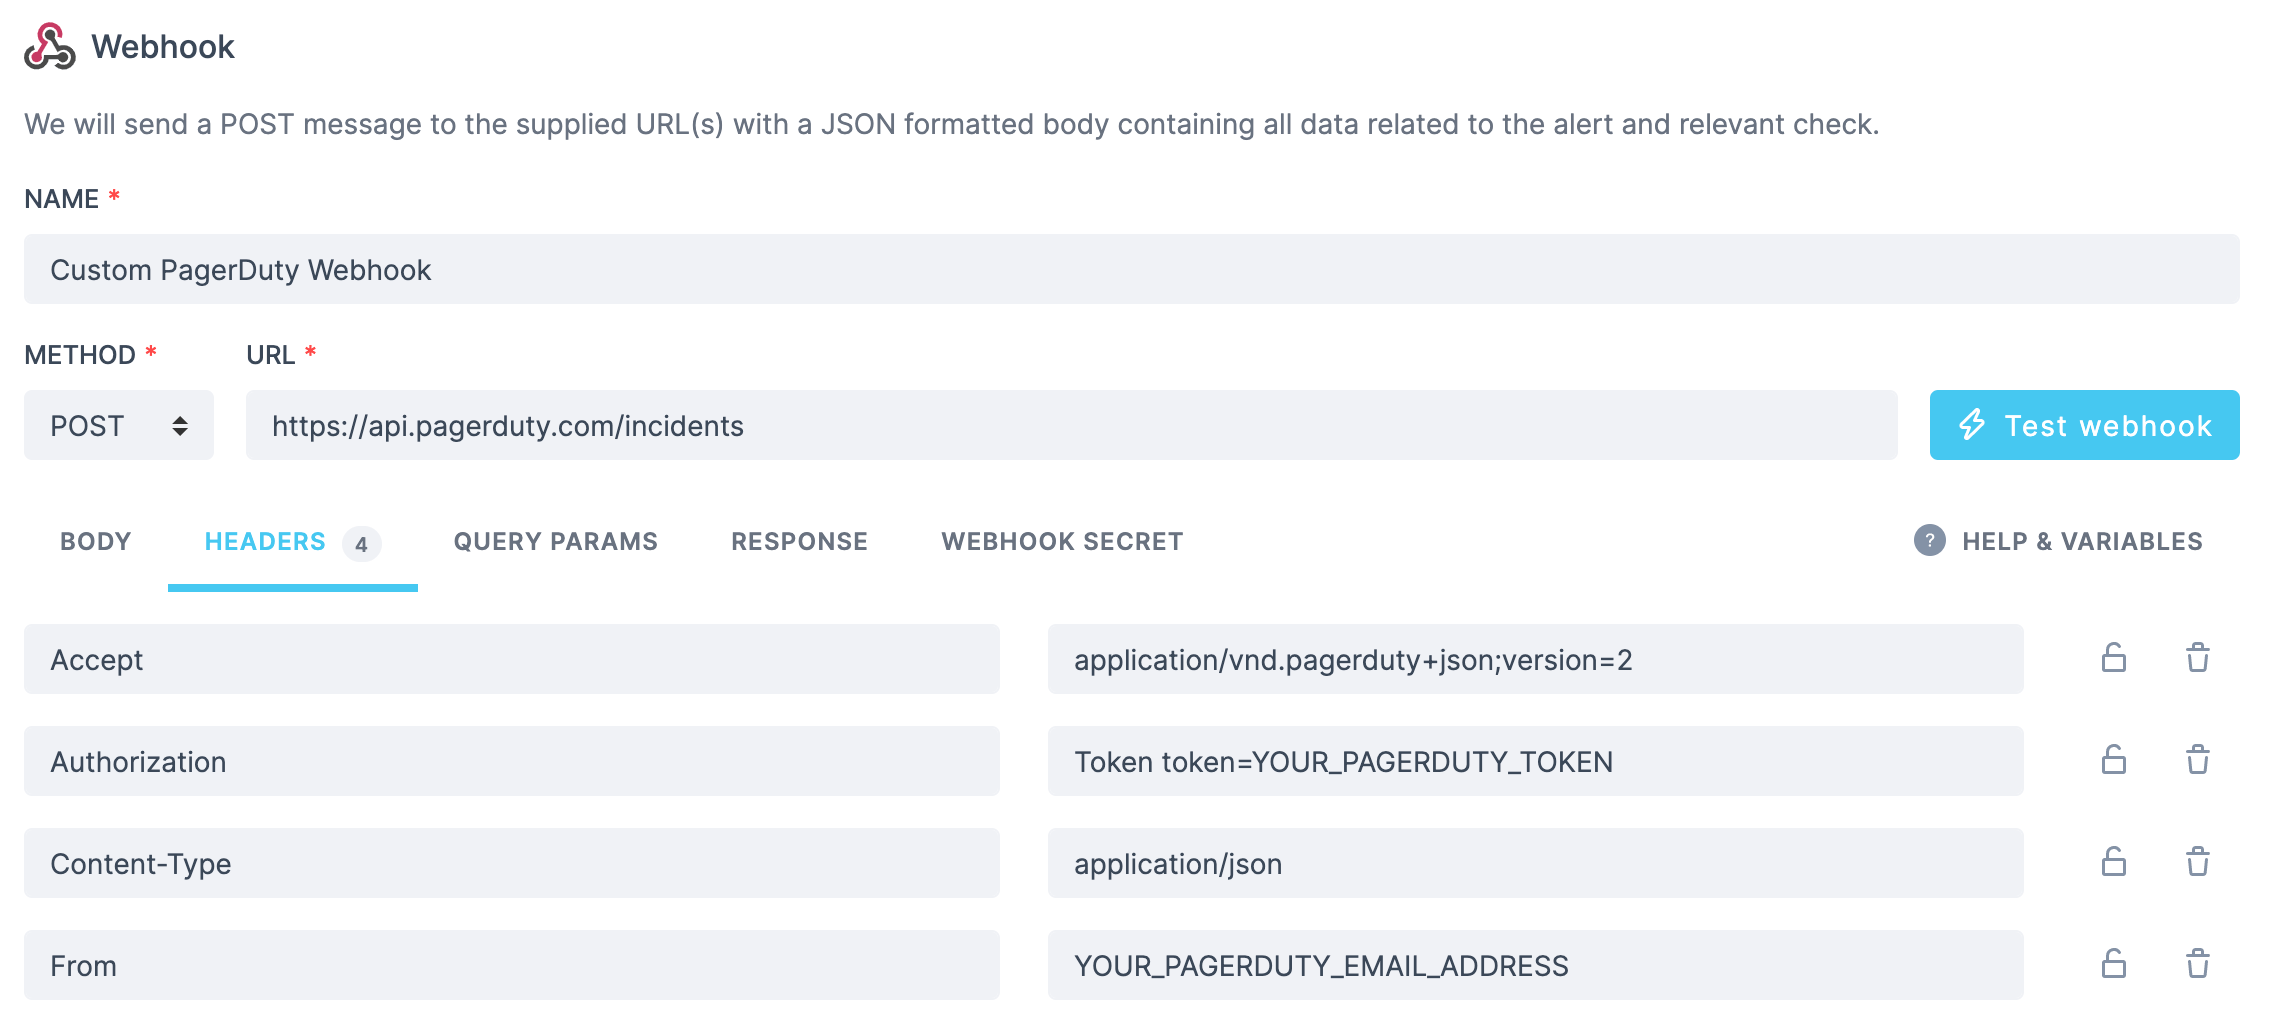
Given an existing service on your PagerDuty account, create an incident for it by posting the following bodyhttps://api.pagerduty.com/incidents. You will need to set the following headers:
Pushover
Send a message using Pushover by posting this body:Slack incoming webhook
To send alerts to a Slack workspace that isn’t connected to your Checkly account, for example a second workspace or one where the Checkly Slack app isn’t approved, post them to an incoming webhook of a Slack app you create. This uses a generic Webhook alert channel, not the deprecated Slack webhook alert channel:- In Slack, create an app in the workspace, turn on Incoming Webhooks, select Add New Webhook to Workspace and pick the channel. Copy the webhook URL. See Slack’s guide to sending messages using incoming webhooks. Depending on your workspace’s settings, installing the app can need an admin’s approval.
-
In Checkly, add a Webhook alert channel with the method
POSTand the webhook URL as the URL. -
Use a body with a
textfield, for example:
& or = in the link, from being HTML-escaped. See Using Variables.
Compared to the Checkly Slack app:
- Each webhook URL posts to the one channel you picked when you created it. To alert another channel, create another webhook and another alert channel.
- Each alert is posted as a new message.
- The message contains only what your body template includes. You write the message format yourself.
Trello
You can create a Trello card with aPOST to this URL:
ALERT_TITLE are filled in only when the webhook has a payload template, so put them in the payload, not in the URL alone.
SSL alert
You can send your SSL alerts using webhooks. Using the following body:ALERT_TITLE to include the domain and the days remaining till your certificate expires.
Twilio
You can configure a webhook to POST to a JavaScript snippet running in a Twilio Function. This code receives the Checkly webhook JSON, then triggers a Twilio “Flow execution”:Jira
A webhook can be used to create a new issue on Jira via the Jira API, for example in the case of a previously passing check that switches to failing state. We will be creating a POST request to{{JIRA_INSTANCE_URL}}/rest/api/3/issue, where the content of your JIRA_INSTANCE_URL environment variable would look something like https://your-jira-instance-name.atlassian.net.
The required headers will be:
{{JIRA_INSTANCE_URL}}/rest/api/2/issue). The only difference is that version 2 does not support Atlassian Document Format (ADF).